Using
the Magic Wand tool
By
now you should have an idea of the size of
PSP and all of the things that are
available to you. If you aren't sure
of anything in PSP, and you haven't
already, take a look at this
tutorial for an overview of everything
that is available in the programme.
This
tutorial is going to show you how to use
the Magic Wand tool to select a part of
your image so that you can change just
that part of the image.
This
is the result I got from following this
tutorial, although depending which
settings you choose, yours may look
different:


You
will need:
A
copy of PaintShop Pro - you can download
a 30 day trial version from here
This
image - right click and save to your hard
drive:

Fire
up PSP, then open up the image you've just
saved (file, open, highlight the filename,
then click OK)
In
the Colour Palette on the right hand side,
you will notice that you only have one
colour available - black.
We
want our picture to be a bit more
colourful than just black and white, so we
need to tell PSP that we want more colours.
To do this, go to the "Colours"
menu, scroll down to the "Increase
Colour Depth" option and then choose
"16 Million Colours".

You
should now have all the colours back in
the Colour Palette
Now we're going to start
using the Magic Wand tool to help us to
colour in our image.
Select your Magic Wand
tool

Go over to your image and
click inside the very first circle - you
will now have the marching ants pacing
around inside the circle

Now we need to put a
colour in the circle you've just selected.
Select your Flood Fill
tool

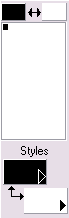
Go over to your Colour
Palette, and in the "Styles and
Textures" block, click and hold your
mouse on the first box in the
"Styles" section so that a
pop-out list comes up

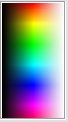
Choose the colour,
gradient or pattern of your choice - I'm
going to use a solid colour for this part,
so I'm going to click on the paintbrush in
this box.
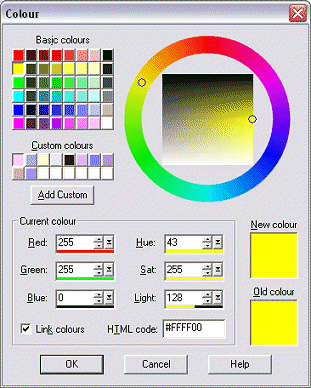
You will notice that a
colour/gradient/pattern has appeared in
the box now. Single left click on
the box and the Colour/Gradient/Pattern
dialogue box will pop up - choose your
colour/gradient/pattern in here and click
on "OK". I'm going to use
bright yellow.
Go over to the marching
ants inside the circle and single left
click - the circle will now be filled with
the colour/gradient/pattern you chose.

We've finished with that
circle now so we need to get rid of the
marching ants. To deselect the
circle, go to the "Selections"
menu and choose "Select
None". A quicker way to do this
is to use the keyboard shortcut - hold
down the Control (Ctrl) key and press D.
Woohoo! You've just
selected and used a part of your
image!! See if you can do the same
with the next circle - try and remember
what you've just done and go as far as you
can without looking at these steps... if
you get stuck, just come back here and
follow the tutorial. Try using
something totally different this
time. I'm going to use a gradient
for this circle. This is what my
image looks like now:

Take
a break from the screen for a few minutes
now - go and grab a drink or go for a walk
around the room or something... you've
learnt the basics and you deserve a little
break! :o)


