Making Curved Text
This
tutorial is here at the request of a very
good friend of mine. Thank you
Heidi!!
It took me forever to get the hang of how
to do this the first few times I tried, so
don't give up if you can't get the hang of
it the first time... keep on trying and
eventually something will "click" and
it'll work! :o)
There
are lots of tutorials out there that tell
you how to do this but I could never
follow them 'cos there either wasn't
enough detail or enough screenshots, so
when Heidi asked me to teach her how to do
it, I decided I was going to put as many
screenshots and as much detail into this
one as I could. I remember only too
well how frustrating it was when I
followed tutorial after tutorial after
tutorial and I just couldn't get it to go
right so hopefully by putting lots of
screenshots and detail in here it will be
easier to follow :o)


You
will need:
A
copy of PaintShop Pro - you can download
a 30 day trial version from here
A copy of Winzip - you can download it
from
here
This
zip file (the tube should be
compatible with PSP versions 5, 6 and 7).
Unzip it to somewhere on your hard drive
Fire up PSP
and wait for it to load
Open
up your unzipped tube ("File" then
"Open" or
 and then navigate to where you unzipped
your tube to and hit "Open")
and then navigate to where you unzipped
your tube to and hit "Open")
Start
a new image at the following settings:
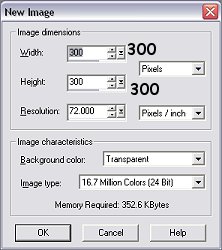
Width:
300 pixels
Height: 300 pixels
Resolution: 72.000 pixels per inch
Transparent background
16.7 million colours (24 bit)
Go
back to your tube ("Windows" menu and
then choose the name of your tube in the
list)

Take
a copy of your tube ("Edit" then "Copy"
or Ctrl and C)

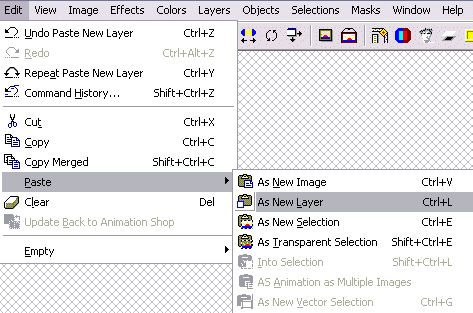
Then
go back to your blank image ("Window"
menu then choose the name of your image)

Paste your tube as a new layer ("Edit"
then "Paste" and across to "As New
Layer" or Ctrl and L)
Now
would be a good time to save your
image as a .psp file so that if
something *does* go wrong, you can get
back to this point and follow the steps
again until you are happy with what you
have done on your image. It's
important to save it as a .psp file so
that the you can come back to exactly
this place - a .gif or .jpg wouldn't let
you do that - it would add a background
to your image and we don't want that
yet.
Now
we need to use our Preset Shapes tool

Make
sure you have your Tool Options
Window on the workspace - if you
don't, right click on a blank bit of
space next to your toolbars and choose
the option that says "Tool Options".
You should now have a titlebar on your
workspace that says "Tool Options".
If it's getting in your way, just click
and drag on the title bar and move it to
somewhere else.


Make
both your foreground and background
colour white

Go
up to your Tool Options Window and use
the following settings:

Shape: Elipse
Retain Style: NOT checked
Antialias: Checked
Create as vector: Checked
Line width: 1
Line style: straight line


