
|
AUTO
|
Chapter VII: ReassemblyAt this point I am just about ready to begin hanging parts off of the frame. Now that I have the Pro-Flo bronze swingarm bushings and Redwing shocks, I can assemble the complete rear end. I will also be installing the RZ front end soon, if only to test fit the parts to see what will work and what will not. Also, I am thinking of beginning the process of wiring harness routing and such. Digital images of the assembly process in this space soon...
Update 01/12/21Had the chance to remove one carb and do a complete disassembly and cleaning. It had a bit of green sludge or varnish in the bowl, on one of the floats, and all around the nut holding the main jet. Motomaster carb cleaner did a fairly good job of getting rid of most of it. I'll do the second carb tomorrow evening after my brain cells have had a chance to recover from extensive inhaling of carb cleaner fumes...
Update 02/06/20
Began with replacing all the assorted Phillips and hex head fasteners with new Allen head fasteners. Mounted the rear subframe, battery box, seat/helmet lock, coil, rectifier, inner mudguard, and tapped in the bearing cups for the tapered steering stem bearings. Did a test fit of the tank and seat - I need a replacement set of seat pins and the rubber bushings for the tank (front and rear). Those I'll likely get from PGM.. Also took apart the instrument cluster for cleaning and to put the newer tach I got from Nick in place of the old beat up one (thanks again, Nick!!). Spiders really seem to like the inside of the clock housings - both tachs had multiple nests with dried up spider carcasses in them. Yum. Also put together the tail light from a mix of old parts and parts I got off of eBay. I have everything except the long, skinny bolts needed to mount the lens to the base. All I need is a trip to Canadian Tire for some bearing grease so I can mount the swingarm and forks. I am going to mount the RZ forks to get the triple clamps and steering stem bearings properly in place, then drop the forks out of the triple clamps to give them a work over (clean up the legs, new oil, see what springs are inside and maybe get some ATK or Progressive springs). I am also going to tackle the new rear master cylinder install very soon. Should be interesting. Stay tuned...
Update 02/06/21
Cleaned up a bit of the wiring as well, but there is a lot more to do in terms of cleaning up the wiring and re-wrapping some of it in new electrical tape. Luckily the wiring is fairly simple and straightforward on this machine.
Next step is to install the rear master cylinder, and do a complete rebuild of both the front and rear brake systems. The front will be converted from the stock three-line system to a two-line system with steel braided lines. Also, I may have a contact lined up for a proper paint job on the tank, side panels, tail section and fender. The fender I still need to source, but the rest of the plastic and tank just needs a little prep-work before they can be painted.
After that, re-installing the engine, bearings for the rear wheel, a rear tire, chain and sprockets, wiring, mounting the turnsignals, and mounting the pipes are just about all that is left. Will it be done by the end of summer '02? Let the betting begin...
Update 02/06/26
When I said, "the wiring is fairly simple and straightforward on this machine", I immediately doomed myself to finding out that even a "simple" wiring system is still quite complex. Serves me right. Having fun, though!
 |
|---|
 Dirty carb.
 Clean carb.
 Also had the chance to pound the bronze bushings I got from Pro Flo into the swingarm. After doing so, I took out the other parts needed to mount the swingarm into the frame, cleaned them up, and realized that one of the two inner bushings that ride on the bronze bushings is corroded badly. Time for a trip to the parts counter to see if they are still available... I also need the gaskets for the float bowls on the carbs, and some other stuff, so the trip is long due.
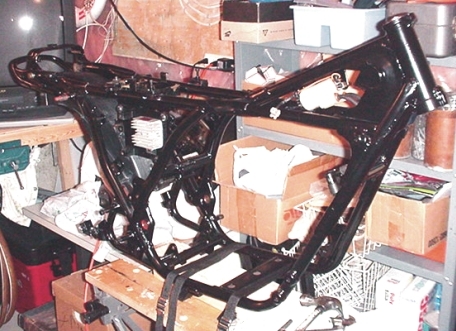 Strapped the frame down to my workmate and started hanging parts off of it.
 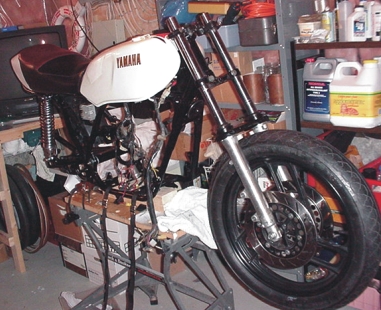 Test-mounted the RZ twin disk front end today, slapped on the wheel and loosely installed the ATK fork brace.
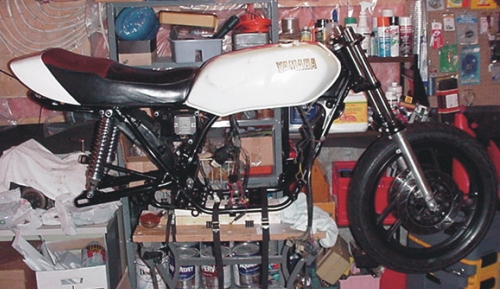 Also installed the swingarm and rear shocks. With a test-fit of the tank and seat, she is already starting to look like a real-life motorcycle again, after years of hibernation.
 Began cleaning up wiring in earnest. Stripped off sections of electrical tape, sprayed on WD40 and wiped clean, then re-applied new electrical tape. Cleaned up each connector with WD40 and a soft brush as I went along. Got about one-third done today, will continue tomorrow.