
Tools
The first step is to unpack and inspect your components. Take some time to get to know your hardware by reading the included documentation. Once you are thoroughly acquainted now we need to begin gathering our tools. On most installs all that you will need is:
Motherboard Setup
The first thing that you want to do is to configure your motherboard and install the CPU, heatsink, and memory. First set the jumpers if necessary, like the wake on LAN settings, etc.
As all motherboards are different you should keep the motherboard manual handy and refer to it often. My heatsink mounts through the motherboard so I had to remove the stock heatsink retention bracket, simply done by pulling out the four plastic pins. The next step is to install the CPU. This is done by pulling up on the retaining lever, inserting the CPU (line up the pins using the missing pins as a guide and simply slide it in), push the retaining lever back down, locking the processor in place.


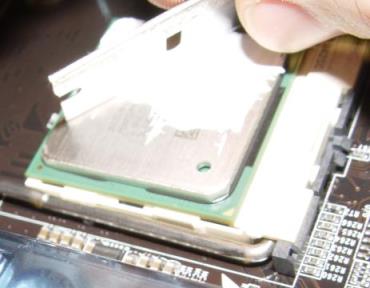
The next step is to install the heatsink, but before I can do that I will need to clean the processor with some alcohol and a cotton swab and apply some thermal compound. If you are using the stock heatsink included with a retail packaged Pentium then you don’t need to use a thermal compound. These heatsinks ship with a thermal pad attached to the bottom, but these perform very poorly so you may choose to remove the pad and clean the heatsink. To apply our compound we start by squirting a small amount onto the processor. We then use our clean razor blade to spread the compound thinly and evenly over the top, all we need is about a paper-thin coverage.

Finally we place our heatsink flat onto our processor and tighten as required per particular model, and attach our fan. When attaching our fan it is important to note which direction we want the fan to blow. This is labeled on the side. Most heatsinks want the air to flow downwards onto the heatsink but a few want the fan to suck the air through; check your documentation.


The last thing for us to do in this stage is to insert our memory. This is easily done by simply opening the retaining clips on either side, evenly inserting the module into its slot, and closing the retaining clips. There is an off-center notch that will only permit the module to be inserted one way.

