|
CONSTELLATION FAST TRACK TAG
Needed: Jasc/Corel Paint Shop Pro. Alien Skin Xenofex 2 - Constellation filter Eye Candy 4000 - Gradient Glow Filter Tube of Choice - For this tutorial, I used a delightful image created by Suzanne Woolcott. You can purchase her wonderful art in tube and full form at AMI which stands for Artistic Minds, Inc. Supplies: Fast track template created by me, liquid satin pattern from PSP, and Lori's Colorized Flowers. Lori has awesome doodles. She now has her own blog, located here, where you can download all of her wonderful graphics.
SETTINGS USED IN THIS TUTORIAL Drop Shadow: Vertical Offset 2, Horizontal Offset 2, Opacity 80, Blur 5, Color Black Step 1 Open up the constellation fast track template and your tube graphic. On the constellation fast track template, open up the layer palette and left click on the eye on the bottom white layer to close it off. (A red X will appear). Step 2 Go to the second layer (where the template is) and go to Layers/Duplicate. You will now have a duplicate template Layer. Step 3 Open up the layer palette and go to your original template layer. Left click the selection tool set to rectangle with these settings: Mode: Add/Shift, Feather 0 and Anti-Alias checked. Step 4 Going from left to right and down, draw a rectangular selection in the inside of the multi color frame so that it extends to all the four surrounding borders of the tag. Only extend the selection a small bit so that it sparingly touches the outside borders.
Step 3 Go to Layer/New Raster Layer Step 4 Open up the Liquid Satin pattern. Left click the top color box at the material palette. When the Color Selection Window opens, left click the pattern tab, left click the down arrow and scroll down until you find the Liquid Satin pattern with angle set to 0 and scale set to 55. Left click the flood fill tool and fill the selection with the background. Go to Selections/Select None. Step 5 If you need a different shade to coordinate with your tube image, you will need to colorize it. Go to Adjust/Hue and Saturation/Colorize and move the sliders over until you have achieved a color that works with your tube graphic. Click ok. Step 6 Go to Layers/Arrange/Move Down. If you find that you did not fill the entire portion of the inside of the tag with the Liquid Satin pattern, you can use the raster deform tool to stretch it to fit. Step 7 Open up your layer palette and close off the top layer (copy of template) by left clicking the eye on that layer. (You will see a red X appear). Go to the bottom layer (the white background layer) and left click on the red X to open it up.
Go to any of the open layers (where there are no red X's) and go to Layers/Merge/Merge Visible. You have merged the white background, the satin pattern and the original template layer together. Rename this merged layer background.
Step 8 Open up your layer palette and go to the copy of template layer and left click the red X to open up that layer. Go to Layers/Duplicate. Do this once more so you now have a total of 3 duplicate template layers.
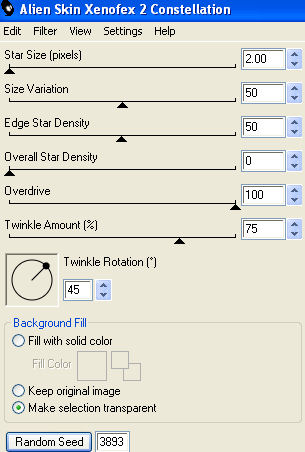
Step 9 Go the first of the duplicate template layers (Copy of template). Go to Effects/Alien Skin Xenofex2/Constellation and use these settings:
Step 10 Go to the second duplicate template layer (copy2 of template) and repeat Step 9 but click the random seed button. Step 11 Go the the third duplicate template layer (copy3 of template) and repeat Step 9 but again, click the random seed button. Step 12 Go to the top Duplicate Template layer (copy3 of template) and left click the selection tool, set to rectangle, and draw a rectangle around the inside of the tag but do not include the outermost perimeter that has the constellation filter effect applied. (See my tag above). Make the tube image active and go to Edit/Copy. Make the tag image active and go to Edit/Paste as New Layer. If the image is too large, go to Image/Resize using the percent option, bicubic and resize all layers Not checked. DO NOT DESELECT. Step 13 Left click the mover tool and place the image within the selection. Go to Selections/Invert, click the delete key and go to Selections/Select None. Open up the layer palette and rename this layer, image. Step 14 (Optional) Go to Effects/3D Effects/Drop Shadow and apply drop shadow setting from above. Step 15 Open up the doodle graphic. Using the Freehand Selection tool, draw a selection around the doodle you wish to use. Go to Edit/Copy. Make the tag image active and go to Edit/Paste as New Layer. If the image is too large, go to Image/Resize using the percent option, bicubic and resize all layers Not checked. Open up the layer palette and name this layer Doodle.
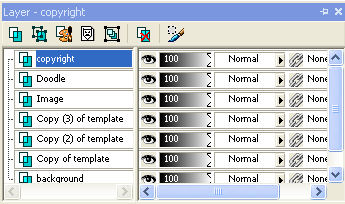
Step 16 Go to Layers/New Raster Layer and add your copyright. Rename this layer copyright.
Step 17 Open up your layer palette and close off the following Layers (left clicking the eye): The bottom background layer, the three copy of template layers. The only layers you should now have open are your image, doodle and copyright layer. Make sure you are on the image layer and go to Layers/Merge/Merge Visible. Rename this merged layer, Image. Step 18 Go to your background layer (bottom layer) and duplicate this layer 2 times so you now have 3 background layers. Go the image layer (the layer that was just merged with the image, doodle and copyright and is the top layer) and duplicate this layer 2 times so you now have three layers.
You should now have three background layers, 3 template layers and 3 image layers. Merging the layers: Step 1 Left click the eye on all open layers to close them all off (any layer that does not have a red X). We want every single layer closed off. Left click the red x on the following layers to open them up: background, copy of template, image. Go to the open background layer and go to layers/merge/merge visible. Left click the eye on this layer to close it off (so you see a red X). Step 2 Left click the red x on the following layers to open them up: Copy of background, Copy 2 template, Copy of image. Go to the copy of background layer and go to layers/merge/merge visible. Left click the eye on this layer to close it off (so you see a red X). Step 3 Left click the red x on the following layers to open them up: Copy 2 of background, copy 3 of template, Copy 2 of image. Go to the Copy 2 of background layer and go to layers/merge/merge visible. Step 4 Open up the two closed merged layers by left clicking the red X and you should now have 3 open merged layers. Save this file as a psp or psd file. We will continue in animation shop by clicking here.
|