Tip
#2 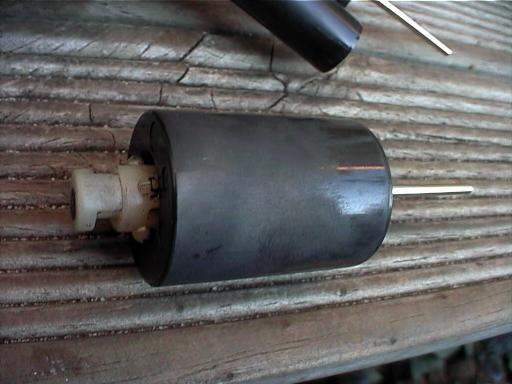
|
carby
tuning and needle jet adjustments
|
This page is set out for 1024 x 768 viewing.
This page has recently been changed as it was too confusing and wasn't
saying much, as I wrote it in bits and pieces whilst fixing my bike via
trial-and-error.

This picture is of the slide needle. On the across you will find four
of them, two in each carb, one for each cylinder.
Adjusting the needle setting is easy. The needles are easily accessed
when you replace the slide holder in the processes described elsewhere
on this website.The needles are set into their position by a circlip.
Pop the circlip out by pushing gently on its open sections with a screwdriver,
then reset its position at one of the five ridges along the needle to alter
needle jet-jet needle mixture characteristics. Do it for all four cylinders!
Read plugs after a ride. Reset/experiment if necessary.
From what seems to be repeatedly happening on the forum(s), there is
a common problem. The bike runs too rich and chews too much fuel. The fix
is easy. Once you get into your carbs you will probably find they are on
the factory setting of #3. If you are experiencing flat spots through the
midrange that get worse as the bike gets hotter, move them to #2 on the
diagram above - that is lower the needles, or make it leaner. It's a trial
and error process.
Check out this thread from ezboard, it will do a bit more explaining.
| Author |
Comment |
hawk127
Registered Member
Posts: 23
(4/22/02 10:50:13 am)
Reply |
need a tune
need some help identifying the mixture needle on the carbs,
I have the manual but it's a little vague as to which one to adjust and
which way, I think it's running a little rich can someone give me directions
as to where the needle or is it needles are. |
Across02
Registered Member
Posts: 24
(4/22/02 11:44:18 am)
Reply |
Re: need a tune
Check out
au.oocities.com/ozcross250/
Heaps of good info on there about tuning your Carbies.
Cheers,
Nathan |
Rich
Registered Member
Posts: 45
(4/22/02 1:33:18 pm)
Reply |
carbs
A few things that may quickly help,
The needles really only adjust the mixture in the midrange, that's being
vague I know, but I've found it affects things anywhere from 3000 to 13000.
A quick check to see if your bike is running lean or rich at any point
in the revs is to pull on the choke as required to see how the carbs (and
hence engine) respond to more fuel. If the revs drop, it was probably running
rich, and if the bike takes off from underneath you then it was probably
lean.
Raising the needles (lower clip position) will richen the mixture, lowering
them (raising the clip position) will lean it.
If your problems are more idle/startup related then the needles probably
aren't the cause. Check what position the clips are on (usually middle),
and adjust from there one position at a time. Are the needle slides ok?
Are the emulsifier tubes ovalised (the tubes the needles drop in and out
of), you'll see when you pull the needles out.
Let us know how it goes, good luck. |
hawk127
Registered Member
Posts: 24
(4/22/02 7:20:31 pm)
Reply |
Re: carbs
this is the thing I can't find the needles/clips, is there more
than one per carb, where on the carby are they, which number in the manual
refers to them, it starts and idles fine actually it idles sweet at 900rpm,
but at any rev range as soon as I go near the choke, I did the check, it
just dies and dies fast. |
michael
Regular Poster
Posts: 103
(4/22/02 7:39:36 pm)
Reply
| Edit |
Re: carbs
Hi hawk127,
if you go to the site that nathan suggested but on this specific page
au.oocities.com/ozcross250/holder.html
and take a look at point number 4, you will see a pic of what you need
to be looking for, and what you will get once you open up the carb lids
& pull out the immediately accessible stuff in there (illustrated by
the pics which are below the one of the top of the carbs).
The result of the choke test that you did, as suggested by Rich, probably
indicates mixture richness in your bike. That means the needles have to
go down (clip possies up). You are probably experiencing a bit of a flat
spot in the mid-range that Rich described above?
The idea behind what Rich says is that if there is too much fuel, then
things will get worse as your bike heats up, (ie better when cold) because
as the engine heats up it uses fuel more efficiently and so has even more
of that fuel to spare that it already has too much of.
Conversely, if it gets better as it heats up then it points towards
a lean mixture and you would bring the needles up (move the circlips down.)
There are four needle slides, two in each carby; that is one for each
cylinder. You will find a duplicate of the workshop manual picture for
the carby that you should look at, off a link on the home page of the same
site.
good luck. |
|
I have needed to put up an additional page on needle settings on the
across because of a 'criticism' of it that popped up on the EzBoard forum.
You
can find it here. Read it if you are not confident about messing with
the needle settings.

What follows is a mass of information on the tuning of the carbys, that
I then found elsewhere on the net. I would suggest now that from what I
have seen on the across forums, a lot of information about having to go
and change jet sizes wouldn't really be applicable. this is because most
people, with either stock exhaust or aftermarket, have not really needed
to go to such great lengths to get the bike running right. The needle possy
stuff is invaluable though. Here it is:
| source
(go back to the source to get some additional information on what
is included here
e.g., adjusting floats, pics of worn needle/needle jets, fuel screw
cap removal details)
Carburetor
tuning guide #1
Follow steps in order....First, dial in:
1. Top end (full throttle / 7.5k to redline
- Best Main Jet be selected before starting step 2!
Select Best Main Jet
To get the best, most even top end power (full throttle/after 7500
rpm), select the main jet that produces the highest top speed / pulls hardest
at high rpm.
If the bike pulls harder at high rpm when cold and less hard when fully
warmed up, the main jet is too large.
Install a smaller main jet and retest until you find the main jet that
pulls the hardest at high rpm when fully warmed up.
This must be done first - before moving on to the other tuning ranges.
If the bike doesn't pull well at high rpm when cold and gets only slightly
better when fully warmed up, the main jet is too small.
In order to properly tune the midrange and low rpm carburetion, THE
MAIN JET MUST FIRST BE PROPERLY SELECTED after 10 to 15 minutes of hard
use!
Do not pay too much attention to the low-end richness when you are
changing main jets - you still need to be using the main jets that produce
the best power at high rpm. You will deal with the low-end / cruise later
- after step 2.
2. Midrange (full throttle /5k-7k)
Select best needle clip position
To get the best power at full throttle / 5k-7k rpm, after you have
already selected the best main jet,
If the engine pulls better on a full throttle roll-on starting at <3k,
when cool but soft when at full operating temperature, it is too rich in
the midrange and the needle should be lowered.
If the engine pulls better when fully warmed up but still not great
between 5k-7k, try raising the needle to richen 5k-7k.
If the engine pulls equally well between 5k-7k when cooler as compared
to fully warmed up, the needle height is probably properly set.
Do not pay too much attention to the low-end richness when you are
changing needle clip positions - you still need to be using the clip position
that produces the best full throttle / 5k-7k power in conjunction with
the main jets that produce the best power at high rpm. You will deal with
the low-end / cruise next.
3. Low end (full throttle / 2k-3k)
Float height (AKA fuel level & how to..)
To get best low-end power, set float height (fuel level) so that the
engine will accept full throttle, without missing or stumbling, in
2nd gear from 2.5k to 3k rpm at minimum.
Float heights, unless otherwise specified in the installation guide,
are measured from the "gasket surface" of the carb body to the highest
part of the top of the float - with the float tang touching but not compressing
the float valve spring.
If the engine has a "wet" rhythmic, soggy area at full throttle / 3k-4k
rpm, that gets worse as the engine heats up, lower the fuel level by resetting
the float height 1mm greater (if the original was 13mm - go to 14mm). This
will lower the fuel level, making full throttle / 2k-3k rpm leaner.
If the engine is "dry" and flat between 2k to 3k rpm, raise the fuel
level.
Example: change float height from 15mm to 14mm to richen up that area.
REMEMBER, since the main jet WILL affect low speed operation, the MAIN
JET has to be within 1 or 2 sizes of correct before final float setting.
Warning: If the engine is left with the fuel level too high, the engine
may foul plugs on the street and will be "soft" and boggy at part throttle
operation. Adjust Floats to raise/ lower the Fuel Level.
Base settings are usually given if a particular application has a history
of fuel level criticalness. The Fuel level height in the float bowl affects
full throttle/low rpm and, also, richness or leanness at cruise/low rpm.
Reference: a bike that runs cleanly at small throttle openings when
cold, but starts to show signs of richness as it heats up to full operating
temperature, will usually be leaned out enough to be correct if the fuel
level is LOWERED 1mm. Check out and RESET all: Suzuki (all), Yamaha (all)
and Kawasaki (if low speed problems occur). Needless to say, FUEL LEVEL
IS EXTREMELY IMPORTANT!!!
If there are low-end richness problems, even after lowering the fuel
level much more than 1.5mm from our initial settings, also check for needle
wear and needle jet (part of the emulsion tube). See Worn Needle and Worn
Needle Jet diagram. It is VERY common for the brass needle jets (in the
top of the "emulsion tube") in 36mm, 38mm and 40mm Mikuni CV carbs to wear
out in as little as 5,000 miles. Check them for "oblong" wear - the needle
jet orifice starts out round! Factory Pro produces stock replacement needle
jets / emulsion tubes for 36mm and 38mm Mikuni carbs.
4. Idle and low rpm cruise
Fuel Screw setting (AKA mixture screws)
There is usually a machined brass or aluminum cap over the fuel screws
on all but newer Honda. It's about the diameter of a pencil. Cap
removal details. Newer Honda carbs use a special "D" shaped driver, usually
supplied in the carb recal kit.
Set for smoothest idle and 2nd gear, 4k rpm, steady state cruise operation.
Set mixture screws at recommended settings, as a starting point. For smoothest
idle, 2nd gear 4000 rpm steady state cruise , and 1/8 throttle high rpm
operation.
Pilot fuel mixture screw settings, float level AND pilot jet size are
the primary sources of mixture delivery during 4000 rpm steady state cruise
operation.
If lean surging is encountered, richen mixture screws (turn out) in
1/2 turn increments. Alternative pilot jets are supplied when normally
required.
Pilot fuel mixture screw settings, float level and pilot jet size also
affect high-rpm, 0 to 1/8 throttle maneuvers. Too lean, will cause surging
problems when the engine is operated at high rpm at small throttle openings!
Opening the mixture screws and/or increasing pilot jet size will usually
cure the problem.
NOTE: A rich problem gets worse as the engine heats up.
If the throttle is lightly "blipped" at idle, and the rpm drops below
the set idle speed, then rises up to the set idle speed, the low speed
mixture screws are probably set too rich: try 1/2 turn in, to lean the
idle mixture.
NOTE: A lean problem gets better as the engine heats up.
If the throttle is lightly "blipped" at idle, and the rpm "hangs up"
before dropping to the set idle speed, and there are no intake leaks and
the idle speed is set at less than 1000 rpm, the mixture screws are probably
too lean: try 1/2 turn out, to richen mixture. Be sure there are no intake
leaks and the idle speed is set at less than 1000 rpm!
Carb tuning is a combination of science, art, intuition and a lot of
wizardry. These tuning kits have been thoroughly tested to ensure easy,
trouble-free, optimized performance.
Please note: If you have installed the kit and gone through the optional
screw settings, clip positions and main jets, and still have a persistent
flat spot/problem, we ask you to call us. Unique engine/exhaust/filter/altitude/temperature
combinations may require individualized setups. We are here to help. The
information gained to your solution will be installed in our computerized
reference database. PLEASE CALL!
We ask that upon completion of installation and tuning, that you call
us with specifications of your installation, (pipe brand, filters, advancer,
altitude, humidity, temperature and final carb settings) to be entered
in our TUNING DATABASE. The database allows us to include the "most used"
jet sizes and setup specifications in every kit. Use (415) 721-4964,
(800) 869-0497 or fax (415) 454-8803. Thanks! Marc W. Salvisberg
source http://www.factorypro.com/tech/carbtun.html
|
Motorcycle Carburetor Theory
101
source
Motorcycle carburetors look very complex, but with a little theory,
you can tune your bike for maximum performance. All carburetors work under
the basic principle of atmospheric pressure. Atmospheric pressure is a
powerful force which exerts pressure on everything. It varies slightly
but is generally considered to be 15 pounds per square inch (PSI). This
means that atmospheric pressure is pressing on everything at 15 PSI. By
varying the atmospheric pressure inside the engine and carburetor, we can
change the pressure and make fuel and air flow.
Atmospheric pressure will force high pressure to low pressure. As the
piston on a two stroke engine goes up (or goes down on a four stroke engine),
a low pressure is formed inside the crankcase (above the piston on a four
stroke). This low pressure also causes a low pressure inside the carburetor.
Since the pressure is higher outside the engine and carburetor, air will
rush inside the carburetor and engine until the pressure is equalized.
The moving air going through the carburetor will pick up fuel and mix with
the air.
Inside a carburetor is a venturi, fig 1. The venturi is a restriction
inside the carburetor that forces air to speed up to get through. A river
that suddenly narrows can be used to illustrate what happens inside a carb.
The water in the river speeds up as it gets near the narrowed shores and
will get faster if the river narrows even more. The same thing happens
inside the carburetor. The air that is speeding up will cause atmospheric
pressure to drop inside the carburetor. The faster the air moves, the lower
the pressure inside the carburetor.
--------------------------------------------------------------------------------

FIG 1
--------------------------------------------------------------------------------
Most motorcycle carburetor circuits are governed by throttle position
and not by engine speed.There are five main metering systems inside most
motorcycle carburetors. These metering circuits overlap each other and
they are:
* pilot circuit
* throttle valve
* needle jet and jet needle
* main jet
* choke circuit
The pilot circuit has two adjustable parts, fig 2. The pilot air screw
and pilot jet. The air screw can be located either near the back side of
the carburetor or near the front of the carburetor. If the screw is located
near the back, it regulates how much air enters the circuit. If the screw
is turned in, it reduces the amount of air and richens the mixture. If
it is turned out, it opens the passage more and allows more air into the
circuit which results in a lean mixture. If the screw is located near the
front, it regulated fuel. The mixture will be leaner if it is screwed in
and richer if screwed out. If the air screw has to be turned more than
2 turns out for best idling, the next smaller size pilot jet will be needed.
--------------------------------------------------------------------------------
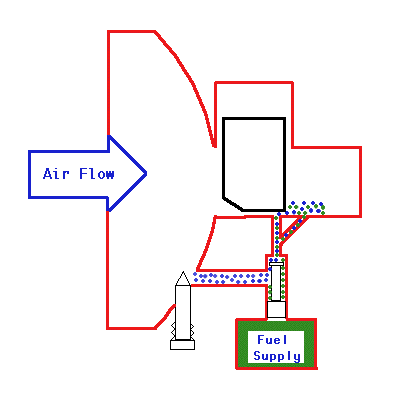
FIG 2
--------------------------------------------------------------------------------
The pilot jet is the part which supplies most of the fuel at low throttle
openings. It has a small hole in it which restricts fuel flow though it.
Both the pilot air screw and pilot jet affects carburetion from idle to
around 1/4 throttle.
The slide valve affects carburetion between 1/8 thru 1/2 throttle. It
especially affects it between 1/8 and 1/4 and has a lesser affect up to
1/2. The slides come in various sizes and the size is determined by how
much is cutaway from the backside of it, fig 3. The larger the cutaway,
the leaner the mixture (since more air is allowed through it) and the smaller
the cutaway, the richer the mixture will be. Throttle valves have numbers
on them that explains how much the cutaway is. If there is a 3 stamped
into the slide, it has a 3.0mm cutaway, while a 1 will have a 1.0mm cutaway
(which will be richer than a 3).
--------------------------------------------------------------------------------
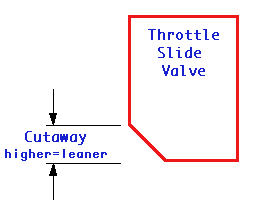
FIG 3
--------------------------------------------------------------------------------
The jet needle and needle jet affects carburetion from 1/4 thru 3/4
throttle. The jet needle is a long tapered rod that controls how much fuel
can be drawn into the carburetor venturi. The thinner the taper, the richer
the mixture. The thicker the taper, the leaner the mixture since the thicker
taper will not allow as much fuel into the venturi as a leaner one. The
tapers are designed very precisely to give different mixtures at different
throttle openings. Jet needles have grooves cut into the top. A clip goes
into one of these grooves and holds it from falling or moving from the
slide. The clip position can be changed to make an engine run richer or
leaner, fig 4. If the engine needs to run leaner, the clip would be moved
higher. This will drop the needle farther down into the needle jet and
cause less fuel to flow past it. If the clip is lowered, the jet needle
is raised and the mixture will be richer.
The needle jet is where the jet needle slides into. Depending on the
inside diameter of the needle jet, it will affect the jet needle. The needle
jet and jet needle work together to control the fuel flow between the 1/8
thru 3/4 range. Most of the tuning for this range is done to the jet needle,
and not the needle jet.
--------------------------------------------------------------------------------
FIG 4
--------------------------------------------------------------------------------
The main jet controls fuel flow from 3/4 thru full throttle, fig 5.
Once the throttle is opened far enough, the jet needle is pulled high enough
out of the needle jet and the size of the hole in the main jet begins to
regulate fuel flow. Main jets have different size holes in them and the
bigger the hole, the more fuel that will flow (and the richer the mixture).
The higher the number on the mainjet, the more fuel that can flow through
it and the richer the mixture.
--------------------------------------------------------------------------------
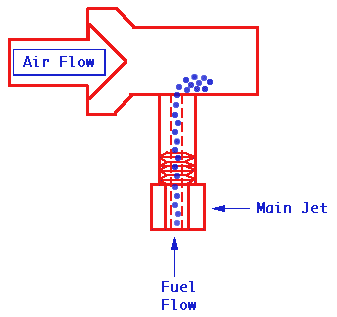
FIG 5
--------------------------------------------------------------------------------
The choke system is used to start cold engines. Since the fuel in a
cold engine is sticking to the cylinder walls due to condensation, the
mixture is too lean for the engine to start. The choke system will add
fuel to the engine to compensate for the fuel that is stuck to the cylinder
walls. Once the engine is warmed up, condensation is not a problem, and
the choke is not needed.
The air/fuel mixture must be changes to meet the demands of the needs
of the engine. The ideal air/fuel ratio is 14.7 grams of air to 1 gram
of fuel. This ideal ratio is only achieved for a very short period while
the engine is running. Due to the incomplete vaporization of fuel at slow
speeds or the additional fuel required at high speeds, the actual operational
air/fuel ratio is usually richer. Figure 6 shows the actual air/fuel ratio
for any given throttle opening.
--------------------------------------------------------------------------------

FIG 6
--------------------------------------------------------------------------------
Carburetor Jetting Troubleshooting
Carburetor troubleshooting is simple once the basic principles are
known. The first step is to find where the engine is running poorly, fig
7. It must be remembered that carburetor jetting is determined by the throttle
position, not engine speed. If the engine is having troubles at low rpm
(idle to 1/4 throttle), the pilot system or slide valve is the likely problem.
If the engine has problems between 1/4 and 3/4 throttle, the jet needle
and needle jet (most likely the jet needle) is likely the problem. If the
engine is running poorly at 3/4 to full throttle, the main jet is the likely
problem.
--------------------------------------------------------------------------------
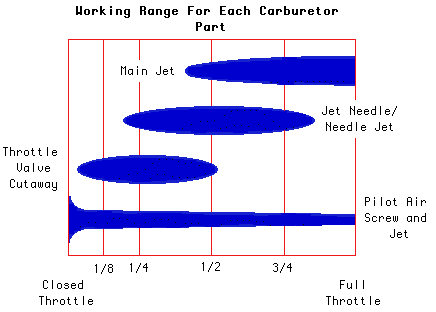
FIG 7
--------------------------------------------------------------------------------
While jetting carburetors, place a piece of tape on the throttle housing.
Place another piece of tape on the throttle grip and draw a line (while
the throttle is at idle) straight across from one piece of tape to the
other. When these two lines are lined up, the engine will be idling. Now
open the throttle to full throttle and draw another line directly across
from it on the throttle housing. At this point, there should be two lines
on the throttle housing, and one on the throttle grip. Now find the half-way
point between both of the lines on the throttle housing. Make a mark and
this will show when the throttle is at half throttle. Divide the spaces
up even again until idle, 1/4, 1/2, 3/4, and full throttle positions are
known. These lines will be used to quickly find the exact throttle opening
while jetting.
Clean the air filter and warm the bike up. Accelerate through the gears
until the throttle is at full throttle (a slight uphill is the best place
for this). After a few seconds of full throttle running, quickly pull in
the clutch and stop the engine (Do not allow the engine to idle or coast
to a stop). Remove the spark plug and look at its color. It should be a
light tan color (for more info on reading spark plugs click here). If it's
white, the air/fuel mixture is too lean and a bigger main jet will have
to be installed. If it's black or dark brown, the air/fuel mixture is too
rich and a smaller main jet will have to be installed. While changing jets,
change them one size at a time, test run after each change, and look at
the plug color after each run.
After the main jet has been set, run the bike at half throttle and check
the plug color. If it's white, lower the clip on the jet needle to richen
the air/fuel mixture. If it's dark brown or black, raise the clip to lean
the air/fuel mixture.
The pilot circuit can be adjusted while the bike is idling and then
test run. If the engine is running poorly just off of idle, the pilot jet
screw can be turned in or out to change the air-fuel mixture. If the screw
is in the back of the carburetor, screwing it out will lean the mixture
while screwing it in will richen it. If the adjustment screw is in the
front of the carburetor, it will be the opposite. If turning the screw
between one and two and a half doesn't have any affect, the pilot jet will
have to be replaced with either a larger or smaller one. While adjusting
the pilot screw, turn it 1/4 turn at a time and test run the bike between
adjustments. Adjust the pilot circuit until the motorcycle runs cleanly
off of idle with no hesitations or bogs.
Altitude, Humidy, and Air Temperature
Once the jetting is set and the bike is running good, there are many
factors that will change the performane of the engine. Altitude, air temperature,
and humidity are big factors that will affect how an engine will run. Air
density increases as air gets colder. This means that there are more oxygen
molecules in the same space when the air is cold. When the temerature drops,
the engine will run leaner and more fule will have to be added to compensate.
When the air temerature gets warmer, the engine will run richer and less
fuel will be needed. An engine that is jetted at 32 fahrenheight may run
poorly when the temperature reaches 90 fahrenheight.
Altitude affects jetting since there are less air molecules as altitude
increases. A bike that runs good at sea level will run rich at 10,000 ft
due to the thinner air.
Humidy is how much moister is in the air. As humidy increases, jetting
will be richer. A bike that runs fins in the mornings dry air may run rich
as the day goes on and the humidity increases.
Correction factors are sometimes used to find the correct carburetor
settings for changing temperatures and altitudes. The chart in fig 8, shows
a typical correction factor chart. To use this chart, jet the carburetor
and write down the pilot and main jet sizes. Determine the correct air
temperature and follow the chart over to the right until the correct elevation
is found. Move straight down from this point until the correct coreection
factor is found. Using fig 8 as an example, the air temperature is 95
fahrenheight and the altitude is 3200 ft. The correction factor will be
0.92. To find out the correction main and pilot jets, multiple the correction
factor and each jet size. A main jet size of 350 would be multiplied by
0.92 and the new main jet size would be a 322. A pilot jet size of 40 would
be multiplied by 0.92 and the pilot jet size would be 36.8.
--------------------------------------------------------------------------------
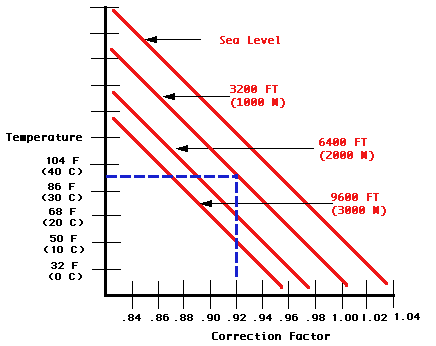
FIG 8
--------------------------------------------------------------------------------
Correction factors can also be used to find the correct settings for
the needle jet, jet needle, and air screw. Use the chart from fig 9 and
determin the correction factor. Then use the table below to determine what
to do with the needle jet, jet needle, and air screw.
| Correction factor |
1.04 or above |
1.04-1.00 |
1.00-0.96 |
0.96-0.92 |
0.92 or below |
| Needle jet |
Two sizes larger |
One size larger |
Same size |
One size smaller |
Two sizes smaller |
| Jet needle setting |
Lower clip position |
Same |
Same |
Same |
Raise clip one position |
| Air screw opening |
One turn in |
1/2 turn in |
Same |
1/2 turn out |
One turn out |
FIG 9
--------------------------------------------------------------------------------
source: MOTOCROSS.COM |
Carburetor Monologue (How carburetors
work...)
Bob Frasier June 6, 1996
source
--------------------------------------------------------------------------------
First, some basic theory, and terminology. All carburetors work on
what is known as "the Bernoulli Principle". In english, the Bernoulli principle
states that as the velocity of an ideal gas increases, the pressure drops.
Within a certain range of velocity and pressure, the change in pressure
is pretty much linear with velocity-if the velocity doubles, the pressure
halves. However, this linear relationship only holds within a certain range
(more on this, and why it is important, later). Carburators work because
as air is pulled into the carb throat (AKA the "venturi"), it has to accelerate
from rest, to some speed. How fast depends upon the air flow demanded by
the engine speed and the throttle butterfly setting. According to Bernoulli,
this air flowing through the throat of the carb will be at a pressure less
than atmospheric pressure, and related to the velocity (and hence to how
much air is being fed into the engine).
So now, we have air flowing through the carb throat, at some pressure
less than atmospheric. If a small port is drilled into the carb throat
in this low pressure region, there will be a pressure difference between
the throat side (what I will call the inside) of the port, and the side
that is exposed to the atmosphere. If a reservoir of gasoline (aka the
float bowl) is between the inside of the port, and the atmosphere, the
pressure difference will pull gasoline through the port, into the air stream.
At this point, the "port" gets the name of a "jet" in the concept of a
carb. The more air that the engine pulls through the carb throat, the greater
the pressure drop across the jet, and the more fuel that gets pulled in.
As noted above, within a range of airflow in the throat, and fuel flow
in the jet, the ratio of fuel to air that flows will stay constant. And
if the jet is the right size, that ratio will be what the engine wants
for best performance. I should mention that I am describing a simple carb
with a fixed throat and jet size. Like on most older cars. The CV carbs
on a BMW work on the same principles, but they vary the throat and jet
size in order to extend the range over which the carb can accurately meter
fuel.
This is where things start to get more complicated. As I noted, a venturi/jet
arrangement can only meter fuel accurately over a certain range of flow
rates and pressures. As flow rates increase, either the venturi or the
jet, or both, will begin to "choke"-that is they reach a point where the
flow rate will not increase, no matter how hard the engine tries to pull
air through. At the other extreme, when the velocity of the air in the
venturi is very low-like at idle or during startup, the pressure drop across
the jet becomes vanishingly small. It is this extreme that concerns us
with respect to starting, idle and low-speed throttle response.
At idle, the pressure drop in a 32 mm venturi is so small that essentially
no fuel will be pulled through the main jets. But the pressure difference
across the throttle butterfly (which is almost completely closed) can be
as high as 25+ mm Hg. Carb designers take advantage of this situation by
placing an extra jet (the "idle jet" natch.) just downstream of the throttle
butterfly. Because of the very high pressure difference at idle, and the
very small amount of fuel required, this jet is tiny. When the throttle
is open any significant amount, the amount of fuel that flows through this
jet is small, and for all intents and purposes, constant. So it's effect
on the midrange and up mixture is easily compensated for.
During startup, the amount of air flowing through the carb is smaller
still. At least till the engine begins to run on it's own. But when it
is being turned by the starter or the kicker, rpm is in the sub-100 range
sometimes. So the pressure difference across the jets is again in the insignificant
range. Plus, if the engine is cold, it wants the mixture extra- rich to
compensate for the fact that a lot of the fuel that does get mixed with
air in the carb precipitates out on the cold walls of the intake port.
Now we come to "chokes" and "enricheners". Bing carbs, and most bike carbs,
use enrichener circuits. All this really is, is another port or jet from
the float bowl to just downstream of the throttle butterfly. Except that
the fuel flow to this jet is regulated by a valve that is built into the
carb body. At startup, when the lever is in the full on position, the valve
is wide open, and the fuel supply to the cold start jet is more or less
unlimited. In this condition, the amount of fuel that flows through the
cold start jet is regulated just like the idle jet is. When the throttle
is closed, the pressure drop across the jet is high, and lots of fuel flows,
resulting in a very rich mixture, just perfect for ignition of a cold motor.
If the throttle butterfly is opened, the pressure difference is less, and
less fuel flows. This is why R bikes like no throttle at all until the
engine catches. However, the mixture quickly gets too rich, and opening
the throttle a tad will make things better. Just like the idle jet, this
cold start jet is small enough that even when the circuit is wide open,
the amount of fuel that can flow is small enough that at large throttle
openings, it has little impact on the mixture. This is why you can ride
off with the starting circuit on full, and the bike will run pretty well-until
you close the throttle for the first time, and the mixture gets so rich
the engine stalls. The valve that controls fuel supply to the cold start
jet allows the rider to cut the fuel available through that jet down from
full during startup, to none or almost none once the engine is warm. In
most cases, at the intermediate setting, fuel to the cold start jet is
cut to the point where the engine will still idle when warm, although very
poorly since it is way too rich.
True "chokes" are different. But very aptly named. A choke is simply
a plate that can be maneuvered so that it completely (or very nearly) blocks
off the carburetor throat at it's entrance ("choking" the carb, just like
a killer to a victim in a bad movie). That means that the main, idle, intermediate,
etc., jets are all downstream of the choke plate. Then, when the engine
tries to pull air through the carb, it can't. The only place that anything
at all can come in to the carb venturi is through the various jets. Since
there is little or no air coming in, this results in an extremely rich
mixture. The effect is maximized if the throttle butterfly (which is downstream
of the big main jets and the choke plate) is wide open, not impeding things
in any way. If the throttle butterfly is completely closed, the engine
does not really know that the choke is there-all the engine "sees" is a
closed throttle, so there is little enrichening effect. The engine will
pull as much fuel as possible through the idle jet, but that is so small
it won't have much effect. So a carb with a choke behaves in exactly the
opposite manner as one with an enrichener. During the cranking phase, it
is best to have the throttle pegged at WFO so that the most fuel gets pulled
in, resulting in a nice rich mixture. But as soon as the motor starts,
you want to close the throttle to cut down the effect of the choke. Even
that is not enough, and most chokes are designed so that as soon as there
is any significant airflow, they automatically open part way. Otherwise
the engine would flood. Even "manual" chokes have this feature most of
the time.
So. I hope this is all at least somewhat clear. "Enricheners" are an
extra, controllable jet that provides more fuel to richen the low speed
mixture. The amount of fuel they provide is at a maximum when the throttle
is closed, and the airflow is at a minimum. As the throttle is opened,
the overall mixture effect goes down. Chokes on the other hand, cut off
the supply of air to the carb without changing the jetting in any way.
But by their action, they increase the pressure difference across all the
jets at low engine speeds, enrichening the mixture. This effect is at a
maximum at high engine speeds and throttle openings. Which is why different
carb types behave different ways during startup.
I have intentionally left this description somewhat general. I will
be glad to try and answer any questions that the text raises.
Bob Frasier
source
|
| Carburetor Tuning
source
-
The Difference Between Two-Stroke and Four-Stroke Carbs
-
Identification Guide to Popular Carb Types
-
Carburetor Parts and Function
-
Basic Carb Service
-
Mechanical Problems
-
Jetting Shouldn't Be Scary!
-
The Ride and Feel Method
-
Jetting For Riding Techniques
-
The Weather Makes The biggest Difference!
-
Track Conditions and Load
-
Fuel and Oil Mixture Ratios
-
Tuning Gauges
-
Octane Boosters
Intro
Carburetor tuning has the greatest effect on engine performance. When
a motorcycle manufacturer builds a bike, they usually install jets in the
carb that are too rich. The manufacturers sell the same model worldwide,
so they couldnt afford to install different jets in the carb to suit all
the different climates and types of fuel. In addition to the climate and
fuel, the manufacturer would also have to consider many other factors,
such as the terrain and type of riding. And then there is the most important
jetting consideration, the rider.
When I worked as a mechanic, I was in charge of jetting the bike over
the course of the day. During morning practice sessions, the track was
usually muddy and the air temperature was at its lowest point. I had to
jet the bike rich for practice because the air density was greater and
the mud put more of a load on the engine. Then I had to watch the rider
and the bike perform on different sections of the track. I would go to
the obstacle on the track that presented the greatest load on the bike,
typically an uphill straight section. Id listen to my engine and watch
the rider. Id listen for pinging or knocking noises or excessive smoke
from the pipe. I would watch to see if the rider had to fan the clutch
a lot and how my bike pulled in comparison to others. Getting feedback
from the rider is difficult because they are concentrating on riding not
the bikes performance. At a pro national there is one practice session,
followed by a series of qualifiers and eventually two race motos. The time
spacing of the riding sessions over the course of the day was such that
I had to compensate the jetting two or three times. Otherwise, the bike
would either seize from being too lean in the morning or run too rich for
the second moto.
Race mechanics have different techniques for carb jetting. These techniques
range from asking other mechanics what jets they are running to using precise
measuring gauges to monitor the engine performance. In motocross races,
where most of the riders are of equal skill levels, a holeshot in the start
can mean the difference between a place on the podium and 30 minutes of
roost in your face! The difference in horsepower between the bike that
gets the holeshot and the bike that brings up the back of the pack may
only be a few ponies! The race mechanic can give his rider an awesome advantage
if he carefully monitors the carb jetting.
This section will give you insight into the carb tuning process, from
diagnosing mechanical problems that mimic poor jetting to tuning tools
such as gauges. It will also give you tips on a jetting method that Ive
developed called the "ride-and-feel" method," which I consider to be the
best method Its a technique that I teach to all the riders Ive worked
with. You dont need any fancy tools, just the ability to make observations
while you ride.
The Differences in Two-Stroke and Four-Stroke Carbs
The difference between a two-stroke and four-stroke engine is intake
velocity. Two-stroke engines have lower velocity so the needle jet has
a half-moon shaped hood protruding into the venturi to produce a low pressure
area that aids in drawing the fuel up through the needle jet. Four-stroke
carbs need to atomize the fuel more so than a two-stroke carb because so
much of the fuel shears along the intake port and separates from the mixture
stream. Four-stroke carbs have more jets and finer adjustment screws, plus
they usually are equipped with an accelerator pump. A typical state of
the art four-stroke carb is the Kehin CR.
The latest trend in two-stroke carbs features a pump that sprays fuel
into the venturi from 1/4th to 3/4th throttles. In the past, carb manufacturers
made jet needles that attempted to compensate for the natural lean condition
of the mid-range but that compromised the jetting at full throttle. The
auxiliary pumps are powered by electricity supplied by the alternator (about
5 watts) and controlled by either a throttle position or an rpm sensor.
Identification Guide to Popular Carb Types
On two-stroke engines, several different model carbs have been used
over the years, but there are basically two big carb manufacturers. Kehin
and Mikuni are two popular brands of Japanese carbs used on nearly every
dirt bike.
Kehin has several different models. The most popular ones are the PJ,
PWK, and PWM. The PJ is used on Honda CR125, 250, and 500 models from 1985-1997
The slide is oval shaped and there are no additional pumps, its just a
simple carb. In fact it's so simple that the choke and idle screw share
the same jet. The PWK was the next step up from the PJ. The PWK has a crescent
shaped slide and a separate idle circuit from the choke. The PWK is used
on Kawasaki KX125, 250, and 500 models from 1990-97. The latest version
of the PWK features a pump to supply extra fuel in the mid-range. The PWM
is similar to the older PWK (no pump) and the overall length is shorter.
Mikuni has several different model carbs too. The original model VM
had a round slide. There are many different parts available including needle
jets of different diameters and jet needles with different taper angles
and diameters. The next model was the TMX, which became available in 1987.
It was a flat-slide carb, which offered a greater peak flow rate. The TMX
was revised several times, becoming smaller with fewer parts. The TMS carb
introduced in 1992 had no main or pilot jet. The slide and jet needle handled
all the jetting. That carb worked great on 250cc bikes but never became
popular. The PM is the latest Mikuni model. It features an oval crescent
shaped slide and a very short body. That carb comes standard on Yamaha
YZ125 and 250 1998 and newer models.
Carburetor Parts and Function
A carburetor is a device that enables fuel to mix with air in a precise
ratio while being throttled over a wide range. Jets are calibrated orifices
that take the form of parts such as pilot/slow jets, pilot air screw, throttle
valve/slide, jet needle, needle jet/spray-bar, air jet, and main jet. Fuel
jets have matching air jets, and these jets are available in many sizes
to fine-tune the air-fuel mixture to the optimum ratio for a two-stroke
engine, which is 12.5: 1.
Fuel Jets, Air Jets, and Throttle Positions
Three circuits control the air: the air-screw, the throttle slide, and
the air jet. Four circuits control the fuel: the pilot/slow jet, the spray-bar/needle
jet, the jet needle, and the main jet. The different air and fuel circuits
affect the carb jetting for the different throttle-opening positions, as
follows:
Closed to 1/8 throttleair screw and pilot/slow jet
1/8 to 1/4 throttleair-screw, pilot/slow jet, and throttle slide
1/4 to 1/2 throttlethrottle slide and jet needle
1/2 to full openjet needle, spray-bar/needle jet, main jet, and air
jet
(Note: On many modern carbs the spray-bar/needle jet and air jets are
fixed-diameter passages in the carburetor body and cannot be altered.)
Basic Carb Service
Nobody likes to fiddle with a carb if they don't have to. Wedged in
between the engine and frame with tubes, cables, and wires sprouting out
like spaghetti, carbs are a pain to work on. Carbs require cleaning just
like anything else, and some careful observations can save you big money
in the long run. Start by pressure washing the bike, especially around
the bottom of the carb where roost from the tires and oil from the chain
accumulate. Take care when removing the carb, it's easy to damage the cable.
Its better to remove the sub-frame so as to enable unrestricted access
to the carb. This will also make it easier to route the vent hoses in their
proper positions too. When you remove the carb look at the vent hoses.
Are they melted from heat or clogged with mud? If so that can cause a vapor-locking
problem in the float bowl and make the engine bog.
Remove the top of the carb and disconnect the cable from the slide.
Is the cable frayed or kinked? Is the rubber dust cover missing? If so
then replace the cable. Now remove the float bowl, jet baffle (white plastic
shroud around main jet), float and fuel inlet needle, and the air-screw.
Shake the floats and listen for fluid that may have seeped inside. If so
replace the floats otherwise the engine might suffer from constant fuel
flooding. Check the fuel inlet needle. It has a Viton rubber tip and occasionally
fuel additives and dirt damage the tip. Also check the spring-loaded plunger
on the opposite end of the tip. If the spring doesn't push the plunger
all the way out then replace it. Check the air-screw, there should be a
spring and o-ring on the end of the needle. The spring provides tension
to keep the air-screw from vibrating outward and the o-ring seals out dirt
and water from entering the pilot circuit. Next check the bell mouth of
the carb. Look for the two holes at the bottom of the bell mouth. The one
in the center is the air passage for the needle jet and the other hole
offset from center is the air passage for the pilot circuit. It's typical
for those passages to get clogged with dirt and air filter oil. That would
cause the engine to run rough because without a steady stream of air to
mix with and atomize the fuel, raw fuel droplets make the jetting seem
rich.
Once the carb is basically stripped down (pilot/slow and main jet still
in place) you can flush the passages. Get an aerosol can of brake or carb
cleaner from an auto parts store. Make sure you get the type with the small
diameter plastic tube that attaches to the spray tip. Direct the tip into
the airscrew passage. When you spray the cleaner you should see it flow
out the pilot/slow jet and the air passage in the bell mouth. Next spray
through the pilot/slow jet, look for flow through a tiny passage located
between the venturi and the intake spigot. Spraying cleaner through these
passages insures that the low speed air and fuel circuits are open and
free flowing. The last area to flush with the carb cleaner is the slide
bore and slide. Dirt tends to trap there, causing the mating surfaces to
develop scratches that could cause the throttle to stick!
Just a small amount of water and dirt can get trapped in the tiny passages
of the carb and cause havoc with jetting or even engine damage. How often
should you service the carb? When it gets dirty! For example if you ride
in muddy wet conditions you should at least check the vent hose. If the
riding conditions are dusty and your air filter is covered with dirt, then
its a good idea to do a basic carb servicing.
Mechanical Problems
The process of jettingchanging air or fuel jets in order to fine-tune
engines' performanceis very simple. Jetting becomes complicated because
mechanical problems sometimes mimic improper jetting. This causes you to
waste time and money trying to correct the problem with expensive carburetor
jets.
Before you ever attempt to jet a carb, make sure the engine doesnt
have any of the problems in the following list. If you are in the process
of jetting a carb and you are stumped with a chronic problem, use this
section as a guide to enlightenment!
Crankcase air leaksAir leaks can occur at the cylinder base, reed valve,
or the magneto seal. Air leaks make the throttle response sluggish and
may produce a pinging sound. That sound occurs when the air-fuel mixture
is too lean.
Crankcase oil leaksThe right-side crankcase seal is submerged in the
transmission oil. When this seal becomes worn out, oil can leak into the
crankcase. The oil is transferred up to the combustion chamber and burned
with the air-fuel mixture. The oil causes the spark plug to carbon-foul.
This mechanical problem makes the jetting seem to be too rich.
Coolant-system leaksCoolant systems leaks commonly occur at the cylinder-head
gasket. When the coolant leaks into the combustion chamber, it pollutes
the air-fuel mixture and causes a misfire or popping sound at the exhaust
pipe. Check the engines coolant level frequently. Hondas and Kawasakis
have characteristic coolant leaks because they use steel head gaskets.
Yamahas and Suzukis use O-rings to seal the head and cylinder. Coolant-system
leaks lower the engines peak horsepower. It makes the engine run as if
the air-fuel mixture is too rich.
Carbon-seized exhaust valvesThe exhaust valves sometimes become carbon-seized
in the full-open position. This mechanical problem can make the engine
run flat at low rpm and make the slow-speed jetting seem lean. The carbon
can be removed from the exhaust valves with oven cleaner. Clean the exhaust
valves whenever you replace the piston and rings.
Blown silencerWhen the fiberglass packing material blows out of the
silencer, excess turbulence forms in the silencer and the turbulence causes
a restriction in the exhaust system. This restriction makes the engine
run flat at high rpm.
Broken reed-valve petalsThe petals of the reed-valve can crack or shatter
when the engine is revved too high. This mechanical problem makes the engine
difficult to start and can also have a loss of torque. Expert rider should
switch to carbon fiber reed petals because they resist breaking at high
rpm. Novice riders should use dual-stage fiberglass reeds (Aktive or Boyesen).
These types of reed petals provide an increase in torque.
Weak sparkWhen the ignition coils deteriorate, the engine performance
will become erratic. Normally, the engine will develop a high-rpm misfire
problem. Check the condition of the coils with a multimeter.
Clogged carburetor vent hosesWhen the carburetor vent hoses get clogged
with dirt or pinched closed, the jetting will seem to be too lean, so the
engine will run sluggish. Always check the condition of your carburetor
vent hoses. Make sure there is no mud in the hoses and that the hoses are
not pinched between the suspension linkage.
Carburetor float levelWhen the float level is too low, the jetting
will seem to be too lean, so the engine performance will be sluggish. When
the float level is too high, the jetting will seem to be too rich.
Worn carburetor fuel-inlet needleWhen the fuel-inlet needle wears out,
excess fuel enters the float bowl and travels up the slow jet and into
the engine. This makes the carb jetting seem to be too rich. Replace the
fuel-inlet needle and seat every two years.
Jetting Shouldn't Be Scary!
Jetting is the process of making adjustments to the air and fuel jet
sizes in order to fine tune the carburation to suit the load demands on
the engine and make the power delivery consistent and optimum. Too much
anxiety is placed on jetting. Most people just want to call me on the phone
and ask what jets they should put in their carb. Thats an impossible question
because that the big dirt bike magazines attempt to answer just to increase
readership. People get confused because they read jetting specs in a magazine,
put those jets in their bike and seize the engine. Any quoted jetting in
this book is just a baseline. Most magazines don't list parameters for
their jetting specs like; Brand new bike running with VP C-12 fuel with
Silkolene oil mixed at 30:1 and a NGK 8 spark plug, ridden by a really
slow lard-ass editor twisting the throttle on a hard-packed track. Some
part numbers and jet sizes are given in the Tuning Tips section for models
that definitely need certain jets in order to get the bike near the baseline.
There is an old saying that says you can fish for a man and feed him for
a day or teach him to fish and enable him to feed himself for life. Here
is a quick lesson on how to jet your dirt bike.
The Ride and Feel Method
The most basic method of determining correct carburetor jetting is "ride
and feel." This method requires you to determine if the carburetor tuning
is too rich or too lean by the sound and feel of the engine. The first
step is to mark the throttle body in 1/4-throttle increments, from closed
to full open. Then, this method requires that you ride the motorcycle on
a flat, circular course. To check the carb jetting for throttle positions
up to 1/2 throttle, ride the motorcycle in second or third gear. Roll on
the throttle slowly from 1/4 to 1/2 open. If the engine is slow to respond
and bogs (engine makes a booooowah sound) then the carb jetting is too
lean. You can verify lean jetting by engaging the carbs choke to the halfway
position. This will make the air-fuel mixture richer and the engine should
respond better. If the carb jetting is too rich, then the engine will make
a crackling sound; the exhaust smoke will be excessive and the engine will
run as if the choke is engaged. Careful engagement of the choke can help
you determine if the jetting is rich or lean. Another important tip is
to just change the jets one increment at a time, either rich or lean, until
the engine runs better. Most people are afraid to change a jet because
they think that the engine will be in danger of seizing. Believe me, one
jet size won't make your engine seize but it could be the difference between
running bad and running acceptable.
To check the jetting for throttle positions from 1/2 to full open, ride
the motorcycle in third and fourth gear. (You may need to increase the
diameter of the circular riding course for riding in the higher gears.)
Check the jetting in the same manner as listed above. The carb jets that
affect the jetting from 1/2 to full throttle are the jet-needle, main jet,
power jet (electronic carbs) and the air jet (on four-strokes).
If you want to take this technique out to the racetrack, you can test
the pilot/slow jet when accelerating out of tight hairpin turns, the needle
clip position on sweeper turns and short straits, and test the main jet
on the big uphill or long straits. Of course be careful if you try to use
the choke technique because you could lose control when riding one handed.
Jetting for Riding Techniques
Certain types of riders require jetting to compliment their technique.
For example beginner minibike riders will need slightly richer jetting
on the pilot/slow jet and the needle clip position to mellow the powerband
and make it easier to ride. Conversely desert racers who hold the throttle
wide open for long periods of time need rich main jets to compensate for
the high load.
The Weather Makes The Biggest Difference!
The weather can have a profound affect on the carb jetting because of
the changes in air density. When the air density increases, you will need
to richen the air-fuel mixture to compensate. When the air density decreases,
you will need lean-out the air-fuel mixture leaner to compensate. Use the
following as a guide to correcting your jetting when the weather changes:
Air temperatureWhen the air temperature increases, the air density
becomes lower. This will make the air-fuel mixture richer. You must select
jet sizes with a lower number to compensate for the lower air density.
When the barometric pressure decreases, the opposite effect occurs.
HumidityWhen the percentage of humidity in the air increases, the engine
draws in a lower percentage of oxygen during each revolution because the
water molecules (humidity) take the place of oxygen molecules in a given
volume of air. High humidity will make the air-fuel mixture richer, so
you should change to smaller jets.
AltitudeIn general, the higher the altitude the lower the air density.
When riding at racetracks that are at high altitude, you should change
to smaller jets and increase the engines compression ratio to compensate
for the lower air density.
Track Conditions and Load
The conditions of the terrain and the soil have a great affect on jetting
because of the load on the engine. Obstacles like big hills, sand, and
mud place a greater load on the engine that requires more fuel and typically
richer jetting. In motocross, track conditions tend to change over the
course of the day. Typically in the morning the air temperature is cooler
and the soil wetter requiring richer jetting. In the afternoon when the
temperature rises and the track dries out, leaner jetting is needed in
order to keep the engine running at peak performance. Other changes for
mud and sand riding might include changing to a lower final-drive ratio
(rear sprocket with more teeth) to reduce the load on the engine and help
prevent it from overheating. Advancing the ignition timing will make the
engine more responsive at low to middle rpm.
Fuel and Oil Mixture Ratios
When we talk about the "fuel" in the air-fuel mixture for a two-stroke
engine, we are really talking about a mixture of fuel and oil. If you richen
the pre-mix ratio (20:1 as opposed to 30:1) there is more oil and less
fuel in the same volume of liquid, which effectively leans the air-fuel
ratio. And this fact gives the clever tuner one more tool to use when the
correct jet is not available or when none of the standard jets are exactly
right. You can richen the jetting by slightly reducing the pre-mix ratio
(less oil). You can lean the jetting by increasing the pre-mix ratio (more
oil). The best part is that changes in the pre-mix ratio affect the jetting
over the entire throttle-opening range, but the changes in ratio must be
small to prevent excess wear from lack of lubricating oil or fouled plugs
from too much oil.
Pre-mix oils are formulated for a fairly narrow range of pre-mix ratios.
You should examine the oil bottle for the oil manufacturers suggestion
on the pre-mix ratio. All production two-stroke dirt bikes have a sticker
on the rear fender suggesting that you set the pre-mix ratio to 20:1 That
sticker is put there for legal purposes. Always refer to the oil manufacturers
suggestion on pre-mix ratios. In general, small-displacement engines require
a richer pre-mix ratio than do large-displacement engines because smaller
engines have a higher peak rpm than larger engines. The higher the engine
revs, the more lubrication it requires.
Tuning Gauges
There are three types of gauges that professional tuners use to aid
carb jetting:
1. Relative-air-density (RAD) gauge
2. Air-fuel (AF) ratio meter
3. Exhaust-gas-temperature (EGT) gauge
The following is a description of how each gauge functions and their
advantages.
RAD gaugeThis is the best gauge for dirt bikes because of the convenience.
The gauge is no good unless you get the jetting perfect once. The RAD gauge
provides you with an indication of how much the air density changes, helping
you compensate for the affects of changes in the air temperature, altitude,
and barometric pressure. The gauge is calibrated in percentage points.
Once you set the jetting with the ride and feel method, you can set the
calibration screw on the gauge so the needle is pointing to 100 percent.
When the air density changes, the RAD gauge will show the relative percent
of change. Using a calculator you can multiply the percentage change shown
on the RAD gauge by the jet size and determine the corrected jet size for
the air density. The pilot/slow and main jet have number sizes that correlate
with the RAD gauge, but the needle clip position can only be estimated.
Normally for every two main jet increments, the needle clip must be adjusted
one notch.
AF ratio meterThe AF meter measures the percentage of oxygen in the
exhaust gasses, and displays the approximate air-fuel ratio of the carb.
The gauge displays AF ratios from 10-16:1 The optimum AF ratio for a two-stroke
engine is 12:1. The AF gauge utilizes a lambda sensor that is inserted
into the center of the exhaust stream, approximately six inches from the
piston in the header pipe of a four-stroke and in the baffle cone of a
two-stroke engine. A permanent female pipe fitting (1/4in.) must be welded
to the side of the exhaust pipe in order to fasten the sensor. The weld-on
fitting set-up is also used on the temperature gauges, and the fitting
can be plugged with a 1/4in. male pipe fitting when the gauge is not in
use. This gauge is ideal for four-stroke engines.
EGT gaugeThe EGT gauge measures the temperature of the gasses in the
exhaust pipe by means of a temperature probe fastened into the exhaust
pipe, six inches from the piston. This type of gauge enables you to tune
the carb jetting and the pipe together, taking advantage of the fact that
exhaust pipes are designed with a precise temperature in mind.
An exhaust pipe is designed to return a compression wave to the combustion
chamber just before the exhaust port closes. Most pipes are designed for
a peak temperature of 1,200 degrees Fahrenheit. Most dirt bikes are jetted
too rich, which prevents the exhaust gasses from reaching their design
temperature, so power output suffers. Sometimes just leaning the main jet
and the needle-clip position makes a dramatic difference.
Digitron is the most popular brand of EGT gauge. It measures both EGT
and rpm. This gauge is designed for go-kart racing so its not suited for
wet weather conditions. It is designed to mount on the handlebars. That
way the rider can focus in on it. Once you have performed the baseline
jetting, send the rider out on the bike with the EGT. The rider observes
the EGT to give you feedback on the necessary jetting changes. Once the
jetting is dialed, we use the tachometer to check the peak rpm of the engine
on the longest straight of the racetrack. For example, if the peak rpm
exceeds the point of the engines power-peak rpm, then change the rear
sprocket to a higher final-drive ratio (rear sprocket with fewer teeth)
until the rpm drops into the target range. An EGT gauge is ideal for dirt
track bikes and go-karts, where peak rpm temperature is critical.
source
|
HOW-TO Jet Your Carb
This information was taken from December '96 issue of DIRT WHEELS.
source
WHAT MEAN JET? : Carb jetting can be easily understood if we understand
the basic princibles of carb and engine operation. A carb mixes fuel with
air before it goes into the engine. When the mixture is correct the engine
runs well. The bottom line is a carb must be adjusted to deliver fuel and
air to the engine at a precise ratio. This precise ratio can be affected
by a number of outside and inside infuences. If you are aware of these
influences you can re-jet your carb to compensate for the changes. I'm
going to show you some examples of how you can change your jetting for
better performance and in some cases increased engine life. As with any
engine work be sure you have good tools the correct parts and a good manual
before you get your hands dirty!
ALTITUDE COMPENSATION: For our first example let's say we find a new
riding area WAAY up in the mountains. Our jetting is dialed in for our
usual riding area which ranges from sea level to 1500 feet. Our NEW riding
area starts at 4000 feet and goes up from there. Going to a higher elevation
will require will require a jetting change but which way? Like our fuel
density, air density can also change. Higher elevations have less air density
then lower ones. At high elevations our engines are getting less air, so
they need less fuel to maintain the proper air/fuel ratio. Generally you
would go down 1 main jet size for every 1750 to 2000 feet of elevation
you go up(info for Mikuni carbs). If you normally run a 260 mainjet at
sea level you would drop down to a 240 at 4000 feet. Something else goes
down as you go up in elevation is horsepower.You can figure on losing about
3% or your power for every 1000 feet you go up. At 4000 feet your power
will be down about 12%-even though you rejetted! For our second example
let's say we are still at our new 4000-feet elevation riding area and a
storm comes in. We head back to camp and ride it out overnight. The next
day there's a foot of snow on the ground the skies are clear and it's COLD!.
Aside from getting the campfire going and making some coffee you should
be thinking about jetting again! Cold air is dense air and dense air requires
bigger jets. If the 240 jet ran good the day before you will need a bigger
jet to run properly today. If the temperature is 50 degrees colder than
it was the day before you can actually go back to your sea level jetting,
a 260 mainjet! If you don't rejet you can kiss your assets goodbye when
you rebuild the seized engine. Air temperature makes that much difference!
Our final example will deal with something often overlooked. We are
still up in the hills enjoying our NEW riding area when we notice the old
fuel supply getting shorter. No biggie;there's alittle store/gas station
just down the road. A short trip a few bucks change hands and we are ready
to go again. Out on the trail the bikes are running funny, sometimes "pinging"
and running HOT. What happened?!?! When we changed jets to compensate for
altitude and temperature we were still using SEA LEVEL gasoline. Gasoline
sold at higher elevations have a different blend of additives to compensate
for the altitude. Generally high elevation gasoline is less dense to compensate
for less available air going into the engine and to aid starting. The lighter
specific gravity of the high elevation fuel actually "leaned out" our mixture!
A 1 to 2 sizes bigger mainjet will get us back into the hunt. If you ride
in vastly different areas try to bring enough or your normal fuel along
to last the entire ride. It will save you hassles and gray hair in the
long run!
PILOTS,NEEDLES,MAINS: So far we have only talked about main jet changes
to compensate for altitude, temperature and fuel density. As most of you
know there is a pile of jets in a carb. While mainjets are the most critical
for ensuring full power operation and engine longevity, the other jets
are equally as important for a good running engine. Let's run through them
quickly. Pilot jets control the low-speed and idle mixtures. Many times
an adjustable jet is used in conjunction with the pilot jet. The adjustable
jet allows a precise setting of the idle mixture. If the adjustable jet
is located to the rear of the carb and usually on one side it is a AIR
adjustment. It controls the amount of air that mixes with the fuel coming
from the pilot jet. If the adjustable jet is to the front of the carb,on
the side or bottom, it controls the amount of air/fuel mixture going into
the engine. In either case if adjusting the mixture screw won't improve
the low-end running speed it's time for a different pilot jet. Throttle
valves(the slide) control the off idle, to 1-quarter open ,mixture. Some
aftermarket carbs have replacement slides available with different "cutaways".
Changing the cutaway changes the mixture. More cutaway is lean, less cutaway
is rich. Some carbs do not have different slides available, so you have
to compensate by changing the mixture on the idle circuit or needle circuit.
Partial throttle hesitation or rough running can be caused by the slide
cutaway. Needle jets control the amount of fuel going by the needly and
into the engine at low to mid throttle. There are 2 types of needle jets
used in a carb. One is a primary type that has a very precise hole hole
drilled through the middle of it, along it's length. The size of the hole
relative to the size of the needle determines how much fuel goes into the
engine. The other type of needle jet is constructed essentially the same
except for a bunch of holes drilled into the side of the jet. These holes
allow air to mix with the fuel before it's metered into the engine. Either
type of needle jet works well in most cases but there is power to be gained
on HIGH PERFORMANCE 4-STROKES by going to the needle with the holes in
the side. These are called "bleed" type needle jets and produce more midrange
power in a 4stroke. In any engine going to a leaner(smaller) needle jet
is the easiest way to rejet the midrange running when going to higher elevations.
Changing the needle jet leans out the mixture evenly at all the midrange
throttle settings moving the needle clip doesn't. Jet needles more commonly
know as the "needle" control the fuel mixture throughout the midrange.
The shape or taper of the needle dictates how much fuel goes into the engine
at a given throttle opening. The needle must work in conjunction with the
fueling requirements of the engine relative to slide position. If you have
an engine with a strong hit in the mirange the needle will probable have
a noticable reduction in size the the slide is half open. Remember it takes
fuel to make power and when the engine makes power it needs fuel NOW! If
it doesn't get the right amount of fuel it pings or misses. You many have
cleared up alittle midrange pinging by moving the needle up a notch but
at the same time you may have overrichened some other areas. If the problem
isn't oo bad you won't even notice the rich condition. If the machine stutters
before it comes on the power that part of the needle's taper is too small
and the only way to cure it is to get a needle with a different taper.
Finding the right needle can be difficult so hopefully moving the clip
will do the job. Finally the good old mainjet comes into play at 3-quarters
open to full throttle conditions. Most of you already know a bigger mainjet
has a bigger hole so it lets more gas into the engine! Pretty simple!!
As simple as it is the mainjet is absolutely CRITICAL to high-speed engine
operation. Not onlt does it meter the gas into the engine, it can aid in
cooling the engine as well. A properly sized mainjet will let the engine
make good power for a long time. A 1 size smaller mainjet may make greater
power for awhile. A slightly rich mixture burns cooler than a lean one
so be sure the mainjet is big enough! One final note on jets. All of them
and the carburetion functions then perform tend to overlap into some other
jet's territory. If you mess with one jet, you may have to mess with a
few of the others.My best advice is to not change more than one jet at
a time. Slowly work out the correct jetting and keep notes on what you
are doing. If you get totally fouled up at least you can go back to where
you started.
SIGN, SYMPTOMS AND CAUSES: How would you know if there was something
wrong with your jetting? If you listen, your engine will tell you! All
you need is an interpreter. Since i speak and understand several different
engine dialects, i will give you a hand. Let's start with lean conditions
because they can cause the most damage. In a lean condition the engine
will surge and sometimes ping under acceleration. The engine will also
be "cold-blooded" (hard to start and keep running) but will run better
when hot. The spark plug will look bone white or burned in extreme cases.
The engine may spit back or sneeze throught the carb once in awhile too..
If the engine is running rich the throttle response will be fuzzy and not
too quick. The engine will burble, miss and blow black smoke. It will start
easy but will run funny when fully warmed up. The plug will be dark, wet
or fouled (possible all 3!). Ok so what do you do first to cure the problem?
The very first thingis to check and adjust the float level. If it's off
one way or another it can throw the jetting off too. Set the float to the
specs and retest the running. The next iten is to determine a rich or lean
condition. Let's say the engine gets hot and doesn't pull well. This is
a lean condition so the engine wants more fuel. Stick in at least a 2size
bigger main jet and try it again. If it's better but still not right go
even bigger on the jet. and try it again. Bear in mind that drastic or
sudden changes in jetting usually mean an air leak has developed somewhere
in the engine. Find it and FIX IT!! When the engine burbles on the topend
come down 1 jet size at a time until it winds all the way down. Don't drop
and more sizes! If the engine seems sluggish and lumpy or want to load
up on the bottom end the mixture is TOO RICH. Adjusting the low speed mixture
screw helps alittle but doesn't cure the problem completely. What you need
now is a new pilot jet. Go 1 size smaller and try the adjustment again.
When the engine runs smooth with the adjustment screw about 1 and a half
turns out from the seat you have it!!
IS THAT ALL THERE IS TO JETTING??: There's alot more to jetting than
just stuffing jets in holes and hoping the problem goes away. If you can
understand what your engine is trying to tell you when it runs funny you
will have a better chance or correcting the problem than someone who doesn't
have a clue. When you rejet, go slowly and carefully until the problem
is solved. As a final thought let me remind you that jetting is alot like
life, if you have a choice it's always better to be a little rich!!
source
|
|

 Made
in Sydney, Australia
Made
in Sydney, Australia