The following is a list of the equipment that I use at The PenSans Brewery and how I handled the various design aspects.
As mentioned elsewhere, PenSans is a homebrewery, not a set of state of the art, gleaming, stainless steel vessels. However, if you understand your brewing processes and the influence that certain equipment decisions have on your ability to replicate the full process at home, you can still brew world class beers. 5 minutes of tasting at our regular brewing club meetings and I don't need further proof of that !
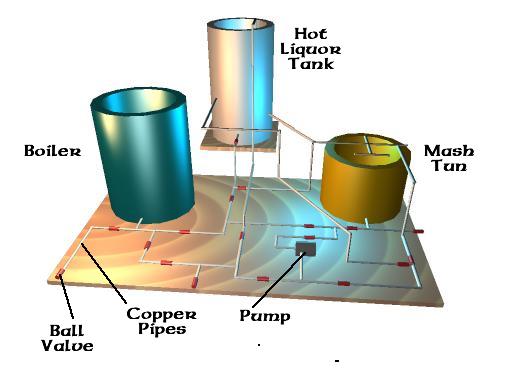
In this section I will describe what the system looks like and why the various sizes were selected. I have done a 3D model of how it looks when assembled so check out the pics as they come. Check further down for the info on the model. I thought that this might be an easier way to describe the overall equipment design issues without confusing you with what it looks like in practise . . . please read on !
DESIGN ASPECTS
After four years brewing in 25 litre (5 gallon) plastic food buckets I needed an upgrade . . .
My new brewery was built from the perspective that I wanted to ferment in a fridge to control temperatures. So I bought a fridge !!
From that came the dimensions of the largest vessel that would fit inside the fridge, so I located a suitable diameter plastic container for the fermenter, got it cut down to size and ended up with a maximum volume of around 70 litres. To allow for the yeast krausen I usually don't fill it past the 66 litre mark. . . tight I know !
When I redesigned the brewery I had started making the transition to 19 litre (US 5 gallon) stainless steel 'cornelius kegs' and figured that with a 66 litre starting volume I could probably fill 3 kegs, each with say 18 litres of beer. So I want 54 litres out of the fermenter. This leaves behind up to 10 or so litres of beer in the fermenter (allowing for what's lost during fermentation).
A quick rule of thumb in brewing is that, if you brew beer with an OG of 1040, then your final beer volume will be not much different from your mash tun volume. Also, your hot liquor tank and boiler should each be about twice that volume. So if you want to brew 1040 beer and end up with 50-60 litres of beer you should have a mash tun of the 50-60 litre volume size and boilers in the 100 litre range.
If you want to brew stronger or weaker beers you'll need to work out the vague changes . . . e.g. using a mash tun of the 50 litre size for a brew of 1060 would then see about 40 litres of beer being produced. Its all approximate but you'll probably get the picture !
And that's about as much thought as I put into the sizes !
BREWING VESSELS
The fermentation vessel is a 70 litre plastic container. It was once a 100 litre plastic bin with a loose fitting lid. But I got the factory I bought it from to cut it down to the 70 litre level and then to weld on a plastic lid. The lid has a hole in it, about 15 cm diameter, into which I screw a threaded cap. I use an O-ring to help seal the lid in place. I fitted a 1 inch diameter permanent blow off elbow joint into the top. The overall height of the fermenter means it 'just' fits into my brewing fridge !
On the side of the fermenter, around 1 inch from the bottom I got the factory to spin-weld a threaded fitting in so that I can screw a standard 15 mm diameter plastic tap. Spin welding involves melting the fitting into the side wall by spinning it at high speed in a drill with a special attachment. The factory did this too.
The hot liquor tank is a 100 litre plastic container with a loose fitting lid. I have fitted in a standard 3 kW geyser element around 3 inches from the bottom. I find that a 3 kW element is a nice balance between not overdoing the current pulled at the mains and achieving sufficient power to rapidly heat the liquor. I have used a standard element, so it will scale up if you bung loads of mineral salts in it. Elswehere I describe how I put my minerals directly into the mash tun and the boiler. A 1 cm thick layer of insulation around the outside is used to improve the heating rate.
The boiler is another 100 litre container, again with a loose fitting lid. I have fitted a 4 kW incalloy element in this vessel. The incalloy is great because it is pretty much immune to scale build up during a boil. However, the power level is a touch high for a domestic power supply ! I have furnished a power control box for this and it usually runs at around the 3 kW level. By insulating the boiler with 1 cm thick foam sheet I can achieve a good rolling boil.
The mash tun is another plastic container, this time its been cut down to 54 litres and has a loose fitting lid made from marine ply.
A tap has been fitted around 1 inch from the bottom (so as to avoid grain debris getting into the run off later) and uses a 5 mm thick round plastic sheet with 3 mm holes in as a false bottom.
VESSEL INTERCONNECTS
Cool title eh . . .
Its possible to run the hot liquor and wort between the vessels using a variety of plastic pipes, which is pretty much what I did for 4 brewing years. However, these days I have fashioned a rather nifty set up in which the three vessels are hardwired with a network of permanent copper pipes with ball valves. I have used 15 mm diameter copper pipe, with brass interconnects and 15 mm ball valves. At present the whole assembly is fixed down onto a sheet of wood and the three brewing vessels are connected on using plastic pipes and jubilee clamps. I live in a house where no room was planned for the brewery . . . so it all has to go away afterwards, hence the detachable design !
In the absence of photos, my 3D model is as follows :-