|
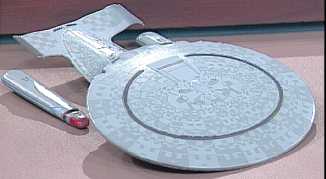
3 Enterprise Set, TOS, A & D
(Eventually a full set of 1/2500 Enterprises)
Here's how I got started: |
|
|
|
|
 |
|
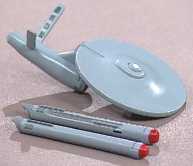
Start by cutting the parts from the sprue and gluing
the main components together. Glue all the warp nacelles, hulls, and saucers
together. Then clean up the flash at the edges of all the pieces. Cleaning the
flash after gluing makes it easier to make sure both halves are
symetrical and also leaves less of a gap to be filled later. |
 |
|
Most of the parts look good, especially the TOS
Enterprise, but the raised lines on the hulls are way out of scale, although
their placement is nearly perfect. Most people wouldn't worry about this, but
then we're not most people, are we? I started the cleanup by sanding off the
raised lines for the windows of the TOS Enterprise with the plans of painting
them on later. I ended up going with my own decals for almost all of the detail. The other ships are a little more involved. |
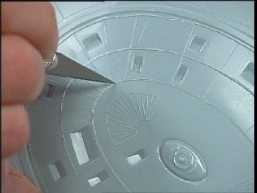 |
I began scribing the lines on the A and D using an exacto knife with the tip broken off. The raised lines were so
huge that it
really was one of the easiest scribing jobs I've done.
|
 |
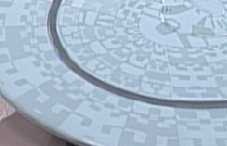
Then I used a 400 grit sandpaper to sand off the
raised lines, and finished up with some 1000 grit to smooth the surface. |
 |
Then, using a scribing tool, I cleaned out the lines
and got rid of any little plastic bits hanging around. It looks so much better
now! |
|
Next up was the task of puttying and sanding the seams. This took a lot less
time than I expected. It all went pretty smooth, smooth being our goal, of
course.
While this was going on I was also in the process of making decals for all of
the lifeboats and 1,000 or so windows on the E-D. Wow! What a job! I scanned in
the instruction sheet from the large E-D kit and used that as a starting point.
With some help from Photoshop I began to recreate the windows in 1200dpi so that
they print out nice and clean on a 600dpi laser printer. Thanks to Larry
Wherthey I ended up printing on an ALPS printer with white for the windows! They
really turned out great! More on that later...
|
 |
|
Next, all the parts were primed and the saucers
were glued on. The seams around the necks were filled and smoothed. Then all the
parts were lightly sanded with 1000 grit to smooth out the primer.
I like to paint the detail areas first, then mask them off and paint the main
colors. Here I've painted the phaser strips and started on the warp engines.
|
 |
|
Here
I've masked off the phaser strips and the main deflector. The impulse and warp
engines are also masked off, but I didn't get any pictures of those. Sorry. A
base coat of a blue-gray was then sprayed on the whole kit. The TOS Enterprise
was also sprayed the same blue-gray. |
 |
|
While the paint was drying on the TOS and the D I
began painting the aztec pattern on the A. Using white with a slightly blue tint
I began painting the paneling by hand with a fine brush. I painted the aztec
pattern on the saucer and a random checkered pattern on the engineering hull.
The warp engines got a vertical checker pattern. The effect is very subtle per
panel, but it gives it a nice scale to the whole kit and really didn't take too
long. (By the way, the color in this picture is slightly altered to make the
aztec pattern show up better!) |
 |
After The paint had a few days to dry I began the
task of masking off the panels on the D to paint an alternate color. I took a
half ounce of the original color and mixed about six drops of a grey-green with
it. This color will hopefully be very subtle, but show up enough to give a large
scale feel to the very small scale D.
|
|
Throughout this I was always working on the decals with my spare time. The
decals for the windows on the top of the saucer were complete and I was just
starting on the lifeboats. Then there was still the saucer bottom and enginering to tackle.
Whew! |
 |
|
I removed the masking and began to paint the aztec
pattern by hand. Even the large checkerboard pattern looks pretty good, but once
the aztec paneling began to take shape it really took on a large scale
look. |
 |
|
Here's the aztec paneling finished! It took about 5
hours to do which was much less time than I thought. I have to admit that 1/2500
scale is starting to grow on me! It takes less paint, less tape, and in some
cases less time. |
 A close up look at the paneling. Cool,
Huh? |
 |
All
the detail painting was completed on the TOS Enterprise in a few minutes. The
decals I made will add the rest of the windows and hull
markings. |
 |
|
I finally finished my decal sheet and here's the
first test of the windows on the engineering hull of the Enterprise-D. They look
fantastic! A big thank you to Larry Wherthey for printing them for me! They will
probably take longer to apply than it took me to paint the aztec
pattern! |
|
|
|
|
|
|
|
I got the set of the B, C and E and began working on them as soon as I could.
I made some lifeboat decals for the C and used decals from Thomas Models for the
E.
So fast forward a few years and I was finally about to finish the entire set
of all six enterprises in 1/2500 scale. Then along comes "Enterprise" with the
NX-01. What's a dedicated modeler like me to do? I decided to scratchbuild the
NX in the same scale as the others. This only took me about 9 months! (did I
mention I have two kids now?)

Here's the final NX-01 scratchbuild. You can buy a kit of this from my other
site: Sci-Clone
So finally in 2002 I finished my set of Enterprises and took them to Wonderfest.
StarshipModeler.com took a great picture of the final display.

Now I can sleep...
|
|
|
|
Please check out my other web site:

last updated March 2003
|