
 Site Info Home Whats New Company Info Dealer Info Product Info What is Aran Products General Order Info Order Contact Us Site Info Home Whats New Company Info Dealer Info Product Info What is Aran Products General Order Info Order Contact Us |
| The Aranizer™ HVAC1 and 2 are designed to install into the ductwork after the heating plenum ot main HVAC unit. |
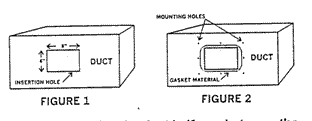
1. A 6" X 8" hole must be cut in the ductwork for the Aran™ generator to be inserted. (See Figure 1) This hole shoule be made, if possible, as far from the heating plenum or HVAC unit as possible without necessitating the use of additional wiring conduit. A 6 Ft. length of flexible wiring conduit is provided. Installer must provide additional wiring conduit if necessary! |
2. Use the Aranizer™ mouonting plate as a template for drilling mounting holes by inserting the Aran™ generator into the duct and pushing the mounting plate flush with the duct. Mark the hole locations with a graphite pencil, felt tipped pen or etching needle. After marking all the holes, remove the Aranizer&trade and carefully drill the 3/32" pilot mounting holes in the duct. |
|
3. Use the provided gasket material to line the duct half way between the mounting holes and insertion hole. (See figure 2) |
4. Insert the Aran™ generator into the duct making sure to hold the mounting plate level with the mounting holes. Make any fine adjustments quickly and secure tightly with the provided mounting screws. |
5. Make sure the control knob on the Aranizer™ is turned fully counterclockwise ("OFF") before beginning any wiring. The Green (GROUND), White (COMMON) and Black (HOT) leads coming from the the Arnaizer™ are to be wired to the junction box. The Installer must provide additional wire for connection to the fan relay! Connecion to the fan realy is necessary for the Aranizer™ to operate only when needed. |
6. Double check the mounting and wiring before operating the Aranizer™. |
7. Start the Aranizer™ on a "LOW" setting initially and turn up as needed or desired. |
8. Enjoy the cleaning and refreshing benefits of your new Aranizer™. |

AranTM, AranizerTM, AranairTM, and AranaireTM, are trademarks
and cannot be used without written permission.