Connecting to a PPP or SLIP Account with Windows NT
- Installing RAS
Installing Network Protocols
Setting Up a Dial-Up Networking Connection
Customizing Your Dial-Up Connection
Configuring the Basic Settings
Specifying the Server Type
The All-Important TCP/IP Settings
Setting the Logon Options
Connecting to Your ISP
Using Dial-Up Networking Scripts
Setting Up a Script for an Internet Connection
Learning Dial-Up Scripting
Troubleshooting Your Dial-Up Connection
Connecting to a PPP or SLIP Account with Windows NT
Like Windows 95/98, Windows NT can connect to the Internet through a modem link to an Internet service provider (ISP) and connect to the Internet through a local area network (LAN).This section concerns itself with an Internet connection through an ISP, although it's also possible to get Internet access indirectly by connecting to a LAN that is connected to the Internet.Windows NT Workstation 4.0 includes built-in software that allows your computer to dial up your ISP and make a connection to the Internet. This enables you to use Internet applications such as a Web browser.
Windows NT’s Remote Access Service (RAS) software provides the means to dial your ISP and make a connection to the Internet. To use this kind of connection, you must configure RAS to handle the Internet's TCP/IP network protocol to dial your ISP and connect your system to their network. And, of course, you’ll need a properly installed and configured modem.
Windows NT supports the standard connection protocols needed by ISPs, including the Serial Line Internet Protocol (SLIP), the Point to Point Protocol (PPP), and the Password Authentication Protocol (PAP) variation of PPP. In addition, Windows NT can automate the connection process using dialing scripts.
RAS is the built-in Windows NT component that handles dialing and answering calls, and making network connections via modem (or direct cable). The software can do more than just make a connection to an ISP. However, since this document is devoted to making a dial-up Internet connection, we'll limit our discussion to that aspect of RAS. RAS is part of the normal Windows NT installation. Typically, you won't need to do anything to add the software to your system. You do, however, need to configure RAS to use the TCP/IP network protocol and set it up to connect to your ISP.
You can confirm that RAS is installed on your system by opening the Network control panel (Start, Settings, Control Panel, Network) and clicking the Services tab. RAS should be listed along with the rest of the network services, as shown in Figure 2.1.
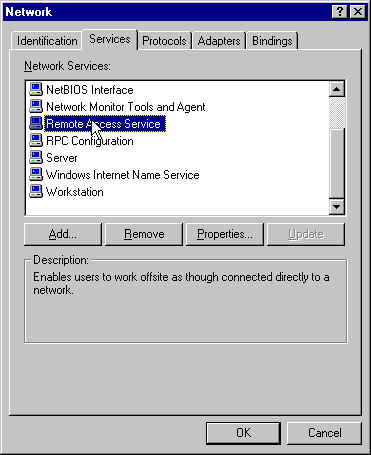
FIG. 2.1
The Network dialog box showing RAS already installed.If RAS is not already installed, you can click the Add button to open the Select Network Service dialog box shown in Figure 2.2. Click the Remote Access Service item in the list and click the OK button to install the software. NT may ask you to supply the system CD or floppy disks.
Back in the Network dialog box, select Remote Access Service and click the Properties button to open the Remote Access Setup dialog box shown in Figure 2.3. (If you've just installed RAS, this dialog box opens automatically.)
The list should show RAS attached to your modem. If not, you can click Add and then click Install Modem to start the modem installation wizard to complete that portion of the setup task.

FIG. 2.2 Installing Remote Access Service.
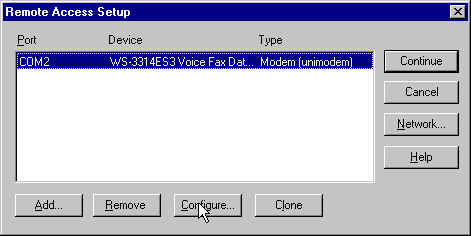
FIG. 2.3 The buttons allow you to configure Remote Access Service.
Click the Configure button to open the Configure Port Usage dialog box shown in Figure 2.4. You can configure RAS to make calls, receive calls, or both. For normal Internet access, you can choose the Dial Out Only option. (If you have needs other than Internet access that require receiving calls as well, choose Dial Out and Receive Calls.) Click OK to return to the Remote Access Setup dialog box.
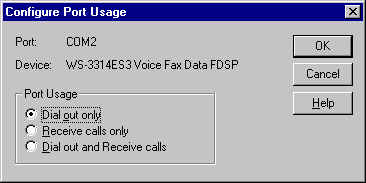
FIG. 2.4
For calling your ISP choose Dial Out Only.Next, click the Network button to open the Network Configuration dialog box shown in Figure 2.5. (The figure shows the dialog box as it appears if you elect to use RAS for dial out only. Additional options appear in the dialog box if you chose to configure RAS to receive calls also.) Here you can specify which network protocols RAS can use.
For normal Internet access, choose only the TCP/IP option. (Check other options only if you have specific needs for the other protocols.) Click OK to close the Network Configuration dialog box and then click Continue to close the Remote Access Setup dialog box.

FIG. 2.5 You need to choose only TCP/IP for Internet access.
Having RAS installed to make the connection between your computer and the Internet won't do much good if your system can't speak TCP/IP - the language of Internet. So you'll need to make sure the TCP/IP network protocol is installed on your system.
Open the Network control panel (Start, Settings, Control Panel, Network) and click the Protocols tab to view the list of network protocols installed on your system. If the TCP/ IP protocol doesn't appear in the list, click Add to open the Select Network Protocol dialog box. Select TCP/IP from the list and then click OK. Supply the system CD or floppy disks when NT requests them.

FIG. 2.6
If you plan to use the Internet, you'll need to have the TCP/IP protocol installed.Don't be concerned about configuring TCP/IP properties such as IP address, DNS server settings, and such. Later, when you define a Dial-Up Networking phonebook entry for your ISP, you'll have the opportunity to enter those settings for each phonebook entry.
A network protocol must be linked to an adapter or service for it to be used with that adapter or service. These links are called bindings. When you install a network protocol, NT automatically links the new protocol to all available adapters and services. But you can disable some bindings to restrict the flow of data through your system.
You need to make sure the TCP/IP protocol is available to the RAS. To confirm the status of the bindings for the TCP/IP protocol, click the Bindings tab in the Network control panel dialog box. NT displays status messages as it checks the bindings between protocols, adapters, and services on your system and displays them in the list in the Bindings tab (see Fig. 2.7).
Select All protocols from the Show bindings for list box, then expand the TCP/IP entries (TCP/IP Protocol and WINS Client). Make sure the Remote Access WAN Wrapper option is enabled under each one. If you don't plan to use TCP/IP with your other network adapters, you can disable those options. In fact, for security and performance purposes, it's a good idea to do so.
If you're knowledgeable about network configuration, you can enable and disable other bindings to fine tune the configuration and then click OK. Windows NT stores your bindings and prompts you to restart your computer so your changes can take effect.

FIG. 2.7
Make sure the bindings link Remote Access Service to the TCP/IP protocol.Setting Up a Dial-Up Networking Connection
Once you have RAS and the TCP/IP protocol installed, the preliminaries are out of the way and you can get on with setting up a dial-up connection to your ISP. But first, you'll need to obtain the following information:
- The type of connection supported (SLIP, PPP, or PPP with password authentication)
- The phone number to dial
- Your IP address (if it is permanently assigned)
- Your full Internet domain name
- The IP addresses of all DNS servers
- The IP address of the service providers' gateway machine or router
- Your login name and password
- Modem configuration details
ISPs are in the business of helping users set up dial-up connections and should be able to provide all the information you need. Even if the ISP isn't experienced with configuring Windows NT 4.0, you shouldn't have any problem getting the needed information since it is the same as that needed to configure dial-up access with Windows 95/98 and other operating systems.
Dial-Up Networking is the name of the utility that handles your outgoing RAS calls and network connections. Dial-Up Networking keeps all the details about the way you connect to your ISP (or other dial-up connection) in a phonebook. Then, to make a dial-up connection, you can simply select a phonebook entry and click a button.
To create a Dial-Up Networking phonebook entry for your ISP, begin by double-clicking on the Dial-Up Networking icon in the My Computer window. If this is the first time you've accessed Dial-Up Networking, a small message box appears noting that you have no phonebook entries.
Clicking OK launches the New Phonebook Entry Wizard shown in Figure 2.8. (If the Dial-Up Networking dialog box appears, you can launch the wizard by clicking the New button.) Enter a name for your phonebook entry and click Next.
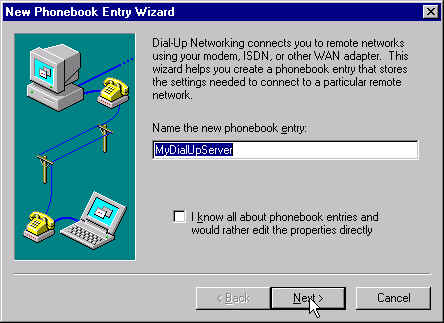
FIG. 2.8
The New Phonebook Entry Wizard automates the process of setting up a connection for your ISPOn the next page of the wizard (shown in Fig. 2.9), check the I am calling the Internet option. If your ISP supports Password Authentication Protocol (PAP) logons, check the second option as well. If, however, your ISP needs a manual logon or assigns static IP addresses, check the third option. Click Next to proceed.
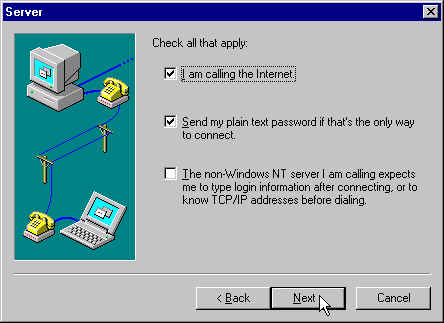
FIG. 2.9. Answer the general questions first.
The Phone Number page is where you enter the phone number you want your modem to dial. If you check the Use Telephony Dialing Properties option, Windows NT compares the number to your current dialing location at the time of the call and automatically adds long distance codes and outside line access numbers as needed. After entering the phone number, click Next.
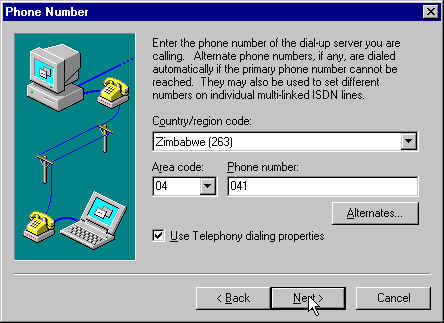
FIG. 2.10 Enter the phone number Dial-Up Networking should dial.
Depending on the choices you made on the Server page, the wizard may prompt you for more information, such as choosing the SLIP or PPP protocol and whether to use a script or terminal window for log in. Enter the information as requested. Then, when you reach the final page of the wizard, click Finish to add the newly defined entry to your Dial-Up Networking phonebook. Upon completion of the wizard, you return to the Dial-Up Networking dialog box, as shown in Figure 2.11.

FIG. 2.11 The starting point for Dial-Up Networking.
Customizing Your Dial-Up Connection
The information you enter when using the New Phonebook Entry Wizard may be all that's needed to get you connected to your ISP However, you may need to fine-tune the configuration settings for an entry to make a successful connection or to get better performance.
To edit the connection settings, choose the phonebook entry in the Dial-Up Networking dialog box, click More, and choose Edit entry and modem properties. This opens the Edit Phonebook Entry dialog box shown in Figure 2.12.
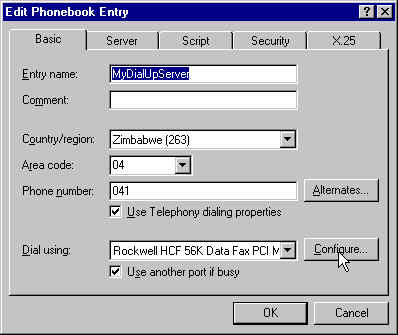
FIG. 2.12
Customizing the phonebook entry.Configuring the Basic Settings
The settings on the Basic tab allow you to edit the entry name, phone number, and so on. If your ISP has more than one phone number available, you can click Alternates to open a dialog box where you can enter alternate phone numbers.
If Dial-Up Networking can't connect to the main phone number, the software automatically attempts to call the other numbers on the list. Near the bottom of the dialog box, you can choose a modem from the Dial Using drop-down list box.
Click Configure to open the Modem Configuration dialog box shown in Figure 2.13. Here you can adjust modem settings for use with this connection. If you have trouble with connections to your ISP, the ISP's technical support staff may suggest changing some of these settings for compatibility with their modems.
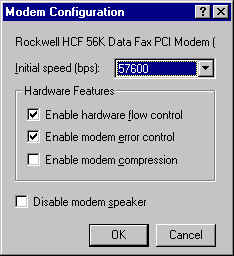
FIG. 2.13
These modem settings apply when using the selected Dial-Up Networking phonebook entry.NOTE
Note that some general modem settings are changed from the Modem control panel. Options such as disabling call waiting, using a calling card, pulse or tone dialing, and others are configured from this control panel.Click the Server tab to bring up the page shown in Figure 2.14. The first option on this page is the Dial-Up server type. The default is PPP: Windows NT, Windows 95 Plus, Internet. This is the setting you should use for most dial-up Internet connections.
It handles connections to PPP accounts needing manual logons as well as accounts with automatic password authentication (PAP or CHAP). Your other choices are SLIP: Internet and an option for connecting to older Windows systems.
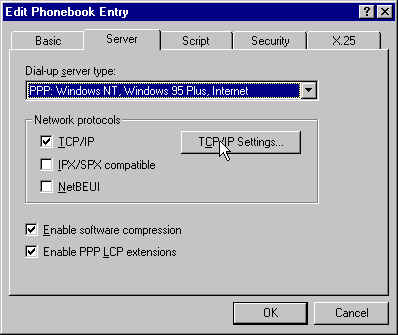
FIG. 2.14
Tell Dial-Up Networking about the server you want to connect to.TIP: Many ISPs support both SLIP and PPP connections. Since PPP offers error correction and data compression, you should use it if possible. Check with your ISP to see if PPP is available to you before settling for SLIP as the server type.
In the Network protocols section of the Server page, make sure the ICP/IP option is checked. Normally, for an Internet connection, that is the only protocol that should be active. You should disable the IPX/SPX Compatible and NetBEUI protocol options.
The All-Important TCP/IP Settings
To configure the TCP/IP settings for this connection, click the TCP/IP Settings button. This opens the PPP TCP/IP Settings dialog box shown in Figure 2.15.
Typically, an ISP automatically assigns an IP address to your computer when you log on. The address is temporary - good only for the duration of your connection and returned to the ISP's pool of available IP addresses when you log off.
Choose the Server Assigned IP Address option to configure your connection to accept dynamic addresses. On the other hand, if your ISP has assigned your system a permanent IP address, you should choose Specify an IP address and enter the address into the space provided.
Most ISPs maintain one or more name servers. By default, Dial-Up Networking is configured to get the address of the name servers from the server when you connect. However, if your ISP provides you with the specific addresses of its name servers, you can choose Specify Name Server Addresses and type in the addresses. (Although most ISPs have DNS servers, few have WINS servers as well. Consequently, you will normally leave the WINS settings blank.)
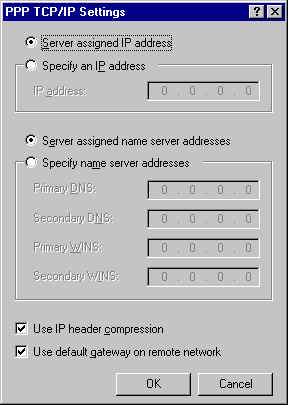
FIG. 2.15
If your ISP assigns you a permanent IP address, enter it here.The last two options in the dialog box - Use IP Header Compression and Use Default Gateway on Remote Network can usually remain in their default (checked) state. Change them if instructed to do so by your ISP.
If you have trouble connecting, you might want to try deactivating the Use IP Header Compression option. When you are through editing the TCP/IP settings, click OK to close the PPP TCP/IP Settings dialog box and return to the Server tab of the Edit Phonebook Entry dialog box.
Back on the Server page, you'll find two more options—Enable Software Compression and Enable PPP LCP Extensions. You can usually leave both options enabled unless instructed by your ISP to make changes. You might also try disabling one or both options if you have trouble connecting to your ISP.
If your ISP requires you to manually log on to their system activating your SLIP or PPP connection, you'll need to tell Dial-Up Networking how to handle the logon procedure. Click the Script tab to display the page shown in Fig. 2.16.
To start with, you'll want to choose the Pop Up a Terminal Window option. This causes Dial-Up Networking to open a terminal window immediately after making a modem connection to the remote computer. You can use the terminal window to log onto the remote computer, then close it once your SLIP or PPP connection is completed.
Later, after you verily that your connection is operating properly with a manual logon, you can automate the process with a script. (Scripts are covered later in this section.) If you need to send commands to your modem before dialing, click the Before Dialing button to open a dialog box where you can elect to open a terminal window or edit scripts for that purpose.

FIG. 2.16
This page allows you to specify how to handle manual logon procedures.If your PPP account at your ISP supports password authentication, click the Security tab. Here you can specily the level of security applied to your password.
For normal Password Authentication Protocol (PAP) accounts, choose the first option (Accept Any Authentication Including Clear Text). If your account supports Challenge-Handshake Authentication Protocol (CHAP) and you want to ensure that your password is always sent in encrypted form, choose Accept Only Encrypted Authentication. The third option. Accept Only Microsoft Encrypted Authentication, doesn't apply to normal Internet access accounts.
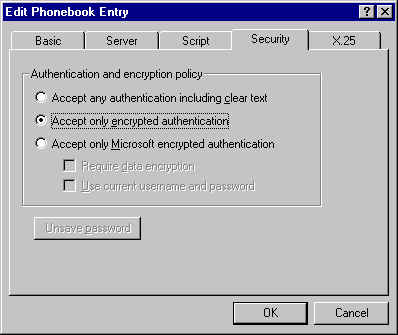
FIG. 2.17
You can enable encrypted passwords for a CHAP account.After adjusting the settings, click OK to close the Edit Phonebook Entry dialog box.
After you've set up and configured a Dial-Up Networking phonebook entry for your ISP, you're ready to test the connection. To call your ISP, open the Dial-Up Networking dialog box (double-click Dial-Up Networking in the My Computer window), choose the appropriate entry in the Phonebook entry to dial list box, and choose your dialing location from the Dialing From list box. (Click Location to create or edit the location if necessary. For instance, you might need to edit the Location setting if you need to specify dialing codes for outside line access or long distance calls.) Click Dial to start the call.
The first time you try to call a phonebook entry, Dial-Up Networking opens a dialog box (see Fig. 2.18) for you to enter the username and password needed to gain access to your account. Dial-Up Networking automatically enters the username you entered when you installed or logged onto Windows NT. You'll need to replace it with the user ID for your account with your ISP.
TIP: If you start a 32-bit Internet application, such as a Web browser , without first establishing an Internet connection, Windows NT will attempt to establish a dial-up connection for you using the default phonebook entry. The dialog box shown in Figure 2.18 will appear automatically.
When you type your password, NT displays asterisks to hide the password from prying eyes. For an Internet connection, you'll probably leave the Domain box blank. It's normally used only for connections to Windows NT networks via RAS servers.
If you want Windows NT to save your user name and password, check the Save Password option. If you do (and the connection is successful), this dialog box does not appear the next time you dial this phonebook entry Dial-Up Networking uses the saved user name and password instead. Click OK to proceed with the connection.

FIG. 2.18
Enter your user ID and password here.Once your username and password are entered, Dial-Up Networking displays a status message as it initializes your modem and dials the remote computer. When the remote computer answers, your modem negotiates settings (such as connection speed and error correction) with the remote modem.
Next, your computer's software attempts to talk to the remote software to establish the connection protocol (PPP or SLIP). How this connection is made depends on the type of remote computer and the protocol.
NOTE When you connect with the PPP protocol, there are two options for passing your password to the PPP server. These two options are PAP (Password Authentication Protocol) and CHAP (Challenge Authentication Protocol). If you have selected the Use Encrypted Password option for your connection, it forces the use of the CHAP protocol. If your service provider requires CHAP but you have not selected this option, you are asked to confirm the use of the encrypted password when you connect.
If you have a PPP account that supports password authentication, Dial-Up Networking attempts to log on automatically using the username and password you entered in the previous dialog box (or saved in your password file). On the other hand, if your ISP requires you to log on manually (and you configured Dial-Up Networking to open a terminal window as described in the previous section), the software opens a terminal window.
In this window, you can receive prompts from the remote system and respond by typing commands to log on to the remote system. If you must complete a manual log on, it usually consists of entering your username and password, and perhaps typing a command, such as SLIP or PPP, to start the connection protocol. Once the manual logon is complete, click Done to close the terminal window.
NOTE
After you have made sure your connection works correctly, you can automate the connection process by using dial-up scripting. Using a dial-up script allows you to automatically enter your username, password, and any commands. Dial-up scripting is discussed in the section "Using Dial-Up Networking Scripts," later in this document.Dial-Up Networking displays status messages as it negotiates the connection protocol and makes the Internet connection to the remote computer. Once the connection is completed, the message shown in Figure 2.20 appears.
Click OK to close the message box. Now your computer is connected to the Internet and you can use your Web browser, any of Windows NT's Internet tools, or other Internet applications.
FIG. 2.20
Success! Your connection to the Internet is complete.When you're ready to end your connection to the Internet, right-click the Dial-Up Networking button on the taskbar, point to Hang Up Connection on the menu that appears, and then choose the connection you want to end. Confirm your desire to disconnect by clicking Yes in the message box that appears.
Using Dial-Up Networking Scripts
If your connection requires that you type some information (such as your username, password, or protocol) in response to on-screen prompts before you can connect to your ISP's system), you can automate this process by using Dial-Up Networking's scripting capability. Unlike Windows 95 in which dial-up scripting is provided in the Microsoft Plus! for Windows 95 package, basic scripting is included in Windows NT's Dial-Up Networking software.
NOTE
Scripts aren't necessary for most PPP connections. Dial-Up Networking can automatically log onto a remote system that supports password authentication. Scripts are needed only to replace the manual logon that is required of SLIP accounts and some older-style PPP accounts.Setting Up a Script for an Internet Connection
The key to successfully automating the logon process with a script is carefully noting the exact procedure needed to log on manually. You must know what prompts appear on-screen and how you must reply to log on. Exact spelling and capitalization is critical!
Then you can create a script that waits for significant prompts and enters the appropriate text in response. You'll need to log on manually a number of times to determine exactly what prompts and responses should be included in the script.
To automate your logon with a script, start by opening the Dial-Up Networking dialog box (My Computer, Dial-Up Networking), selecting the phonebook entry you want to automate, and opening the Edit Phonebook Entry dialog box to the Script tab (More, Edit entry and modem properties, Script). Choose the Run This Script option and then select a script from the drop-down list box.
Initially, the Run This Script list box contains only a single item: Generic Login. This is a sample script that looks for prompts containing the strings "ogin" and "assword," and responds with the user name and password from the Connect To dialog box. While this script may suffice for some connections, you'll probably need to create or modify scripts for your specific needs.
To create or modify a script, click Edit Scripts. This opens the Dial-Up Networking script file (Switch.inf) in Notepad (see Fig. 2.21). The file itself contains instructions for its use.
In addition to the Generic Login script, the file contains a couple of other sample scripts that you can activate and use or modify. To create or modify scripts, simply edit the script file and save it.

FIG. 2.21
The Dial-Up Networking script file.Each script is identified by a heading: a name enclosed in square brackets. The heading is followed by commands, one to a line, to wait for certain prompts and enter responses. Any line that begins with a semicolon is a comment line and is ignored by the program.
The instructions appear in the file as comments and the sample scripts are disabled the same way. To enable a sample script, delete the comment character (the semicolon) at the beginning of each command line in the script.
The best way to learn how to use Dial-Up Networking scripts is to look at a couple of examples, The sample scripts in the Switch.inf file are hard to read because of all the comments surrounding the commands. So we have reproduced them here without the distracting comments:
[Generic login]
COMMAND=
OK=<match>"ogin: "
LOOP=<ignore>
COMMAND=<username><cr>
OK=<match> "assword: "
LOOP=<ignore>
COMMAND=<password><cr>
OK=<ignore>
[Login for YourLoginHere]
COMMAND=
OK=<match>"ogin: "
LOOP=<ignore>
COMMAND=YourLoginHere<cr>
OK=<match>"assword: "
LOOP=<ignore>
COMMAND=YourPasswordHere<cr>
OK=<ignore>
[Sample SLIP login]
COMMAND=
OK=<match>"ogin: "
LOOP=<ignore>
COMMAND=YourLoginHere<cr>
OK=<match>"assword: "
LOOP=<ignore>
COMMAND=YourPasswordHere<cr>
COMMAND=<cr>
COMMAND=<cr>
COMMAND=<cr>
COMMAND=<cr>
COMMAND=
OK=<match> "Home"
LOOP=<ignore>
COMMAND=SLIP<cr>
The [Generic login] script uses variables(<username>and <password>) to insert the user-name and password you enter in the Connect To dialog box into the script output. The other two scripts simply record your user name and password in plain text in the script.
To use these scripts, you replace YourLoginHere and YourPasswordHere with your own login name and password. You may also need to replace the text appearing in quotes following the <match> statements with the text of the prompts from your login procedure.
After editing the script file, save it and close the Notepad window. Then click the Refresh list button to force Dial-Up Networking to reread the file and add the scripts it contains to the Run this script list box.
TIP: There's more information on scripting in the RAS Help file. To display the Help file, Start, Run, then type Rasphone.hlp in the Run dialog box and click OK.
Once you specify a script, click OK to close the Edit Phonebook Entry dialog box. The next time you dial the Dial-Up Networking phonebook entry, the terminal window does not appear. Instead, Dial-Up Networking runs the script to perform the logon.
Troubleshooting Your Dial-Up Connection
A number of factors can contribute to problems with your Dial-Up Networking connection. A problem with your modem, phone line, ISP, or connection setup can all cause your connection to fail or work poorly. Even the smallest configuration detail can cause a mismatch between your system and your ISP.
One thing that can help you troubleshoot Dial-Up Networking connections is the information available in the Dial-Up Networking Monitor dialog box shown in Figure 2.22. To open the dialog box, right-click the Dial-Up Networking button on the taskbar and choose Open Dial-Up Monitor. The dialog box appears on top of the other open windows so you can monitor activity over your dial-up connection.
FIG. 2.22 The Dial-Up Networking Monitor dialog box provides a wealth of troubleshooting information.
Besides monitoring activity in the Dial-Up Networking Monitor dialog box, you can try the following solutions if your Dial-Up Networking connection isn't working properly.
If your modem does not dial at all when you try to connect to your ISP, first check to make sure you have the correct modem configured for your system. Open the Modems control panel and verify that the modem type reported is the same as the actual modem installed and that it's installed on the correct COM port. When you installed the modem, the wrong modem may have been detected; reinstall the modem with the correct type of modem.
If the modem is properly configured, check your phone connection to make sure the modem is connected to the phone line. You can also try dialing your modem manually using HyperTerminal or the Phone dialer application found under Programs, Accessories on your Start menu.
Your Modem Dials But the Other Modem Doesn't Answer
First, try the connection a second time to make sure that the problem wasn't only a temporary one. Make sure that you are dialing the right number for this connection. Verify the area code and any access codes that may be added to the phone number.
Depending on phone conditions (for example, if the phone system is particularly busy), you might need to add extra time after getting an outside line. Most modems allow you to add a pause by putting a comma (,) into the phone number.
If the phone number is correct, check with someone at the remote site to make sure their system is on and the modem is working correctly.
The Other Modem Answers But the Connection Fails
This is one of the hardest situations to diagnose and this is where most problems with dial-up connections happen. The first step is to verify that all your connection and modem settings are right, especially the settings for the remote server type.
Most ISPs have information packets for users listing all the correct settings for connections to their systems. Make sure you match these settings exactly.
If everything else checks out, the problem might be that the ISP does not allow LCP extensions. To disable LCP extension requests, select the phonebook entry in the Dial-Up Networking dialog box and open the Edit Phonebook Entry dialog box (More, Edit entry and modem properties). Click the Server tab and clear the Enable PPP LCP extensions option. Click OK to close the dialog box and try the connection again.
Internet Applications Don't Work
If your connection starts up but your Internet applications (such as a WWW browser or FTP program) don't work, first check your TCP/IP settings to make sure that they are right.
Again, select the phonebook entry in the Dial-Up Networking dialog box and open the Edit Phonebook Entry dialog box (More, Edit entry and modem properties). Click the Server tab and click TCP/IP Settings to open the PPP TCP/IP Settings dialog box.
Make sure the IP address and name server addresses are correct. If you still have trouble connecting despite having the correct addresses entered, try disabling the Use IP Header Compression option. Make sure the Use Default Gateway on Remote Server option is checked unless you have specific instructions to the contrary from your ISP.
Adapted from "Special Edition - Using the Internet" (Que ,1996)