|
POLISHING (V) For polishing, Pitch-lap and Cerium Oxide paste (or rouge) powder is used. Make a paste of cerium oxide powder. Pour Cerium Oxide (or Rouge powder) in some water so as to make a thick solution. Mix the powder thoroughly. Filter the whole solution through 2-3 layers of very fine cloth to remove dust or other smallest particles. Also feel the filtered solution. If it is giving coarser feeling then again filter it through more finer cloth. It should give much smoother feeling than the 1000 number/or MA 5/6 powder paste. If the CeO powder is rough. There is also another method to clean it. Pour some powder in 'A' half glass or cup of water. Mix the powder thoroughly, make not-so-thick solution, while shaking it, pour the solution in another cup/glass 'B', just leaving the quantity which seem coarser. Mix this coarser-residue with some water thoroughly and while shaking pour the solution in 'B' leaving the residue which seem highly rough. Again mix some water in this, make a solution and pour the solution in 'B', leaving the residue. Doing thus 2-3 times will segregate the coarser/rough elements which are not soluble and those may be thrown. Now clean the mixture in container 'B' in the same manner so that in this solution also if there are coarser/rough elements those could be segregated and thrown. Finally you will get a cleaned solution. Pouring the top-thin-solution of this in another container now the residue will be a clean thick paste. After some time when small-amount of thick-paste is settled in bottom of this top-thin-solution, the top water may be thrown and this paste is also useful in final polishing. The paste thus made, is to be used for polishing the Mirror. Remember highly cleaned paste is very necessary. Smallest coarser particles may make a scratch on the Mirror. Though it does'nt matter with some scratches, as they don't affect the quality of the Mirror's surface but too many scratches may destroy the Mirror and you will have to again go to either 320 or 220 grit grinding. If the CeO is of high quality the cleaning process is not needed. Directly a thick paste could be made and used. Making Pitch-lap : Pitch is a coal-tar like substance - not coal-tar. It melts very easily. It should be chewable, neither too brittle nor too soft. Take around 200gms of Pitch. Melt it very slowly by slowly heating. Don't boil it. Pour some melt-pitch drops into water and when cooled test its hardness. If with pressure, nail is not making imprint, pitch is hard and if with soft pressure it easily goes down, pitch is soft. Pitch should be of medium hardness. Finger-nail should go down the pitch around 1 mm but it should not go down very easily. If the pitch is on softer side there may come Turned-down edge on the Mirror surface. If on harder side, zones and scratches may appear. Hence medium harness pitch is always preferable for hand-polishing. Softer pitch may be made harder by adding Rosin in small quantity gradually and testing it until it is of proper hardness. Softer pitch may also be made harder by boiling it for sufficient longer time and testing it untill it is of proper hardness. Harder pitch may be made softer by adding Turpentine or softer-pitch gradually.
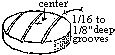
Smear the CeO paste over the Mirror and when the poured-pitch on Tool is slightly cooled down and getting half-hard, press it with this smeared Mirror (2nd illus). Press in such manner that surface of pitch and Mirror should come in perfect contact with each other. Take a blunt knife or an iron strip 3mm thick and 8-9 inches long. Press this on the pitch upto 4-5mm to make square channels of around 20mm size as illustrated in 3rd and 4th picture. The channels should be equal in dimension. There should be no channel in perfect centre i.e. the central channels should be slightly off-centre always (3rd illus). After making channels, immediately again press the again-paste-smeared-Mirror on pitch by pressure of palm to make a rough contact of Pitch and Mirror. As channels and squares will get deformed/distorted slightly, so again press the channels with iron strip and again press the paste-smeared Mirror over it so that there is a good contact/matching between pitch-lap and Mirror surface. Now cut the corners of the squares/channels with sharp knife/blade in such a manner that all squares and channels are almost of same size (around 20mm) and depth (around 4-5mm). See illustration 5th and 6th. After this clean the pitch-lap with water and some soft brush. Again press it with paste-smeared Mirror firstly by palm-pressure and then put some weight say 2 kgs. over it. Keep it in that way around one hour, so that pitch with all channels and Mirror are in perfect contact. Pressing can be given putting mosquito net between pitch and Mirror. By this Mirror is fast polished. While pressing, Mirror's surface should always be thoroughly smeared with cerium oxide paste over it otherwise the Mirror will stick with the pitch and damage the pitch channels thereby necessitating to make the pitch-lap again. VI) Having made the pitch-lap, now you have to give the same motion and
process to Mirror and Tool as indicated in detail in para (III) 1 to 8
inter-changing the position of Mirror and Tool and not caring for saggitta
but for proper polish and sphericity. Instead of grit-water mixute now you
have to pour CeO paste which should neither be too thick nor too dilute. If pitch is on right side then after every two-three hours you can shape the facets and channels so that these are of same size. Clean the pitch-lap with water and soft brush and again press the pitch by putting 2 kg weight over Mirror. After good matching again start polishing the Mirror. Complete polishing will take around 4 to 6 hours. The polishing process is same as grinding process described earlier in para (III) of making mirror. The polishing is a very important process wherein you have to be very cautious. The making of good astronomical mirror/lens depends on this process and quality of pitch. Take care: 1. That movement of either Mirror over Tool (MoT) and Tool over Mirror (ToM) is very smooth i.e. without any jerks or frictions at some places otherwise it will create zones. Try to feel the smoothness. If it is not smooth press the pitch again as described above for around half an hour. 2. If pitch is too hard the motion may not be smooth and zones and scratches over the Mirror may come. It is said, if the pitch facets and channels deform after one hour of polishing, the pitch is on softer side, if around 2 hours, it is fairly good and if it takes 3 or more hours or pitch facets don't deform, the pitch is on harder side and in that case you have to make fresh pitch and facets. It is also said that pitch on very slightly softer side is better, as after some time pitch tends to be going on harder side. 3. The motion should never be too fast, jerky or too slow. 4. Try to be between ¼ and 1/3 diameter long strokes. Never exceed it. 5. The smoothness should start from the center of Mirror not from its sides. If it is so, the Mirror is not a perfect sphere it is on oblate side. After complete polishing the Mirror should give a glare of normal polished glass. It should reflect around 4 to 8 per cent light. The Mirror is regarded fully polished when its edges/corners are also clearly polished and are giving reflection of the bulb-filament with the same intensity as in centre. If the edges are not properly polished right beneath the bulb you will clearly see rough surface or the intensity of the reflection will not be as much as in the centre. So you have to continue polishing process until the edges are also fully polished. Sometimes during coarser or fine-grit grinding, small pits remain. If it
is so, these small pits will never be polished after hours of polishing
process and you will have to leave that portion. So, you have to be very
attentive and see when chaning over to finer grits that all pits specially on
the edges of the Mirror are of same size, otherwise at polishing stage these
pits will create difficulty and will either not be polished or take longer
than normal time After full polishing of the Mirror now you have to test if it is fully spherical and without zones. |