Build This Low Cost 1/2 H-Bridge
How To Hook Up The Receiver To The Controller
The "VEX" reciever comes with a yellow cable. Plug the cable into the "VEX" reciever, the other end of the cable plugs into the telephone handset jack.

Since I will not know the colors of the wires coming out of your jack; I will referent the yellow cable wires.
If you bought the jack from us then:
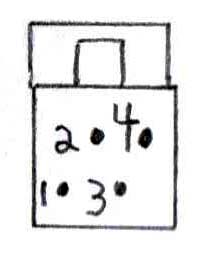
pin 1 on the jack is connected to the yellow wire of the cable.
pin 2 on the jack is connected to the green wire of the cable.
pin 3 on the jack is connected to the red wire of the cable.
pin 4 on the jack is not used.
If you look at the yellow cable you will see 4 wires which are yellow, green, red and white. The yellow wire gets wired to + 5 volts on the solderless breadboard. The green wire is the signal and it gets wired to the 1K ohms resistor which gets wired to pin 6 on the controller chip. Wire a 10K ohms resistor to the +5 volts. The other end gets wired to pin 6. The red wire gets wired to ground on the board. The white wire is not used.
You need to wire the controller's pin 14 to pin 2. This lets you use button ch 6 to give the motors a high and low power range.
You need to wire a 1K ohms resistor to + 5 volts on the board. The other end of the 1K ohms resistor goes to controller's pin 39, 40, 7 & 33.
NOTE: If you plan to run the robot from a microcontroller or computer as well as from the remote then you do not need to wire controller's pin 7 & 33 to the 1K ohms resistor. See next page.
Next Page
Home Page