
Here are a few examples of the TOMY Toys. Small wind up toys that can be found at novelty toy stores. Notice the extracted Tomy timer in the foreground.

Here is a close up of the Tomy timer with a paperclip wire glued into the twist knob. I had to use a Dremel drill to get a hole small enough. I used the other pieces of the paperclip to attach a cardboard anchor plate.
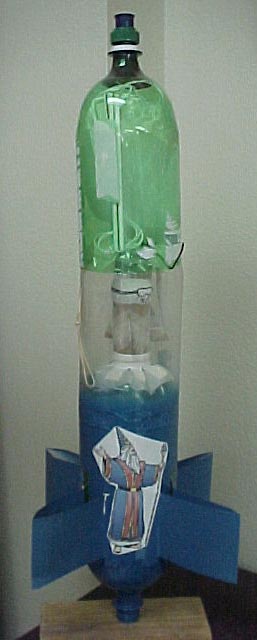
This is a completed rocket. This rocket follows the "Bertha" design series. It uses a Tomy timer to release the nosecone. You can see the parachute underneath. You can also see a raw egg pilot in the cargo bay. This rocket was launched many times in the spring of 2000, with never an injury to the egg or the rocket itself.
This rocket neatly shows the differrent sections. The pressure chamber (blue), the cargo bay (clear), and the nose cone/parachute assembly (green).
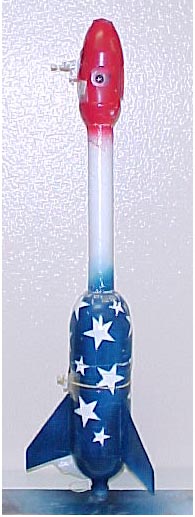 This rocket is named The Stars and Stripes Forever. This rocket follows the space needle design
scheme. Launched in the Spring of 2001 it reached an altitude
of 422 feet. However, the crowning achievement of this rocket
launch was the placement of an on-board 35mm camera that took
pictures in flight. See below for more photos and the aerial photograph.
This rocket is named The Stars and Stripes Forever. This rocket follows the space needle design
scheme. Launched in the Spring of 2001 it reached an altitude
of 422 feet. However, the crowning achievement of this rocket
launch was the placement of an on-board 35mm camera that took
pictures in flight. See below for more photos and the aerial photograph.
 This is a close up
of the nose cone minus the upper nose cone shield. I used a large
TOMY timer to activate a $10 camera. I found this transparent
plastic camera and gleaned the knowledge of it's inner workings.
I then carefully disassembled the camera and installed a metal
hook (paperclip) onto the shutter release lever. The metal hook
exits the camera through a small hole drilled in the base of the
camera housing. The TOMY timer then pulls on a loop of string
and eventually activates the shutter.
This is a close up
of the nose cone minus the upper nose cone shield. I used a large
TOMY timer to activate a $10 camera. I found this transparent
plastic camera and gleaned the knowledge of it's inner workings.
I then carefully disassembled the camera and installed a metal
hook (paperclip) onto the shutter release lever. The metal hook
exits the camera through a small hole drilled in the base of the
camera housing. The TOMY timer then pulls on a loop of string
and eventually activates the shutter.

 This is my rocket entry for 2002. I based it on the Tang 4 experimental design. This rocket takes off then jettisons the booster with the aide of a Tomy timer. The glider is released and spirals back down the the launch site. I launched this rocket four times and had a good launch each time.
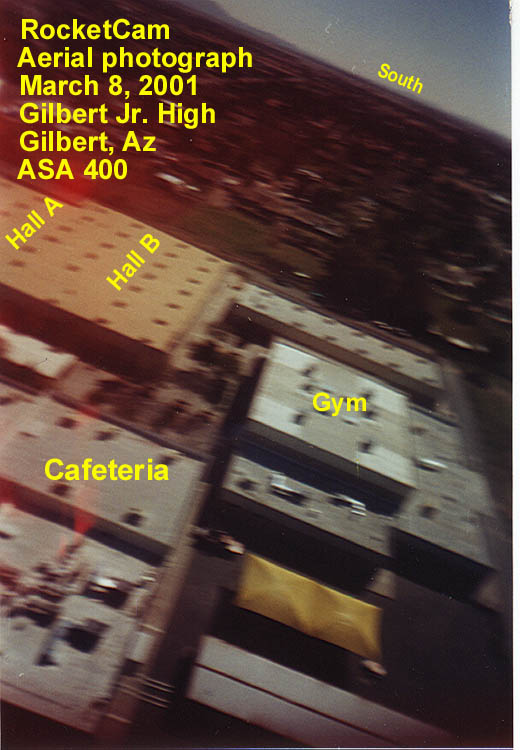
Before you gaze at the ROCKETCAM pictures, let's take a moment to gain a little perspective. First of all, please remember that these pictures were taken at an impressive altitude within a moving platform. That being said, the pictures are out of focus and blurred. However, the quality of photograph is good enough to make out landmarks and objects on the ground. You will also notice that some photos have been sun-washed. This is because on the final flight of the rocket, the parachute system failed and cracked the camera letting sun light expose portions of the film. Click on the links below to access the ROCKETCAM photos. Enjoy.
Photo 1: A shot of the NW corner of the school and surrounding neighborhood.
Photo 2: A shot of the SW corner of the school and surrounding neighborhood.
Photo 3: A shot of the swimming pool and surrounding neighborhood. Notice the cloud layer and how close the rocket came to taking a picture in the cloud.
Photo 4: A shot of the outdoor basketball court.
Photo 5: A shot of the campus. All buildings except for the 300 building and main office can be seen.
Photo 6: A shot of the football field and bleachers.