
I wouldn't recommend that the first time rocketeer try these advanced designs but I wouldn't want to leave them out for selfish reasons.
SCREAMIN' SLEEVE **New for 2003!!!**
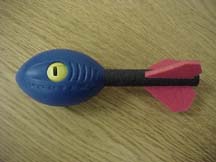
Add a whistling "scream" special effect to your rocket with a few add ons.
I found a "Vortex" foam football in the toy isle of a local department store. Some of these footballs have several "Howler" buttons in them that whistle when you throw them. Simply remove the buttons from the foam ball. You may have to pull hard, because they are glued into the foam. Cut small holes into a 2 liter sleeve you made and hot glue the buttons into the openings. Finally, attach the SCREAMIN' SLEEVE to the top of your pressure chamber.
 Double
Rocket/ 4-Liters of Fury
Double
Rocket/ 4-Liters of Fury
The first advanced project is a double pressure chamber. This double rocket is a 4-liter dynamo. Two 2-liter bottles are joined by a small piece of 1/8 inch threaded lamp rod. I found several versions of these plans online, but the best, and I suppose the original plans should be credited as "The Robinson Coupling". The hardest part of this project is sealing the joint where the couple is located. The air pressure inside the container needs to hold at 100 psi. I have found that PL Premium Construction adhesive is flexible and strong enough to hold the seal. Be patient, the adhesive needs at least 24 hours to cure. Don't pressure test until then.
The coupler can be made one of two ways. Either by joining bottom to bottom, or bottom to top. I will describe the second of the two.
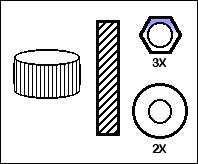
PARTS LIST:
(1) 1/8 in X 2 inch Threaded Lamp Rod
(3) Lamp Rod Hex Nuts
(2) Nylon Washers
(1) 2 liter bottle cap
Teflon tape
Building the "Robinson Coupler"
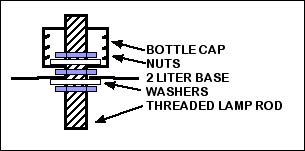 Start
by carefully drilling a 1/8 in hole in the bottom of the 2-liter pressure
chamber and the bottle cap. The lamp rod should just barely fit into the
holes. Be careful not to remove the blue plastic gasket at the bottom of
the bottle cap. (It will help seal the joint in the end.) Dry fit all parts
to make sure it will work before you go any further.
Start
by carefully drilling a 1/8 in hole in the bottom of the 2-liter pressure
chamber and the bottle cap. The lamp rod should just barely fit into the
holes. Be careful not to remove the blue plastic gasket at the bottom of
the bottle cap. (It will help seal the joint in the end.) Dry fit all parts
to make sure it will work before you go any further.
Wrap the entire length of the lamp rod with a couple layers of Teflon tape. Thread one of the hex nuts onto the stem of the lamp rod until you get to the half way point. Set aside.
Carefully push the first nylon washer into the neck of the main pressure chamber. You will need to use a socket and wrench with one or two socket extensions to reach the bottom of the bottle. Balance a nut and the washer on the head of the socket and place the threaded lamp rod into the hole from the top down. With the skill of a surgeon, drive the nut and washer onto the rod. Tighten with a wrench on the outside surface. (At his point you could add a small dab of PL Premium Construction Adhesive to seal. PL cures with the water vapor in the air. So, if you get it on your fingers, don't try to wash it off with water. It will just set faster. You will need to use a solvent, like paint thinner.)
It will be necessary to shave down the second nylon washer to fit inside the bottle cap. The second bottle must be able to screw into the cap all the way down to the gasket. Sometimes the washer sticks out too much. Apply the washer and the nut and test fit the second bottle to make sure it seats well. If the second bottle sits crooked, then it is hitting the washer. Remove assembly and shave the washer again. Once you have the right fit, tighten the entire assembly.
 Tomy
Timer
Tomy
Timer
The second advanced project is an automatic parachute
release timer. Taken again from the vast resources on the net, this project
utilizes the "guts" from a small wind up child's toy. Many of these toys
were made by the TOMY corporation, hence the name Tomy Timer. Find a wind
up toy and carefully crack it open. Remove the nickel sized timer package
from the toy case. You can remove the extra cams from the surface of the
timer, but don't cut the main winding shaft.
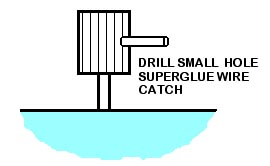 With
a very small drill bit, drill a hole into the plastic twist knob. Superglue
a small wire (paperclip) piece into the hole. This will serve as the loop
catch for the timer system. Next use straight pins to attach the timer
to a small section of plastic bottle scrap or cardboard. This will serve
as a platform to anchor the timer to the side of the rocket.
With
a very small drill bit, drill a hole into the plastic twist knob. Superglue
a small wire (paperclip) piece into the hole. This will serve as the loop
catch for the timer system. Next use straight pins to attach the timer
to a small section of plastic bottle scrap or cardboard. This will serve
as a platform to anchor the timer to the side of the rocket.
 Next
cut a small thin wedge from a scrap piece of bottle plastic. Use this to
slip inside the gear box and jam the gears. This will allow you to wind
the timer, but not let the timer spin down. The gear slip will be tied
to the launcher and get pulled out once the rocket leaves the launch pad.
Next
cut a small thin wedge from a scrap piece of bottle plastic. Use this to
slip inside the gear box and jam the gears. This will allow you to wind
the timer, but not let the timer spin down. The gear slip will be tied
to the launcher and get pulled out once the rocket leaves the launch pad.
How to use the timer
I like using this timer in two ways. You can either build
a side mounted parachute (my personal favorite) or use the timer to physically
release the nose cone.
A side mounted parachute system uses the fins to hold
the parachute to the side of the rocket. Tape a rubber band to the bottom
of one of the fins. Stretch the rubber band diagonally upward over the
folded parachute. Then loop the rubber band over the top of the second
fin. Tie a small piece of string to the end of the rubber band and then
tie a small loop at the end of the string. Wind the timer with the gear
slip jammed in the box. Put the string loop around the timer knob and over
the loop catch. The more turns you take, the longer the timer will hold
the chute in position. After the gear slip is removed, the timer will turn
down and at some point the string loop will slip off the loop catch. The
elastic band springs away and releases the parachute.
 The
nose cone release method uses a shock cord (large rubber band) to pull
the nose cone off the top of the rocket. First we need to alter the nose
cone. With a hole punch, punch two holes in the nose cone about 1 inch
from the bottom edge on opposite sides of the cone. Bend a couple of paperclips
so that you make a letter "T" from them. From the inside of the cone, push
the bent paperclip through the hole you made.
The
nose cone release method uses a shock cord (large rubber band) to pull
the nose cone off the top of the rocket. First we need to alter the nose
cone. With a hole punch, punch two holes in the nose cone about 1 inch
from the bottom edge on opposite sides of the cone. Bend a couple of paperclips
so that you make a letter "T" from them. From the inside of the cone, push
the bent paperclip through the hole you made.
 Apply
a piece of tape to the back of the clip to hold it in place. Do the same
for the other hole. Next, build a hinge for the nose cone. Take a 4 X 2
inch strip of chipboard or posterboard and fold it sharply in half. Place
the fold on the bottom edge of the cone, under one of the holes you made
earlier. You might have to trim the hinge to fit. Tape it securely to the
cone. Place the cone on the rocket body and be sure it sits lightly of
the top of the rocket. Use tape to secure the lower part of the hinge onto
the rocket body.
Apply
a piece of tape to the back of the clip to hold it in place. Do the same
for the other hole. Next, build a hinge for the nose cone. Take a 4 X 2
inch strip of chipboard or posterboard and fold it sharply in half. Place
the fold on the bottom edge of the cone, under one of the holes you made
earlier. You might have to trim the hinge to fit. Tape it securely to the
cone. Place the cone on the rocket body and be sure it sits lightly of
the top of the rocket. Use tape to secure the lower part of the hinge onto
the rocket body.
Mount the timer low on the rocket body opposite of the
hinge. Turn the rocket over and work on the side opposite of the timer.
Tape a large rubber band to the bottom of the rocket. Stretch the rubber
band up to the hole you made in the nose cone and attach the rubber band
to the hinge side paperclip. Test the hinge you made. The large rubber
band should pull the nose cone back exposing the parachute bay. If the
nose cone doesn't flip off, then adjust the stretch of the large rubber
band to loosen or tighten the system. Now create a counter resistance pull
on the timer side of the rocket. Tie a small piece of string to a medium
rubber band. Tie a loop in the string to wrap around the loop catch. Attach
the medium rubber band to the opposite side of the nose cone via the other
paperclip, then pull the rubber band down to reach the timer. Adjust the
tension of the counter resistance by shortening or lengthening the string.
Wind the timer, and wrap the string around the twist knob. Place the string
loop over the loop catch.