 The Square Chute
By now you may have spent several hours building the rocket of your dreams. It may not be completely obvious to you yet, but as the old saying goes, what goes up... must come down. It's time to think about saving all that precious work by creating a recovery system for your rocket. Here are a few ideas to get you started. Fins have been removed for clarity. (Note: you may substitute "crepe paper streamers" for "parachute" in most of the following examples)
Let's make a parachute. Here is a list of materials:
Tall kitchen garbage bag -or-
Four-grocery plastic bags
Kite string -or-
Yarn
Baby Powder
Scotch Tape
The size and shape of your parachute can be as varied as your rocket. A good rule of thumb is to make your chute about 12 inches across. Your chute could be larger but some rocket styles have narrow nosecones and the chute could get stuck.
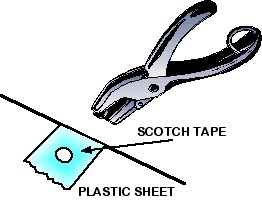
Making the Chute
Carefully cut the garbage bag along one side and the bottom seam. Open the bag along the fold and lay it flat. If you want to use the grocery bags, cut each bag in the same way but lay them out side by side 2 X 2. Use some scotch tape and tape the center seams to make a larger surface area.
The Square Chute
The simplest chute to make is the "Square Chute". Prepare
the edges, where you will connect the strings, with scotch tape
grommets. First apply a piece of tape to both sides of the
plastic. Then, with a HOLE PUNCH, punch a clean hole through the
center of the tape and plastic tab. Repeat this procedure for
each location where you are placing a string.
 To complete the "Square Chute", measure two
24-inch lengths of string and tie each end to one of the grommet
holes. Bring the centers of the string loops together and tie
them off.
To complete the "Square Chute", measure two
24-inch lengths of string and tie each end to one of the grommet
holes. Bring the centers of the string loops together and tie
them off.
Ā
Ā
Ā
Ā
 The Circle Chute
The "Circle Chute" is a classic, timeless engineering
masterpiece. But don't let me influence you. If you have a large
tire or similar round object you can trace the circle on the plastic
with a marker and cut. If you don't have anything large enough
to trace, fold the plastic in half, then in half again, then fold
on the diagonal. This will give you a triangular wedge. With a
sharp pair of scissors, cut along the section that has the open
edges. You don't have to worry about cutting on the curve, just
cut strait across the bottom. If you want to practice this first,
try cutting a piece of paper first. Finish the edges with tape
grommets as mentioned above. Lastly, tie separate 24 to 36 inch
string leads to each grommet. Gather the leads together and finish
the strings off with a good knot.
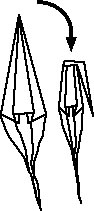
 Anti-Tangle Armature
One of the unforeseeable happenings in rocket parachuting is getting the strings caught or tangled in the fins or safety lines of the rocket. An easy way to avoid this problem is to build this simple cable shield for your chute. Cut two or three straws into 4 or 6-inch sections. Slip the extra long string leads, from your parachute, into the straw sections. The armature should protect the strings as the chute deploys and then slide down out of the way when your chute opens up. (NOTE THE ILLUSTRATION IS NOT TO SCALE.)
Ā
Ā
Ā
Ā
Ā
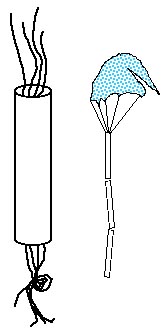
 Folding the Chute
Dust the chute with baby powder to ensure that it doesn't stick to the side of the rocket or itself. Grab the chute between two fingers, in the center, and pull it up toward the ceiling. Let the chute fold naturally as you lift
it. Once you have the chute pulled up, fold it once in half at
the center. You don't want to fold the chute too tightly but you
can fold your chute into thirds if space is a factor. Wrap the
excess string loosely around the chute. Fold the straw armature
sections onto the chute but not part of the excess string wrap.
Ā
Ā
Ā
Ā

Making a Sleeve
If you find that the chute area is too small to hold your parachute, you can increase the size of container by adding a section of chipboard around the girth of the bottle. Or you can use another 2-liter bottle. Remove the top and bottom of the 2nd 2-liter and tape the new cylinder into position. This tends to make your rocket more stable by increasing the distance between the Center of Pressure and the Center of Gravity.
Ā
Ā
Ā
 The "Bertha Cone Chute" (3 out of 5 Stars)
With this chute system, instead of taping the nose cone on, attach a safety cord to the weighted cone and apply a parachute to the top of the pressure cylinder. In theory, once the rocket reaches apogee (the highest point of travel), the weighted nose cone separates from the main body. The main body is creating enough drag to slow itself down. If everything works, the parachute deploys and the two pieces float gently back down to earth.
In practice, the nose cone can sometimes get jammed on the main body causing a failure. In addition, safety cord can be too short and the cone can't clear the body.
Ā
Ā
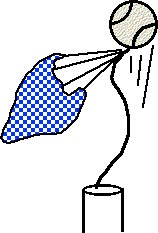 Nose Cone Tug
Chute (3 out of 5 Stars)
Nose Cone Tug
Chute (3 out of 5 Stars)
The "Tug Chute" uses the force of the lifting nose cone to pull the chute out of the sleeve or needle assembly. Attach a safety line to the nose cone or tennis ball. Attach a parachute close to the cone/ball assembly. The chute needs to be folded small enough to fit inside the needle yet not too tight to unravel.
Problems with this system include; not enough line and parachute packing jams.
Cone style noses with a sleeve have more success with this system.
Ā
Ā
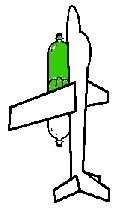 TANG IV-Glider
System (Unknown-Experimental)
TANG IV-Glider
System (Unknown-Experimental)
This is a recovery system that I plan to try this year. It involves a styrofoam glider ($3) attached to a rocket body. In theory the glider should bring the rocket back down after a graceful flight, much like the space shuttle.
Potential problems: The rocket needs to have a long body. The longer the body, the slower the takeoff at launch. If the rocket takes off too fast, the styrofoam wings will get ripped off. A rocket with too much mass however will not reach a high enough altitude for gliding.
I have not determined if I will jettison the pressure chamber after launch. That presents a completely new set of technical problems that I will deal with.
*UPDATE* (Summer 2001) After conducting initial tests with a Tang IV prototype, I have concluded that the mass of the rocket is more than the lifting power of the glider. My styrofoam glider cracked into five nice pieces. If I return to this, I will have to jettison the booster rocket (I will include a parachute on the rocket for safety reasons) in order to let the glider coast back to earth softly.