 |
Bottom Red-Gold glass
Layer.
Open a new file 400 pixels by 450 pixels and background white.
Select View- Ruler on pixels. This is the bottom layer of the
graphic. This whole project will use the Continue Draw Path Mode
and the Path Edit Mode.
The term H after a pixel number is
Horizonal and V is Vertical, indicating positions on the ruler.
Use
File/Save as... to save as a UFO file frequently.
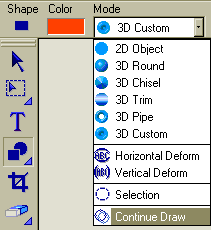
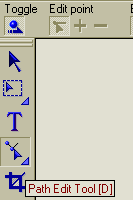
Click the Path Drawing
Tool(first diagram shown) Select Path solid shapes button on
attribute bar. SHORTCUT: Letter D for switching thru the boxes of the
Path Drawing Tool bar quickly. |
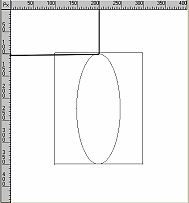 |
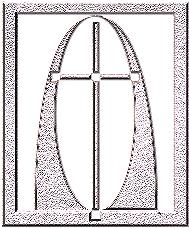
1.Draw first
path.
Click the rectangle shape and draw a vertical rectangle with
upper left hand corner at 100 V and 100 H. Pull the mouse across the
right corner to end at 350 V and 300 H. On the Path Attribute bar click
Mode and then in the drop-down menu box- Continue Draw.. This
will enable you to continue drawing on the same path shape.
2. Draw
second Path. Again select Solid Shape button. Click the
elliptical shape. Position your mouse on the top horizonal bar of the rectangle
at the 101 V and the 150 H and pull mouse down to bottom of the rectangle
releasing the elliptical shape at the 349 V and the 250 H mark. It should
be centered exactly. |
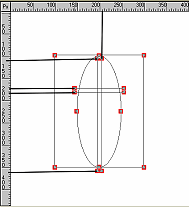 |
3.Drawing 3rd and 4th
Path for cross.
1. Stay in the Continue Draw mode. Select
Solid Shape button on Attribute bar and click retangle shape. Position
mouse 5 pixels down from the center top of the elliptical shape at 110 V and
195 H. Pull mouse down passed bottom of elliptical shape releasing the
rectangle shape at 355 V and 210 H.
2. Start another rectangle at
right-hand outside of elliptical shape at 170 V and 145 H. Pull mouse down
slightly and across releasing mouse at 180 V 260 H. |
 |
4. Selecting the
Attibutes for the new Path Layer.
1. Click on the attribute bar. Now
switch back to the 2d object Mode. Click the Options button and be sure
the Even Odd fill is not ckecked. the Material
button.Select Color/Texture tab- Gallery-Glass- then Orange two.
Bevel tab-3d custom mode, click 5th or last button to the right, Round
corners. Border/Depth tab-Border:57 Depth:30, Type of
border-Both. In order for the layers to fit together right this layer
must be larger than the others. Shading tab -Phong -Shininess:0 and
Strength:19. Transparency tab:80 percent. Copy it to your Easy
Palette under the Add button on the Attribute bar.
2.
File/Save your file as a UFO in a separate folder where you can
put all the individual layers.
3. Press control + D to duplicate the entire
canvas twice. and drag each to a new frame. File/Save as UFO each file
separately. You can close these to save memory. If your computer tends to
crash easily, File/Save the orginial and close it without losing the
Path mode. Before you continue File/Save as a UFO with another
name to use as a working copy.
When you use the any of the effects other
than those under Material Path mode you will not be able to edit in the
Path mode again.
4. Now if you are satisfied that you will no
longer be adjusting this layer you can now select Format/Hue and
Saturation. Hue-12 and Saturation-70. This can also be done later just
before you assemble the layers. |
 |
Middle Layer-Stainglass
Lilac-
Open one of the duplicates. Select Path Drawing tool
button. Select with Pick tool the object on your workspace and click 2d
object under Mode on Attribute bar. Click Options and
Check the box for Even Odd fill. Select Material button.
Color/Texture tab - Click on the Gradient Fill window . Then select
Two-colors box then right click on colors window and pick Windows Color Picker.
Set dark lilac at R-75, G-33 and B-61. Set the light lilac at R-206,
G,-187,B-202 and circular direction fill . Select Bevel tab - 3d round
-Select In-Type of border, mitered corners, Border tab-border:99,
depth:30, Check Smooth spine box. Select Bump tab- File... and
look under PI 6 Program Folders - Materials for Bump12.jpg. Select 50 percent
and check for a reflection. Reflection tab - None. Select
Shading tab- Phong - Shininess:80 and Strength:70. and
Transparency tab:80 percent. Use default 1 for lights. With your mouse
on the sample in the window move the light to the middle of the upper-left
section.
Save as UFO the second layer file and copy it to your
Easy Palette under Gallerys under the Add button on the
Attribute bar. |
 |
Remember that anytime you
need to edit a path that you have drawn, you just click on the Path Edit tool
and toggle the switch to do an path edit. |
 |
Continue Draw the Top Layer-Lilac frame
Open last duplicate. Click the Path Drawing Tool button. Select with
Pick tool the object on your workspace. Check the Odd/Even
fill box. Click on Continue Draw under Mode on Attribute bar.
Select the Arch 2 in Solid Shapes Custom Library.
1. Start the
arch shape at the just inside the upper right-hand corner of the rectangle Drag
mouse diagonally across to bottom left-hand corner stopping exactly on the
corner line.
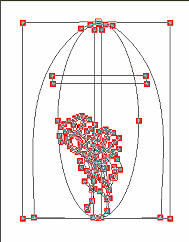
2. Path Editing the Top Layer-Lilac frame
Go back to the Path drawing button on the
tool bar and in the drop down menu click Path Edit Tool. Then click the
Toggle button and make sure the Edit Point Picker button is
selected and the Edit Free also. First click on any part of the arch.
You may need to use the Magnifier to find the pivot point on the top of
the arch. Remember you can utilize the - or + to move the workscreen up or
down so you can keep the mouse in view.
3. Click Free Edit on
Path Edit Attribute bar. Check to see that the arch path is not touching
the top of rectangle path and it is above the elliptical path. At the top of
the arch point, click on the top red outline box . Hit Control 0. Then
you will be able to see two red arms extend out. Grap one and swing it up and
out so that it clears the cross arms. Do the same on the other side. Then
shorten the arms in horizonally, sliding them to make a steeper arch. Toggle
off Path Edit. Select Path Drawing and Continue Draw. 4.
Select Solid Shape rectangle and place your mouse at 80 V and 80 H. Pull
mouse across to 370 V and 320 H. This will be the outside frame.
Edit/Save this layer as a separate UFO file
now. |
 |
Adding Flowers
Now you can add flowers and stem with leaves if you want them to be part of the
frame. Select the flower object ahead and save it in the EP. In your PI6
Stamp Tool area is a lily that you can paste on the top lilac frame
file. When you use the Continue Draw Mode you can you can trace it with
the Spline tool and then add the stem and leaves can be Plant 1 under
Solid Shape/Custom Shapes.
Or use my lily UFO path Zip file for placing it separately after the
layers are assembled. |
 |
Click on the Path
Drawing tool to set the Attributes of the Top Layer.
Click
Options and Check the box for Even Odd fill. Click Attribute bar
Material button - Color/Texture tab -Gradient color and click
window of the Multiple Colors palette -Select Palette ramp 12 (lilac) and then
check the Circular direction Fill. Select Bevel tab-3d chisel and
Mitered corner box. Border/Depth-border:4, depth:20, Type of border
IN. Transparency tab - none. Reflection tab-select File...
and in PI6 Program file, find Material-select Remap.jpg, Density:70 percent.
Select Bump tab-File...PI6 Program file, find Paper then select
-Paper002jpg -Density:100. Leave other boxes unchecked. Select Shading
tab- Click Metallic Copper, Shininess:92 and Strength:19. Light tab: 2
direct, Ambient:30 percent. Remember once you use any of the standard object
Effects on the path you will not be able to edit it in path mode
again. |
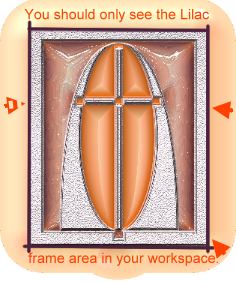 |
Use Pick Tool to
arrange the 3 layers together.
1. Because the first bottom layer you
made is far larger than you need. It is easier to control the looks of the
final project if you do steps in this order. 1.With Pick Tool select the
top lilac frame file only. Edit/Crop lilac frame as close to the its
edges as possible. Use Control 0 to see full view.
2. Open middle
lilac stain glass layer. Use Pick tool to select the object then
Edit/Copy/ and Paste as an object on lilac top frame layer. Then
use Pick Tool and Sent To Back Button.
3. Open gold bottom
layer, Edit/Copy/ and Paste as an object on lilac top frame
layer. Select Pick tool Sent To Back Button.
Select all
layers with the Pick tool and Align using Center Both. Be sure
only the top layer is shown fully in the window.
4. Now select Pick
tool only the top lilac frame layer and click Edit/Crop. Under the EP
Palette Layers box, Lock all in position.
Save as a UFO
file without any merging to use later with different layering for unique
images. If you wish share your creation with the rest of us, Save
as...BMP file. Use the Object merge All and then Edit/Crop; do a
Web- Image Optimizer -JPG. |
 |
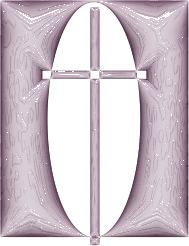
I have changed attributes
and assembled the layers of this project in many different ways. This one was
used at another of our web sites.
It is also used in A
Round Chapel Wallpaper
I know this has been a
lengthy tutorial but I hope it will challenge you to use this very creative
tool. |

