I have two goals with this build along. First, I want to show how to make a cheap bow with the bare necessities. Second, I want to make the build along idiot proof. Wish me luck!
When I say, "bare necessities," I suppose you may be thinking in terms of stone tools or something, but let's not get too crazy. These are the tools I first got when I started making bows. It's a little more tiresome than using power tools, but you can still make a bow.
Instead of giving a grocery list of tools and supplies you need right up front, I'm just going to introduce stuff as we go. The first thing I'm going to introduce is wood.
Choosing your wood
The reason I used red oak in my first bows is because (1) it's pretty cheap, (2) you can find it just about anywhere, and (3) it makes a decent bow. I went to Home Depot and found some red oak that was the perfect size. The little sticky lable on it says it's a 1x2x6. In reality, it's 3/4 inch thick, 1.5 inches wide, and 6 feet long.
You may find yourself sorting through 50 boards to find the perfect one, but it's all worth it. There's a few things you need to look for. First, you need to make sure you have a piece with thin early growth and thick late growth. The early growth is pourous and quite weak. If you have too much of that, the bow will be more likely the break. The late growth is more dense.
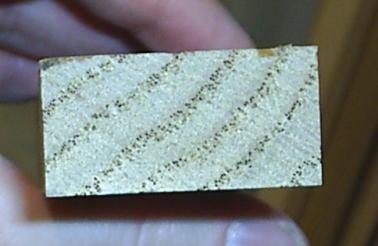
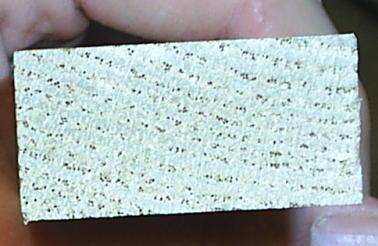
Looky here at the ends of these two pieces of red oak:
The one on the left is good. The one on the right is bad. Another way you can tell is that the one on the left will be heavier than the one on the right because it's more dense. You want nice thick late growth rings, not a bunch of thin ones.
The next thing you should look for is a stick of wood with really straight grain. You have to look at the side of the board to see this. The best way to tell the grain is straight is to look at the rings. Ideally, you'd like to find a piece of wood where the growth rings runs all the way down the side of the board from end to end without running off to the side or something. You should look at all four sides, but most importantly at the 3/4" sides. Of course it is highly unlikely that you will find the perfect board with perfect grain, but you want to get the best you can find. If you happen to find one with absosmurfly perfect grain, then you don't necessarily have to back the bow. The worse the grain is, the more you need to back it.
Here's a look at the 1.5" sides of two boards--one good, the other bad.
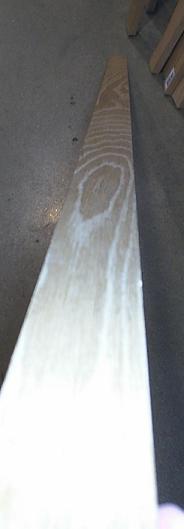
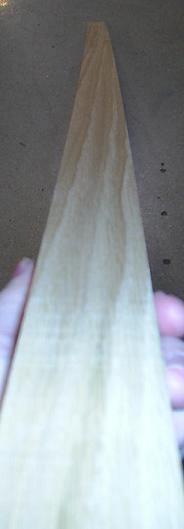
The one on the left is bloody awful. Boo! Hiss! The one on the right is not perfect, but it will do with a backing. In fact, I bought it.
Another little clue I've noticed is that the deeper red the red oak is, the better it is, and the lighter in colour, the worse. The darker red wood is also more heavy than the lighter coloured wood, so I guess it's more dense.
Lastly, try to find a board that isn't warped. Of course if it's warped from back to belly, that's fine. That'll give you a little reflex, which will result in less string follow when you're done provided you make the concave part the back and the convex part the belly. But try to avoid boards that are warped from side to side. That will make it difficult to get the tips lined up so that the string is centered on the handle. If the board is slightly warped from side to side, you can still use it. I'll explain how to deal with that later. But try to find a board that isn't warped if you can.
Oh yeah, one last thing. No knots!
Sort through the whole stack, get the best one, and be on your way.