
Cutting the nocks
Next thing ya gotta do is cut nocks for a string. Draw a line one inch from the tip.
Since the overall length of the bow is 72", and you cut your nocks an inch in on both ends, the bow will be 70" nock to nock.
You want to cut the nocks at about 45 degrees so when the bow is strung, the string doesn't have to bend around any sharp corners. Using the line on the back of the bow as a guide, I begin my cut with a triangle file.
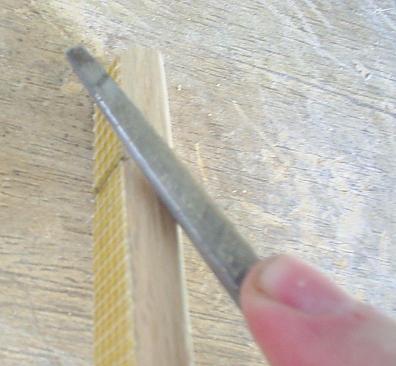
Using the triangle file allows me to start a groove without it slipping and sliding all over the place. You can have that problem if you start with a rattail file. Once I have a groove cut with the triangle file, I cut the rest of the nock with a rattail file.

Make it round toward the back and the belly so the string doesn't have to bend around any sharp edges. When you cut the other side, look at the line on the back and where you cut the groove to the belly, and use those as a guide so that your nocks are even. Work your file around to the belly so that it matches the other side.

Don't cut it too deep, because you may need to make adjustments later on. Just cut it deep enough.
Tillering preparations
There are two more tools you need to tiller your bow. The first is a tillering tree (or stick or whatever you want to call it). It's just an upright doohicky with a notch at the top to set the bow in and notches all down its length to put the string in.

This device allows you to draw the bow to various lengths, stand back, and examine the bend in the limbs to see what needs to be worked on.
I made this out of some pine I got out of a construction site dump. Cutting all those notches is be very tiresome if you're using a hand saw. There are a couple of alternatives.
Alternative 1: Instead of cutting notches, drill holes with a 3/8" drill bit and stick 3/8" dowel pegs in there. Do it at an angle so they point down making a hook. That way, the string doesn't slip off.
Alternative 2: Use nails. My old tillering tree used three nails in place of each notch. One nail wasn't strong enough, so I used three. If you use three nails, don't put them in a perfect horizontal line. If you do, the middle nail will carry no load, and all the load will be on the outter two nails. Instead, hammer them in a sort of "V" shape so all three nails carry some load. Hammer them in until just enough sticks out that you can put a string on there. And do it so they form sort of a hook pointing down. Know what I mean?
Now lemme show you the top where the bow goes.

I've got that notch cut 1.5" wide because that's about how wide most of my bows are before I do the final shaping on the handle. I nailed that other pieces of wood on there to make sure the bow doesn't accidentally slip out.
Now lemme explain why I made the notch 1.75" deep. You see, there's a standard for measuring draw length. Draw length is measured from 1.75" forward of the deepest part of the handle. That's called the AMO length. By making the notch 1.75" deep, I can set the handle down in the notch, and the top of the board will be 1.75" above that. The notches I cut for the string are all measured from the top of the board. So, for example, the 6" notch is not 6" from the bottom of the top notch. Rather, it's 6" from the top of the board. Does that make sense?
Speaking of notches, those notches along the board start at 6" and go to 31". So far, I haven't made any bows with a longer draw length than that. They are all cut 1" from each other, and they are all labled.
I must warn you that some people think this sort of tillering tree is a bit dangerous. While pulling the string down to a notch, the bow could break and hit you on the head. There is a better way. What a lot of people do is attach something to a wall or an upright sturdy beam or something to sit the bow in. Then they attach a pully somewhere below that. That way, instead of being up close to the bow and pulling on the string, you can stand away from the bow and use the pully to pull on the string.
There are some great advantages to the pully system. First, it's more safe because you aren't so close to the bow when it's being pulled. Second, it allows you to see the limbs bending as you pull them. You can do that with my tillering tree, but you don't have the same vantage point. The pully system is far superior. The problem is that I live in an apartment, and I don't think they'll let me nail stuff to the wall on my balcone.
There is another way to watch the limbs bend, though. If you having a big mirror, you can stand in front of it while pulling on the bow and watch the limbs bend. Or, if you have sliding glass windows on your balcone, you can stand in front of it and watch your reflection as you pull on the bow. I have tillered bows completely using this method without ever using any tillering tree at all. That's how I did my English longbow. It's not the best method in the world, but it'll work.
The next thing you need is a tillering string. I use a long Flemish string with a Flemish loop on one end and a timber hitch on the other.

The tillering string has to be long enough so you can put it on a bow and have it be slack.

The timber hitch allows you to adjust the length of the string. That way when you get ready, you can shorten the string and brace the bow.