Bird's Mouth Paddle Shafts
The magic of the bird's mouth technique is that the pieces are all self-aligning and no special jigs or fixtures are needed. The effects of grain runout are minimized, and custom ovals can be built wider or thicker to suit personal preference by simply changing strip widths.
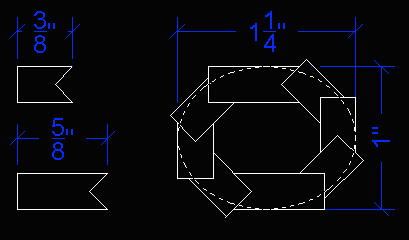
I used 6 strips of 1/4" x 7/16" spruce, and 2 strips of 1/4" x 11/16" spruce (to make it oval). One narrow edge of each strip had a 45* rabbet cut in it to receive the corner of the adjacent piece.

Notice that I increased my strip sizes from those shown to give me an overall paddle shaft size of about 1 1/8" x 1 3/8". The sizes shown are for a shaft sized for my wife.
Coat the narrow faces and bird's mouths of all eight strips with unthickened, then thickened epoxy. The inside face of each strip should receive a coat of unthickened epoxy to protect the wood in the unlikely event water gets inside the shaft.
Aligning all eight strips is like playing pool with a handful of cooked spaghetti, but it can be done. One person (remind me who you are, and I'll give you credit!!) told me he uses a small octagonal plug at then end of the strips which help align the strips and keep the structure from collapsing. Once all eight of the birdsmouths are aligned with their corner of the mating piece, the structure is quite strong, and won't easily collapse.
I use nine or ten 1 1/2" SS hose clamps to hold it all together. For a feathered shaft, clamp both ends tightly and to within 9" of the middle. You will have an 18" section with clamps positioned loosely. Clamp the ends of this 18" area (not so tightly it distorts your shaft) with pipe clamps, and twist the clamps away from each other. Using whatever is handy to prop one flat against your workbench, and the other one up in the air, fix the desired feather angle. You will have as much as 5* of 'spring-back". Voila! A hollow, feathered shaft.
Note: for a right-hand feather angle, with the pipes pointing toward your body, the left clamp should be pulled upward with the right clamp remaining flat. (Ask David Marx of northern Idaho how he got a free left-handed birdsmouth shaft)
The paddle shaft is planed and sanded to a nice, smooth oval, and the ends cut at a curved angle to glue to the back of the shaft.
To mount wood blades to a Bird's Mouth shaft, one would need to plug the end of the shaft with an octagonal piece to keep water out--redwood would look cool! Alternately, the large strip on either side of the paddle (that helps form the oval, rather than a circle) could be tapered to 0" at the ends before gluing to taper the shaft to accommodate blades and finish the ends.
I also plan to lay up a few straight shafts to build Greenland paddles or take-apart paddles.
Seal the shaft with epoxy, and protect it with spar varnish. Pete Rudie has been using CPES to seal his bird's mouth shafts to good effect.
 This is a scanned cross-section of the end
of the shaft.
 A photo of the end of a rounded shaft. (Thanks
to Bill Price for the photo)