 |
PSP 4.12 Tutorials
Decorative Backgrounds |
Fancy Text |
|
|
Matching Bars |
Buttons |
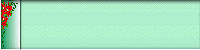
|
|
Decorative Backgrounds,
Fancy Text, Matching
Bars, Buttons
Decorative
Bordered Backgrounds
-
Open a new file 100 x 100 pixels with the background set for White and
choose 16.7 million colors.
-
Open an image (for this tutorial my Poinsettia image) and size it to
100 x 100 pixels. It must be the same size as your new file and 17 million
colors to work properly. To check these details select "View|Image Information".
Feel free to copy my Poinsettia Image
by right clicking your mouse and selecting
Save As Image
-
Choose your colors. Set Foreground Color to Green (R-8 G-148 B-82) &
Background Color to White (255,255,255).
-
From the Tool Palette select the "Paint Bucket". Make sure the Style
Bar (Fill Style) is set for Linear Gradient. Choose Options and set the
direction to 90o, click OK. Fill your Image.
-
Select the Poinsettia image. Make a copy and save the original. Select
the Poinsettia image with the "Magic Wand", then "Selections|Invert","Edit|Copy",
"Edit|Paste" as Transparent Selection into the Linear Gradient image. Line
up to the Left of the Image and make sure that the Status Bar displays
(1,0)(100,99)=99x98). Click Image "Selections|None".
-
Set Background Color to (R-173 G-239 B-206). Choose "Image|Enlarge Canvas"
to 1030 x 100. Set Foreground Color to (R-173 G-239 B-206) by clicking
the arrow on the Color Bar. Using the "Magic Wand" select your text area
and "Flood Fill" with "Fill Style" Solid Color. (Note: this might seem
repetitive, but it helps to maintain a solid line on your border).
-
Now we will add a Shadow to the right side of the gradient. Choose the
"Selection Tool" set at "Rectangle|Feather 0". Select your border making
sure you start at 0,0 and end up at (100, 100) (100, 100); this must be
exact for a perfect border. Choose "Image|Special Effects|Add Drop Shadow".
Set Attributes to Color-Black, Opacity-175, Blur-20, Vertical-0, Horizontal-3
and click OK, then "Selections|Select None" to deselect the border.
-
Save file. And "WOW" we finally have a Decorative Bordered Background!
Fancy
Text
-
Open a new file 390 x 100 pixels with the background set for Foreground
and 16.7 million colors. The "Color Bar" should already be set for Foreground
Color (R-173 G-239 B-206) and Background (White).
-
Open an image (for this tutorial my Poinsettia image) and make sure it is set for 17 million colors by selecting
"Colors|Increase Color Depth|16 million colors". Using the "Selection Tool" set at "Rectangle|Feather", select two Poinsettia's.
Feel free to copy my Poinsettia Image
by right clicking your mouse and selecting
Save As Image
-
Go back to your new (390 x 100) image and choose the "Text Tool". Attributes
should be Font|Nadianne|Bold Italic|26 pts., "Text Effects|Antialias-on,
Alignment|Center, Floating|on", click OK. Text should be lined up at the
top of your image. Choose "Flood Fill|Pattern|Options" and select the current
pattern Poinsettia's and fill your text. To highlight our text we will
choose "Image|Special Effects|Cutout". Set Attributes to Shadow Color-Black,
Opacity-120, Blur-10, Vertical=-4, Horizontal=-4 and click OK. To further
highlight our text we will choose "Image|Special Effects|Add Drop Shadow".
Set Attributes to Color-Black, Opacity-115, Blur-10, Vertical-8, Horizontal-8,
click OK and "Deselect" your text. Follow the same steps for the next line,
however, increase the font size to 28 pts.
-
We are finished with our Fancy Text. Save file as Transparent Gif and it
should blend in perfectly with your background.
Matching
Bars
-
Open a new file 500 x 30 pixels with the background set for white and
again choose 16.7 million colors. Zoom it to 1:1. From the "Selections
Tool" choose "Selection Type" Rectangle|Feather 0 and select your area
until most of the width is selected and the height is the thickness you
would like to have your horizontal bar.
-
Open the background image you have already saved (Decorative Bordered
Backgrounds) and copy it and close your original saved image. Using the
"Rectangle" again, choose the upper portion of the Poinsettia. The "Color
Bar" should be set for Foreground Color (Green R-173 G-239 B-206) &
Background Color should be (White).
-
Select "Flood Fill" with "Fill Style" Pattern & Options. The "Define
New Pattern Screen" should view the current pattern you selected from the
Poinsettia Background, click OK and fill your Image.
-
To add depth to the Bar, use the Cutout option. Choose "Image|Special
Effects|Cutout". Set attributes to Shadow-Black, Opacity-255, Blur-10,
Vertical=-2 and Horizontal=-2 and click OK. Do the same thing with Cutout,
but this time set Attributes to Shadow-Foreground Color, Opacity-255, Blur-10,
Vertical-2 and Horizontal-2 and click OK.
-
Next to create a moving effect choose "Image|Deformations|Motion Blur|90o|3
pixels, click OK".
-
Your Bar is finished. Save file as a Transparent Gif Image.
Buttons
-
Create a new file 120 x 50 pixels (or 130 x 60 pixels for a larger button)
with the background set for white and choose 16.7 million colors.
-
Open an image (for this tutorial use my Poinsettia image) and resize
it to 50 x 50 pixels.
-
Select the new file and set your colors to Foreground (R-173 G-239 B-206)
& Background Color (White). Using the "Flood Fill" set to "Fill Style"
Solid Color, fill your image.
-
Now click Image "Plug In Filters|Render|Buttonmaker Square" & set
Bevel Size to 90, Depth/Contrast to 150, click OK. If by chance you don't
have this particular Free Plugin Filter download it now.
The Button Maker Duo
-
Set Background Color to Black. Choose "Image"Add Borders Symmetric-on|Border
Size 1, click OK. Choose "Image Deformations|Motion Blur|90o|3
pixels". Repeat step, however, set direction to 270o|3 pixels.
-
This is the very last step for this lengthy tutorial, I PROMISE. Select
the 50 x 50 Poinsettia Image we opened in step two, select it with the
"Magic Wand", then "Selections|Invert", "Edit|Copy". Go back to your Button
Image and select "Edit|Paste As Transparent Selection" & line the Poinsettia
Image to the right of the button. Click "Selections|None".
-
Save file as a Gif Image. If you would like to use the buttons I made, please do.
The Font I used is Nadianne, Bold, Color Red.

Copyright ©1997-1999, Paulie's World. All rights reserved.
Registered ® Trademark
|