On the first page we covered the first four items or command on the Menu Bar. This page will conclude the Menu Bar.
The next item on the Menu Bar is Colors.

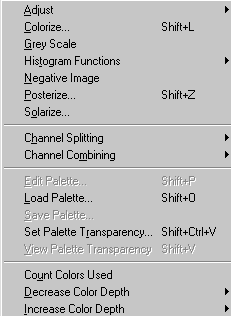
- Adjust: Used to adjust the colors in six different options (Brightness/Contrast, Gamma Correction, Highlight/Midtone/Shadow, Hue/Saturation/Lightness, Hue Map, Red/Green/Blue).
- Colorize: Used to change the active image to a uniform hue and saturation.
- Gray Scale: Used to turn the image from colored to a gray scale image.
- Histogram Function: Used in a more advanced function. Distribution of the RGB values.
- Negative Image: Used to remove the color from the image to produce a negative photo effect.
- Posterize: Used to give a flattened effect to the image.
- Solerize: Used much like the Negative Effect but give you control of the Threshold level.
- Channel Splitting: Used to split the images color channels creates individual grey scale images that are based on its RGB, HSL, or CMYK channels.
- Channel Combining: Used to convert to RGB, HSL or CMYK channels (image must be in a gray form)
- Edit Palette: Used to edit the color palette for images in 256 color or less can be used later for transparent backgrounds.
- Load Palette: Used to load the palette that was created previously into an image file with 16 or more depth.
- Save Palette: Used to save an image palette from 16 to 256 colors.
- Save Palette Transparency: Used for assigning a transparent value to any color in the image palette. This is useful when working with some file formats, such as GIF and PNG.
- View Palette Transparency: Used to view the effect of assigning a color a transparent value.
- Count Colors Used: Used to tell how may colors are being actual used on the image.
- Decrease Color Depth: Used to reduce the colors in the image such as from 16 million to 256.
- Increase Color Depth: Used to increase the colors used from a lower number to a higher one. As mentioned on page one most effects under the Image Command will not be active in less than 16 million, therefore you can use this to go from 256 to 16 million.
The sixth command on the Menu Bar is the Layer Command probably the most exciting addition from version 4 to 5.

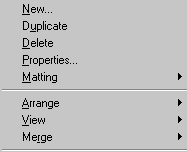
- New: Used to add a new layer to the Layers Palette.
- Duplicate: Used to copy a layer on top of the existing layer
- Delete: Used to delete the selected layer.
- Properties: Used to select and edit the attributes of individual layers.
- Matting: Used in a gray scale mode Matting cleans up the border by removing these pixels.
- Arranged: Used to move the layers around from top to bottom or bottom to top.
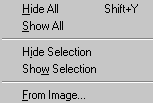
- View: Used to view individual layers or view all the layers at the same time.
- Merge: Used to combine multiple layers into one, which decreases the memory requirements of an image. After layers are merged, they can no longer be edited separately.
Next in line on the Menu Bar is Selections.

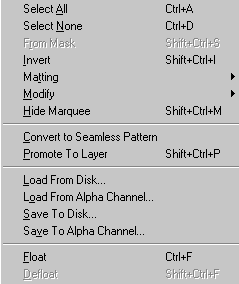
- Select All: Used to select everything inside the Image Window.
- Select None: Used to deselect anything that is selected in the Image Window.
- From Mask: Used to select an existing Mask.
- Invert: Used to invert the selected area (example you select the complete image box the select the Invert option so you now have the main image selected).
- Matting: Used in a gray scale mode Matting cleans up the border by removing these pixels.
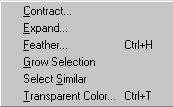
- Modify: Used to open six individual options (Contract, Expand, Feather, Grow Selection, Select Similar, Transparent Color).
- Hide Marquee: Used to hide the selected area known as the Marquee ( what most of use call the dancing line or marching ants).
- Convert to Seamless Pattern: Used to create Seamless Backgrounds a very popular task for web pages.
- Promote to Layer: Used to create a new layer from the selected area.
These next four commands will really be used in a more advanced feature.
- Load From Disk: Used to load a previously saved selection from the hard drive.
- Load From Alpha Channel: Used to load a previously saved mask or a selection. A mask can be loaded as a selection or a selection as a mask.
- Save to Disk: Used to save a selection to your hard drive It will be saved as a separate file in a ".sel" format.
- Save to Alpha Channel: Used to save a selection with the Image.
- Float: Used to float a selected area so you can move it to a new location in the active Image Box.
- Defloat: Used to change to floating selection back to the standard mode.
Again this Command is a little more advanced for the beginner but it is a nice feature.

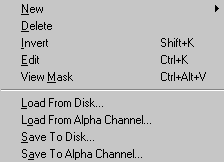
- New: This will allow you to start a new Mask. It opens a Drop Down Menu with five options.
- Delete: Deleting a mask from the layer and deleting it from the alpha channel are two separate functions. When deleting a mask from the layer, you can remove it or merge it into the image. Merging it makes it into a permanent part of the image. Deleting a mask from a layer does not delete it from the alpha channel.
- Invert: Inverting a mask reverses its transparency: what is black becomes white, and what is white becomes black.
- Edit: When you edit a mask you change either the areas or the level of masking.
- View Mask: Choose the View Mask command from the View menu to see the mask using a ruby overlay.
- Load From Disk: Loads much like the Selection Command.
- Load From Alpha Channel: Same as the Selection Command.
- Save to Disk: Much like the Save to Disk in the Selection Command except it is saved with a ".msk" format.
- Save to Alpha Channel: This is the same as the Selection Command
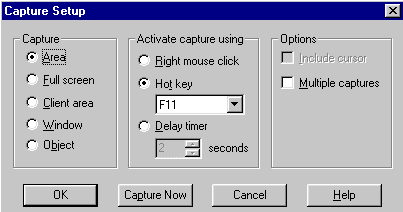
The final Command on the Menu Bar is the Capture Command. It contains only two Commands. This function is used to do screen captures as seen on this page.

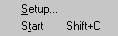
- Setup: This will be the command to setup how you will do your screen capture.
- Start: Used to make the capture command active.