This simple tutorial is to try and explain the vary basics on the use of PaintShop Pro 5 by Jasc Software. This first Image is that of the actual screen.
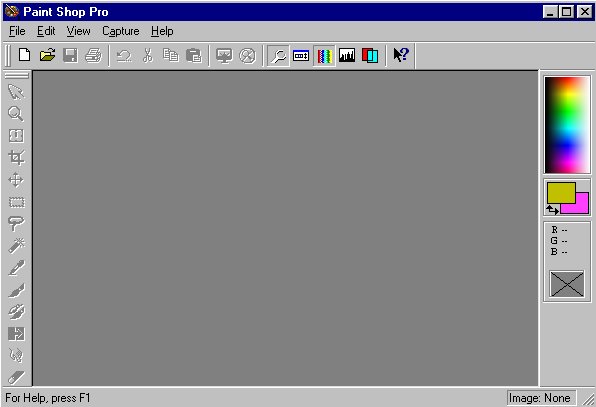
Upon starting Paint Shop Pro 5 this should be the screen you will be looking at.
The first thing I will talk about is the Menu Bar.

The one pictured here is what you will see after you open a new Image. When first starting PSP5 you will only have File, Edit, View, Capture, Help. The first command is File it will give a dropdown menu like below.
Here is a simple explanation of each command;
- New: This is the command you will need to get started. It will open a dialog box where you will be able to set the width and height of the Image Box as well as the Background Color and Image Type. (16 million colors,256 colors etc.).
- Open: You can open an existing Image in one of your directories from this point.
- Browse: Used to browse the different directories on your hard drive to find a specific image.
- Close: Used to close the active image. You will be asked if you wish to save Image if it is new or and existing one that has been modified.
- Revert: Used to undo the last action or change made since the last saved. You can use the Undo function to remove all work done.
- Save: Used to save the active image.
- Save As: Used to save and existing Image in a different name or format.
- Save Copy As: Used to save and existing Image as a copy of (not really saving but making a copy of original).
- Delete: Used to delete and existing Image (must be active on screen).
- Send: Used to send and Image through E-Mail.
- Import: Used with a Scanner, or a Kodak Digital Camera or a Plug-in Import.

- Export: Used to save Picture Tubes in the Tube Directory.
- Page Setup: Used to set the page preferences (i.e. Paper Size, Orientation, Margins etc.).
- Print Preview: Used to view what will be actually printed and to check the printer setup prior to printing.
- Print: Used to print the active image.
- Batch Conversion: Used to convert multiple files to a single file type format. Such as JPG, PSP and others converted to GIF.
- Run Animation Shop: Used to start Animation Shop.
- Preferences: Used to setup all of your preferences (i.e.General Program Preference, File Format, Customize Toolbars).
- Exit: Used to close Paint Shop Pro.
The next command is Edit, here is what you will see when you select it.

The first group of undo commands will very from each different action.
- Undo: Used to undo or delete the last function will very depending on action (i.e. Undo Selection, Undo Shape, Undo Fill etc.).
- Cut: Used to cut selected areas from the active image.
- Copy: Used to copy the entire image or the selected area to the clipboard.
- Copy Merge: Used to copy all data regardless of the layer.
- Paste: Used to paste the contents of the clipboard to whatever you select (i.e. As New Image, Layer, Selection).
- Clear: Used to clear the image or the the floating selection.
- Empty: Used to empty the clipboard or the buffers which will clear up disk space by removing contents from the History list.
Now for the View Command, which has the following nine functions.


- Full Screen Edit: Used to enlarge the screen so the workspace fills the screen.
- Full Screen Preview: Used to show only the image.
- Normal Viewing 1:1: Used to reset the screen to a 1:1 ratio after zooming in or out.
- Zoom in: Used to enlarge image.
- Zoom Out: Used to make image smaller or to return back to the previous size.
- Image Information: Used to get info on active image (File Source, Image, Status, Memory Used).
- Grid: Used to apply a grid to the active image to help align the art work.
- Ruler: Used to set the proper image size.
- Tool Bar: Used to add or remove tool bars from the screen.
The next item on the Menu Bar is the Image Command this you will use almost every time if not every time you work with Paint Shop Pro 5.

- Flip: Used to flip or reverse the image.
- Mirror: Used to create a mirror image the left side becomes the right side.
- Rotate: Used to rotate the image to a setting of your choose (i.e. 45 degrees,90 degrees or spec your own).
- Add Borders: Used to add a border to image. They can be set evenly on all sides or setup your own (can not be used on layer unless layers are flattened).
- Crop to Selection: Used to crop or cut only the selected area to become the active image.
- Canvas Size: Used to reset the size of the or canvas you are working in (does not change to size of actual image only the image box).
- Resize: Used to reset the image size (this will change the size image box as well as the image).
- Arithmetic: Used for more advanced image editing. Combines the data of two images and produces a third based on the information.
- Deformation: Used to deform the image in different ways. Clicking on the command will open a separate menu allowing you to choose the effect of deformation you want (Circle, Cylinder, Pentagon, Pinch etc.).
- Effect: Used to apply specific effect (Buttonize, Chisel, Cutout, Drop Shadow). Image must be selected and 16 million colors.
- Filter Browser: Used to try out the effects before you apply them.
- Blur: Used to get different blurring effects (Blur, Blur More, Gaussian Blur, Motion Blur, Soften, Soften More).
- Edge: Used to apply different effects to the edges of the selected image (Enhance, Enhance more, Find All, Find Horizontal, Find Vertical, Trace Contour).
- Noise: Used to apply three specific filters (Add [Random & Uniform], Despeckle, Median Cut).
- Sharpen: Used to sharpen the image (Sharpen, Sharpen More, Unsharp Mask).
- Other: Used to apply five specific unrelated filters (Dilate, Emboss, Erode, Hot Wax Coating, Mosaic).
- User Defined Filters: Used in a more advanced mode you design and save your own filters.
- Plug-in Filters: Use to save and access third party filters both freeware and commercial types (Eye Candy, Blade Pro etc.).