Editing Pages : Basic HTML Editor

7. Click on the "Edit" button. After you do so, you'll be brought to a page that resembles the one on the screen shot below.

8. Be sure to read and follow all the instructions in the Basic HTML Editor page. For your convenience, we will be running through most of the steps you have to take before the editor can generate a page for you.

9. Choose the background, text, unvisited link and visited link colors that you want for your page. Afterwhich, you may opt to choose an icon or a small graphic to be displayed at the top left portion of your page. Aside from that, you are asked to supply a title as well as two headers -- the title line and second title -- for your page. You must also provide the kind of separator that will be placed between header and the body of your page.

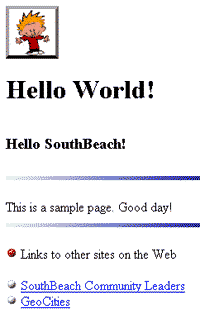
NOTE Below is a very simple example of a page created using the Basic HTML Editor. The words "Hello World!" are placed in the title line while the words "Hello SouthBeach!" serve as the second title. For your information, the separator used below is the blue_thin_line_2 separator.

10. It's now time to edit the body of your page. Note that what you are currently seeing in your screen might not exactly resemble the screen shot below.

TIP Here are some HTML tags that might help you in editing the body of your page.
- The
tag creates a new paragraph.
- The
tag is also known as the line break tag. It makes the characters placed after it to be displayed on the next line of the screen.

TIP Below is the piece of HTML code used in the screen shot above.
This
is my sample page.
Please come back soon and visit me.
Good day!
NOTE Does your page have the HTML code for a certain GeoGuide? If it does, please read on. If it does not, please skip the rest of this note. The GeoGuide is a cool tool you can place in your web pages. It actually has of two parts: The topmost part is composed of a set of links to the different services offered by GeoCities like the forums and chats as well as a link to your GeoCities guestbook. The lower part is a space where advertisments from the business partners of GeoCities and from your fellow homesteaders appear. If your page has a GeoGuide, a GeoCities pop-up advertisment that normally appears every time your page is accessed will no longer be seen. Moreover, you are given the chance to create an ad for your page that will be displayed in other GeoGuides. Aside from that, you are automatically entered in the GeoGuide Sweepstakes. So what are we pointing to here? It will be to your advantage to keep the GeoGuide that is already present in your file. Do not alter the code for the GeoGuide that is already in your file's body. For more information about the GeoGuide, please proceed to its FAQ.
Click on the "next" button to proceed with the rest of the tutorial.
Should you have any comments and suggestions, please e-mail the site administrator. Be advised that GeoCities-related questions will not be entertained in the aforementioned e-mail address. Please direct such questions to SouthBeach Community Leaders.
The copyright for this tutorial belongs to Wilson. Tampering, reproduction or reuse of text and screen shots contained herein without Wilson's approval is prohibited.
Site
Administrator is Wilson
Graphics by DJ
Background by JadeRyan
Last updated: September 18, 1999