


• So you want to make your own skin, huh? Put me out of a job, huh? *laughs* OK then!
• First thing's first! You'll need the base skin files to begin with. All of them are in a zip file so if you don't have WinZip or some other zip file opener thing, you may want to get one. They are in PSD format (Photoshop) so if you don't have Photoshop I suggest using the high res JPG files. Downside is you won't be able to apply all the great tools that are in Photoshop and this help thing will be pretty much useless *laughs*. I've never worked with anything else but I am trying to figure something out in Paint, but with much difficulty. Photoshop is the best skin editor out there I think.
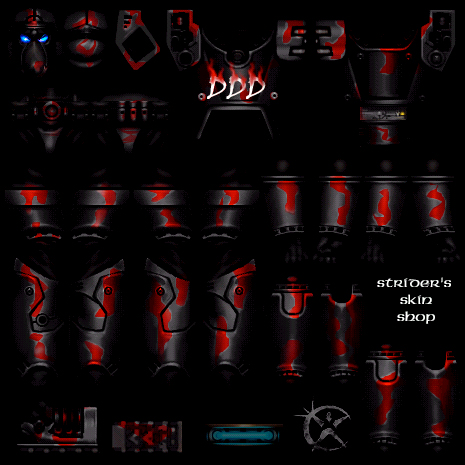
Light Female Skins
Medium Female Skins
Heavy Skins
Medium Male Skins
Light Male Skins
• Download the skins you need or want, open them in Photoshop and your ready to start. Edit them how ever you like just remember that the skins look weird because they aren't stretched onto the player model yet. If you don't know how to use the Photoshop tools because you just got a copy and are stumped, then I'll show you a few tricks. If you already know how to use Photoshop or your skins are done, head on over to the Wrapping section.
![]()
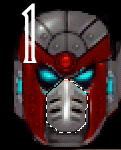
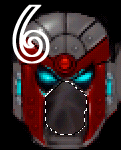
Lasso Tool
• You'll probably use this the most when skinning. Make sure you select the tool so it matches the image above. If you can't figure it out, click and hold then select it. Click to start then if you get to a corner or rounded part click again to hold the line so you can start at a different angle. In the picture below I have selected a part of the face using this tool. You can see the dotted white line where I have selected.

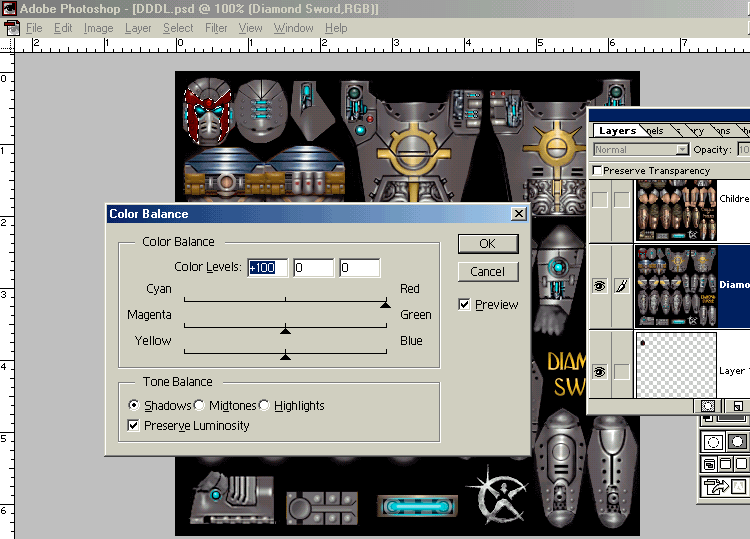
Color Balance
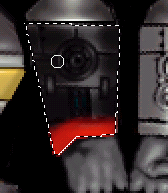
• Use this tool with the Lasso tool to make some of the best color creations. Use the lasso to select certain areas of the skin to create, for example, a camo look, that you can find in the DDD Clan skins that I have made. It's a bit hard to figure out the controls but once you use it for a while you get used to it. Once you have selected the part you want to color, press CTRL and "B" at the same time. The menu should pop up. If not you can reach it in the Image section then Color Balance.
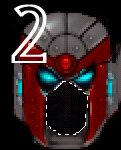
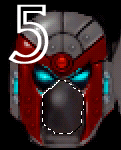
• Shadows give the darkest color you can get. Shadows are best for that darker looking armor and a more aged one. Midtones show a middle of the road color, between Shadows and Highlights. Use Midtones for a new look for your armor. Highlights are the lightest color you can get. I use Highlights for a "glowing" area that needs a brightness to it, such as the lights on the armors. In the picture below I have selected a Shadow red.
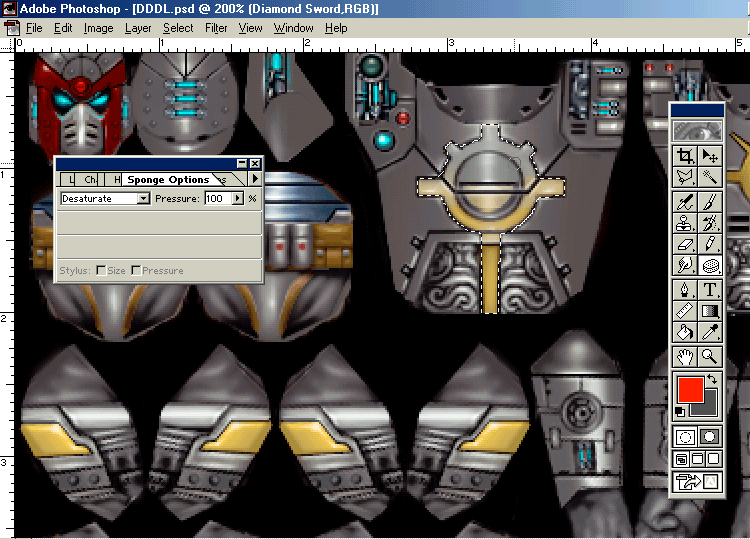
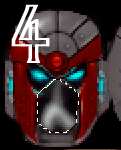
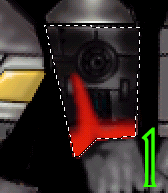
• As you can see only part of the mask is red. Say that you want to change the color of the Diamond Sword emblem on the torso. The Yellow color would affect, say, a blue color, making it an off green. To get rid of that nasty color your going to need the help of the Sponge tool!

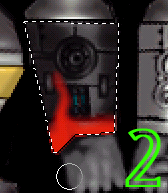
Sponge Tool
• This handy little tool will allow you to wipe away colors without affecting the actual image. Unlike the Eraser, it keeps the shine or rounded look of the image. Make sure the tool is in set to Desaturate to make those colors go away. Select the thing you want to be "Decolorized" with the lasso or if you want to be quick just go ahead and click away at it. The picture below shows how I have started desaturating the Diamond Sword emblem. Notice that it keeps it's shape and not the color.

Smudge Tool
• You can use this tool for 3 things. Blend colors smoothly, for example, make a camo color set in easy and not look layered. Make a cloth look on your skins. Create fire for letters or just plain old fire. Blending colors is easy, just get between the two colors and smudge lightly until they sort of turn from, say, brown to green, over a short distance. Cloth and fire are the tricky ones. For a cloth look it will depend on the base color you use. If you use a light color like yellow, set your other color slot to a darker yellow or black. Black will work in most cases but if you really want to split hairs set to a darker version of the same color. If you start off with a dark color like a very dark looking blue, you want to set to a lighter blue or white.First you may want to make a new layer so the other colors on the armor don't mix with the ones you're dealing with. Then throw down your base color. Now switch to your alternative color and use the Airbrush to spay a semi light line in the direction your cloth will seem to fall. If you want a baggy looking cloth make a smiley looking brush stroke. If you want it to look like a tight shirt, spay a large portion at the top and work down making the size smaller. Now your image should look something like this. I have chosen to use Black as my base, and White as my alternative. I have also chosen to make the face mask look like a cloth instead of a metal look.

• Now take your smudge tool and put the pressure to about 50. In small strokes blend the colors together to get, in my case, a mix of black and white in a sort of upside down "Y".
• In picture 4 you can see how I started to make the top blend in a bit and scale the size down. In Picture 6 I spread my white too thin so I had more black than white. Be careful when you smudge if you lose track of your alternative color spray another splotch like I did, as you can see, in picture 5. Picture 6 is the finished product. I have a more definite cloth shape and you can see it looks as though there are folds. So to sum it all up, with what you have learned you can go from:
This - (Boring...) To
This - (Awsome!)
• Flames are almost like cloth. The difference is you just need one color. First lets start with a regular flame. Say, on the arm of your armor. Before you work on your arm, you want to make a new layer so your colors don't smudge with your armor. Once you have your layer use the lasso tool to outline the arm so you don't go over the sides. Then with the Airbrush take your flame color and spray on the bottom or where ever you want the flame and hold it down so that you have a thick line of color that gradually disappears. I have chosen to use Red as my color. Your image should look something like this after these steps.
• Now that you have your color, take your smudge tool and just pull up on it so you have a light and straight line. Then smudge the bottom toward the right or left and then the top to the opposite direction of the bottom one. It should be something like this.
• Then you can keep adding flames on and try out different ways of making flames. The two bends are the basic shape of a flame. Text is a bit harder to do so once you have making flames down pat, you can move onto flaming text. First make your text. Then make another text layer with the same text you typed. Make the copy the color of the flame you want. For the best results, make your first text bold, then make the other text normal. This way your flame text won't be seen from behind. If you don't get this then read on, I'll explain everything. =)
• Once you have your text in place it should look something like this picture. I've chosen to use white letters and a red flame.
• You can't see the red text in there. That's how you'll want it to be. When you have the text the same exact size the edges seem to merge for some odd reason and it looks, dare I say, very sloppy. Now you'll want to take your flame text and render it so it will be editable. You can render it by first selecting the text layer then going to the Layer section, then Type, then Render Layer. This way you can use your smudge tool on your text. Now, with your smudge tool, Start to make your flames like you did above. When your done the finished project should look something like this. Pretty good huh? =)
• Once you've mastered these trick you can make some pretty awesome skins. As a skinner it is against my rules to leave my name or a trademark on my skins. I feel this is a waste of space and makes skinners look ignorant. I don't plaster my name on my skins because I feel that when making these skin I make them not only for myself, but for every diehard tribes player. If you do wish to leave your name or some trademark image I suggest someplace that isn't looked at all the time. For example instead of pasting your name real big on the back of your skin, so that it hides that awesome flame you put in, set the name on the bottom of the feet or on the hand. I hope this little help thing makes skinning easier for you. Once you have your skins all done you can move up to the Wrapping section of my page, where I show you how to turn you awesome image into some awesome skin VOLs. Good Luck!