 |
|
Step 4: Preparing and ataching the netting to the jacket or Flight suit
You must now sew in (or glue on) the parimeter of the netting, like in the picture shown above (in red). But you don't want the sags, that is, you don't want to be able to pull the netting over about 1 inch from the base material. So you want to have an assortmants of knots in the middle too. Also, you can get the exact same desired effect with the Shoe Goo or Goop instead of sewing the knots. It may pull off if you pull hard enough on it, but it will generaly stay on. (remember I am using the picture above to show you what sewing or glueing around the perimeter means, you may have the other type of BDU suit with the netting in the front). After you have put the little dot under where the
knot is, get your needle and dental floss out. Pull out about an arms distance,
or approximately 25 inches of floss. Thread the needle with it and put
the needle and equal distance of the floss on both sides.
 |
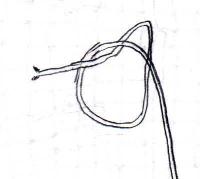
What you need to do now is make a knot at the end of the floss. The easiest way I know to do this is to wrap the ends around your finger with about a ½ to an inch worth of slack and pull the loop of your finger. Put the end into the hole and pull it through. You want to know make another knot directly on top of that knot using the same procedure as mentioned above.
 |
 |
 |
 |
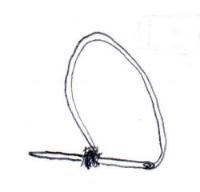
Now you have a correctly threaded needle to
work with. With part of the jacket still pined down (most of it actually,
except for the area that you will be working on) push the needle under
the first dot to the left side and the first knot of the netting and start
sewing. After about 12 or so in and outs (6 from the inside of the jacket,
6 from the outside) or until a nice white clump of dental floss starts
forming, stop sewing when you get to the inside of the jacket again. Now,
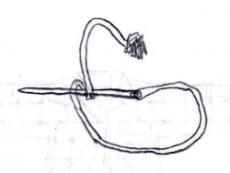
this part is very important. This part guarantees that this knot will not
unravel. What you need to do is stick the needle under the big clump of
dental floss already sewn into the fabric. After you have stuck the needle
through, run it through the loop you just made and pull it tight.
 |
 |
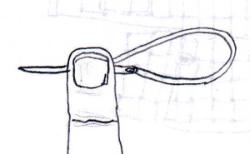
Do that twice. Then wrap the needle around the floss once and put your finger on it and the inside of the fabric and pull the needle through making a close knot on the floss near the sewn in part. Then cut off the floss right after that knot.
 |
 |
 |
Do this with all of the knots in red, and a couple in the middle (or glue it instead). Try to make this fun though, donĺt just sit there and look sad. Turn on some music or the TV; try to make it interesting for yourself. If you only do 10 knots a day, youĺll be done before you know it. Make it a habit to do it right when you get home and it will (believe it or not) get done in time.
After you finished the back area of the jacket and are starting on the shoulders and arms, periodically stretch out the netting and pin it down to see how the netting will sew onto the fabric and make the necessary adjustments. Remember, the knot doesnĺt absolutely HAVE to go on the dot you made for it. You want to the netting to be flat with the fabric and vice versa, not a crumpled up piece of jacket and netting.
After all of the knots have been made for the back, shoulder, and arm areas, time to spread out the jacket and make the dots for all the other pieces of netting. Start with the ones on the sides, they are the easiest to complete for both of the types of ghillie suits. Now, to do the shoulders and the upper arms are going to be a bit trickier then just sewing it. Put the jacket on and take a look in the mirror. Grab a hold on the netting on the shoulder area and pull it over where it should be. Take that marker and put a dot to wear you think would be a good place to put in netting when you stretch it out. Do that for a couple of knots and on both shoulders. Than take it off and start the whole process of sewing (or glueing) all over again, this time completing the shoulder area and upper arms.
After all is said and done, and all of the
knots on the jacket are complete, put it on and try it out! If you are
making the suit without the netting in the front, lye down with it on and
see how it feels. If you did it right, there shouldnĺt be any knots jamming
you in any part of the body. Congratulations! You have finished the jacket.
Take it off and lay it on the ground. Inspect the netting and make sure
there are not breaks in them or cuts in them. If there is (I know my damn
cat chewed one or two of them in the middle when I had it out), then you
need to cut an extra piece of netting off (only one strand with a knot
on each end will do) and sew it near the area of damage, creating a nice
little "patch". Be sure to seal the ends of the cuts with a candle and
flame so it doesnĺt unravel.
| Back: Step 3: (part 4) Cutting the netting to make a poncho (Bushrag) |