 |
 |
Step 5: (part 1) Preparing and ataching the netting to the pants
Time to go onto the BDU pants (after what you
did with the jacket, this thing is a breeze; took me only 3 days to complete
it). First things first, you want to wear the BDU pants with the jacket
that you just completed and stand in front of the mirror. Note and mark
where the jacket overlaps and ends and where the pants begin. You want
to start you sewing about an inch above that mark (also, if your making
the crawling suit, mark where it ends on the front too). If you are making
a suit with the netting in the front, you may skip reading this part if
you wish.
 |
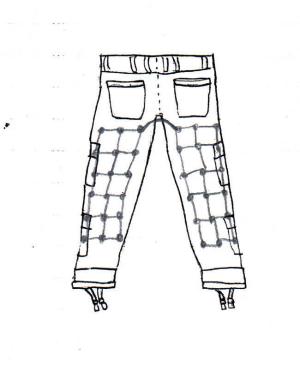
Now, lay the pants on the ground, and the netting
on top of it (you really only need 3 knots wide of the netting on each
leg). Cut two square pieces of netting for the two leg. (Sorry, I goofed
on the actually size of the pants. The crotch area is a little bit lower
than shown on the picture, and the line connecting the two separate pieces
of square netting is a piece of shoe lace since the netting cannot stretch
if connected. You may need two of this to cover the rear section of the
pants.) You may wish to cut the netting short of the end of the pants like
in the picture, or extend the netting to the bottom of the pants. It’s
your decision and really doesn’t make much of a difference except for personal
choice (remember, however, that there will be strands of Burlap on
the netting). Spread out and pin down the netting on the pants and mark
a dot under the knots just like on the jacket and start sewing just like
on the jacket. Since we are going to be putting canvas on the front, it
really wouldn’t make much sense to sew into the first level of the pockets
to spare them.
| Back: Step 4: Preparing and ataching the netting to the jacket or Flight suit |