 |
|
Step 7: (part 1) Cutting and gluing the canvas to the front of the jacket and pants
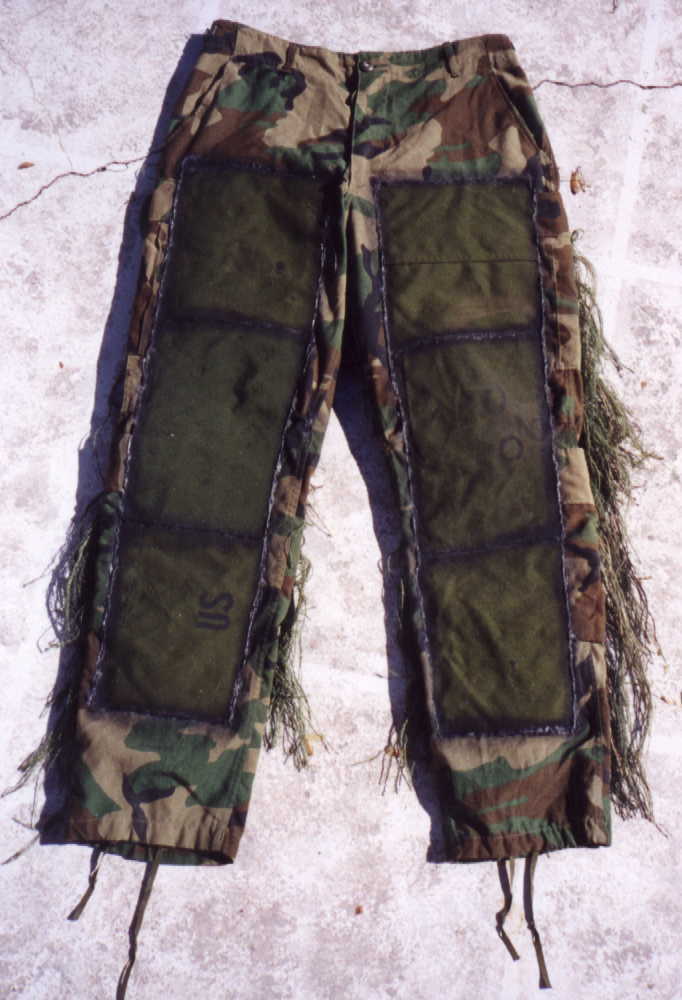
If you are making a suit with netting on the front of it, you may skip this part if you wish. (This page may take a while for everything to load up, so be patient). After everything is dry, its time to get your duffle bag out. Basically, you want to measure how much canvas you need to cover the chest area, and the part of your arms without the netting first. For me, wearing a Medium Long, the big chest area was about 23 inches by 10 inches, and the small chest area was 7 inches by 23 inches. If you have a Medium Long BDU jacket, then you don’t have to worry about anything. You could look to the above picture for advice, and the below picture for the measurements (I kind of goofed in the picture above. You don't really need the canvas to go all the way to the sleeve, just enough to reinforce your elbow area, and you don't really need that extra protruding flap that I have above and below as well).
 |
Now that you have the measurements for the jacket, measure the pants. It should start where you marked it at (when you were wearing the jacket) and it should end about 6 inches below the middle of your knee. It should also be about an inch away from the seam of the outside and inside of the pants, so therefore it will slant slightly downward for each pant leg. For me, wearing a Medium Long, the both of the leg pieces were about 28 inches for the two long sides, 8 inches for the longer width side, and 6 and a half inches for the shorter width side (refer to picture). If you have a Medium Long BDU pants, then you don’t have to worry about anything (along with the Medium Long BDU jacket). Next, you want to take the measurements for the knee’s; the pieces of canvas that you will use to reinforce the legs at the knee. It doesn’t have to be big, about 4 inches from the center of the knee each way and as wide as the big leg piece. My knee pieces were 10 and a half inches for both the long sides, 8 inches for the longer width side, and 6 and 3/4th inches on the shorter width side. Refer to the pictures for an example.
 |
 |
After all your measurements, it’s time to cut the canvas duffle bag up. (NOTE: The people at Snyder Creek sell already camouflaged 330d water resistant Cordura canvas, which is perfect for the patches needed for a suit. It is BY FAR easier then the duffle bag method, and at $14.95 a yard, it's MUCH cheaper and less aggrivating). Anyway's, if your the adventurer type, don't worry. It may look a little weary, but if you do it correctly, there WILL be enough canvas from the duffle bag to do the whole job, plus another chunk of it left over at the end. It is the cutting and planning that makes this feat possible. Your duffle bag should look something like the picture below (sorry, but the picture below is the largest I could get it).
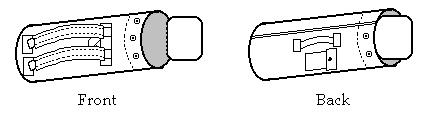 |
Now the first thing you want to do to this duffle bag is cut off that little flap at the opening. This piece will be used for the extra canvas needed to reinforce your knee. Then you want to take a seam cutter or a small knife/scissors and cut the thread holding the piece at the bottom of the duffle bag.
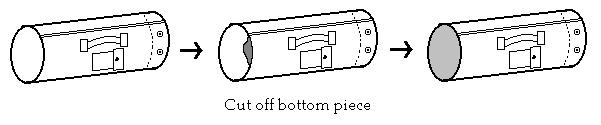 |
Once you’ve cut all the thread off (and the piece at the bottom), you should have an extra oval piece of canvas and a big tube shaped duffle bag. Stash the oval piece of canvas with the other one you have (for the extra canvas needed to reinforce your other knee). Now you want to find the where the duffle bag was sewn together. Take some sharp scissors and cut the along the seam to the left side of it. After you have completed that, go back to that seam you just cut, and cut along the right side of it, separating it from the duffle bag canvas.
 |
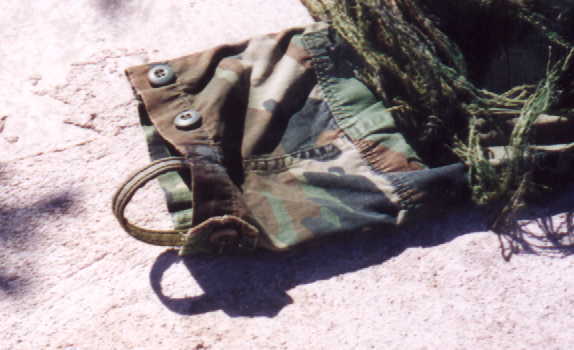
You should now have a very long, thin piece of double stitched canvas. Put this aside with the two other pieces of canvas. This piece will be used for the thumb loops that I will talk about later. Now you should have a big flat piece of canvas, with a bunch of things stitched and attached to it. Cut off shoulder straps and cut the seams from the fabric that it was stitched on.
 |
You basically want as much of a plain canvas surface as possible. Make the cuts for the two chest pieces. Then cut the pieces for your arms making sure to take in consideration the long pieces you will need for the legs (if you notice in my suit above, and some of the sketches that I have, you'll see that I made a funny looking "L" shape for my arm peices, and I went right up to the sleave. Do NOT do it this way! A simple square cut piece will be fine for elbow coverage, and it's not neccisary to go all the way up to the sleave.) After those cuts, mark out where you want to cut out the pieces for the legs, than go ahead and cut them off too.
Now you should have 6 pieces of canvas that you just cut out. Take out the jacket and button it up. Lay out the jacket and the pieces of canvas to where they should be, and see if everything fits into place. If everything looks good, and it all fits, mark where the canvas will be placed on, all the way around it. Now it’s time to take out the Shoe Goo or Goop. This is where you will use so much of this stuff. First thing you have to do, is remove all of the buttons from all of the pockets, and then proceed to put little dabs of glue on the pocket flaps to keep them down and out of the way. Let that dry, and you should have all the pockets flat with the jacket. Now, you don’t really have to glue the canvas to the jacket, you could sew it with dental floss and triple stitch the thing and it would work just as good. But after all the damn sewing you did (over the past month I would think) I think that you would never want to see another needle again. Now, this is how you are going to glue the canvas. This Shoe Goo/Goop is an amazing thing. It can hold this like liquid steel, but it can’t last sticky very long. Meaning, what your going to have to do is start by putting a beam of glue on the two short parts of the canvas (and a couple of dots of glue all over the middle of the canvas), and press it down onto the spot you marked earlier and not try to do the whole thing, or else the bead you started earlier will be almost dry (I know, its happened to me). Hold it for about a minute, or get something flat and heavy to place on it. Then take the glue and make a beam all around the long sides of the canvas and press it down on the jacket. This time, you might need to get something heavy and flat. Old VCR videotapes work well for this purpose. You may need to break out and another tube of Shoe Goo or Goop to finish this piece (that why you need so many of them, but it is well worth it). After that piece is dry (should take about an hour) go to the next piece and repeat the process above. After that, you are ready for the arm pieces. Again, mark were the pieces will go. For these pieces, however, you don’t need the same procedure as above. All you need to do is put a beam on all of the ends of the canvas (and the a couple of dots in the middle) and press it down on the marks you made earlier. Use some VCR tapes and a weight to hold the two pieces down. While these pieces are drying, lets move onto the pants.
First, mark were you need to place both of the pieces on the legs. Then use the same procedure as you did with the chest pieces with these pieces. After they are dry (give them about an hour or so) take out the other canvas pieces that you have been saving and place them over the area in which the knee’s are, and mark it. Then use the same procedure you used with the arm pieces. Let it dry for about another hour, then take out the hot glue gun and its glue sticks. Put a stick in and plug the gun in. It will take about a minute for it to warm up, and after it is ready to use, put a small line of glue over the edges of all of the canvas pieces. Let it dry, for a little bit, than inspect it more closely to see if you missed any edges. That’s enough work for today, let the glue dry and the canvas to settle and come back tomorrow.
After everything is dry and settled, time to
take the suit outside (preferably on the grass or newspaper) and lay it
down. Take out the flat black spray paint and spray paint the hot glue
on the edges of the canvas. Let dry for about 10 minutes, then come back
and apply another coat of paint. After about two or three coats of paint,
let the whole mess get some air circulation and time to de-fumigate.
| Back: Step 6: Preparing and ataching the netting to the Boonie/BDU/helmit cover |