Main Menu
Index Page
About SWTNZ
Links
Creative
Build a LightSaber
The Vacuum-Saber
DIY 12' Bandolier
Inside the X-Wing
Restoring Toys
Creative Reviews
Inside RC R2D2
Broken 12' R2D2
Prop Reviews
The Hildebrandt's
Collecting
Vintage Collectibles
Collecting & Pricing
Toy Concepts
Wampa Revealed
Behind the Beast
Behind the Vehicle
Droids & Ewok
From Steve to Star
Death Star Play Sets
Downloads
Video Edits
Rebel TieFighter
Wallpapers
Star Wars Browser
R2M-Player
Toy Company's
Kenner
Toltoys
Palitoy
Remco
|
|
REMOVING HOUSEHOLD DUST |
There are a variety of ways to remove dust from action figures and vehicles etc,
firstly you could just blow on them but this tends to blow back in your face and
rarely gets into all the little corners. Another way is to blow air from a canister
but not many people have access to these or would even consider such an item.
The best tools to use are fine artist brushes and electrostatic dusters, you can
use various sized soft artist brushes to remove the dust from even the smallest
corner or area and is especially good for large ships that have many exterior
channels etc. An electro static duster is also good for large ships as they take
away the dust rather than just throw it into the air for some other figure or toy
to carry, both these tools are cheap and can be picked up in different stores..
"DO NOT USE POLISH OR SPRAY-ON DUST CLEANERS", as they will only
harm your items instead of protecting them.
|
|
REMOVING DIRT |
In most cases for dirty action figures, soaking them in some warm soapy water
for a while is just fine. Its best to avoid scrubbing them to reduce the chance
of scratching and what ever you do "DO NOT SOAK TOYS WITH STICKERS",
If the figure has stickers use a cotton swab to gently wipe soapy water around
the area of the sticker. Avoid getting the decal or sticker wet and if the sticker
itself is dirty, wipe it with a damp swab or tissue and immediately pat it dry only .
Another way known to clean away dirt is by using denture cleaning tablets
(the effervescent kind). Put one or two tablets into a glass or bowl of water,
add the dirty action figure once the tablets start to bubble or fizz. When the
bubbles are done bubbling up, remove the figure and wipe the wet dirt away
with a cotton swab or a soft head toothbrush. Rinse the figure when you are
done. The denture tablets help scrub the figure clean, but although the
denture tablets should not remove any paint from your figures, there is
always a risk that it might, depending on the age and toy type..
Any toy with batteries or electronics cannot be soaked and should be surface
cleaned only, if the electrical parts of the toy are rusted the rust can stain
the plastic surface and getting the toy damp will only encourage the delicate
metal components to corrode even further. Try cleaning dirty battery contacts
with a swab dipped in isopropyl alcohol or methylated spirits, if the contacts
are very rusty you will need to sand away the corrosion with a fine piece of
sand paper, be careful not to scratch the surrounding plastic area's, then
clean away the dust or it will surely stain.
Ink can be removed using a cotton swab soaked in isopropyl alcohol or
methylated spirits, be sure to rinse the figure when finished.
SOME PLASTICS WILL REACT WITH CHEMICALS, certain kinds of ABS
plastics will melt when they come in contact with turpentine, gasoline, and
paint removers etc. Some figures from the 1980s are made of ABS plastics,
and ToyBiz Marvel action figures often use ABS plastic in special features of
their figures. Any figure with shiny metal or chrome has ABS plastic in it, as
the vac-metal paint is used only on ABS plastic.
Candle wax can be removed from action figures by freezing the figure for
about half an hour and then popping the wax off of the figure with your finger.
Crayon wax will not come off in this way but you can take away the wax
remnants including crayon wax by wiping it with a swab dipped in lighter fluid,
be certain to rinse the figure thoroughly afterwards..
|
|
THE YELLOWING DILEMMA |
If your toys white plastic has yellowing this cannot be removed or reversed.
If a figure or vehicle etc has yellowed it is not a stain. It is the general
decomposition of the plastic itself, ageing, light and heat are the main
contributors for this common symptom. The type of plastic used on our
beloved vintage toys do not have any protection from ultra violet light
like the new plastic toys do, eventually they will sadly become brittle and
begin to crumble. The best thing to remember is that you can help slow
down the decomposition by keeping your toys out of strong light, especially
sunlight and away from heat as this will only speed the process up..
|
|
CLEANING TOY CLOTHING |
Outfits made from nylon or polyester will melt or disintegrate when harsh
chemicals are used on them, so the best thing to do is simply wash it by hand
in cold water using only a mild soap or children's shampoo. Use cold water to
prevent the cloth from shrinking and colors from running, Toy companies don't
always wash their fabric before making clothing for action figures. If a stain is
especially bad try rubbing laundry pre wash stain treater into it with a soft head
toothbrush. Rinse the fabric well after you have washed it to remove all the
soap residue, do not wring out the cloth as it can distort and damage the fabric,
instead place the cloth between two layers of towel, press it together to remove
the moisture from the cloth into the towel.
Do not use denture tablets on clothing or fabric as some contain bleach and
it will ruin the colors. Do not use starch as bugs see starch as food, which
means that they would see your figure's outfit as their lunch.
|
|
CLEANING TOY HAIR |
Some action figures have rooted hair or flocked hair, rather than molded
on hair. Rooted hair can be washed, just like human hair although you'll
want to be gentle while doing it. A gentle soak in warm water with mild soap
or childrens shampoo should work fine. If the hair is greasy use hotter water
and if there are tangles try using a liquid fabric softener and a then comb it to
brush through the tangles. When washing do not rub, If you rub the hairs
together they may tangle even more, then press dry as with the clothing.
|
|
SWTNZ Restoration Fix - Story Telling Yoda Has Cosmetic Surgery |
Now you may have seen this before, unfortunately there are some children or
even adults who cant help pinch poor little Yoda's face, the recent release of
"Call upon Yoda" has a rather delicate flexible rubber skin and on more than
one occasion I have seen these toys quite damaged to the facial areas. The
damage is nearly always to the same vulnerable area's like the corners of the
mouth and to the nose, i managed to acquire one of these damaged Yoda's for
an attempt at restoring his broken rubber face.
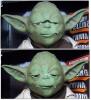
Click To Enlarge
In the picture above you can see a before and after shot, i used a "Super Glue"
product, the type that can bond your skin together really easily if your not careful.
Working on a small area at a time I started with the corners of his mouth, i knew
that the glue would leave some residue on the outside of the repair, but
because it has extremely fast setting properties and the face would need flexing
to mend the joins, i needed a glue that needed as little time for curing as possible.
Using a tooth-pick i placed small drops of glue on the stick and rubbed it on the
rubber edges that needed to be bonded, use as little as possible without getting
any on the surface or it will literally melt the rubber. Then using your fingers press
the two edges together for a few seconds and then use another clean tooth-pick
to help press the rubber joins together, keep your fingers away from the join
or you may glue your hand to his face. Next the corner of his eyes were joined
around the tear duct area and the top portion of his nose, once this is secure
you can finish gluing the side of the nose. Use a tooth-pick to lift the rubber
through the eye sockets if you need to, I also used a pair of tweezers to hold
the rubber in place while attaching the corners of his eyes. This all worked
out rather well as you can see in the picture above, although there is glue
residue on the outside of his face, this may be touched up carefully with some
light green acrylic artists paint, the kind used on doll or figure repairs..
|
|
SWTNZ Restoration Review - Repairing And Restoring Vintage Toy Packaging |
Ok say you got yourself another vintage toy for your ever growing collection
and the box is so old and deteriorating that you don't quite know what to do
about it, well i had the chance to make some repairs to such a box and here
is exactly what can be done to improve the quality of that old packaging..
The below packaging is a vintage Toltoys, "Give A Show Projector" box, it is
extremely worn, torn and in dire need of some medical attention. A lot of
collectors would simply ignore this and live with the damage, but in this case
i want to preserve this very rare example for as long as possible..

Click To Enlarge
Firstly this type of packaging is conveniently made in such a way that it can be
made without the need of cello tape, glues or staples. So step one is to very
very carefully unfold the cardboard without tearing the fragile joins, in the above
pictures you can see a before shot of the packaging laid out unfolded. Next we
need to flatten the cardboard as much as possible, locate all the folded and torn
pieces and reposition them into their correct places. Now place the packaging
on an ironing board or some other heat resistant clean surface, to protect the
card from burning lay a thin cotton cloth over it first and then with the iron set
to a medium heat begin flattening the card gently. You will need to take your
time and check under the cloth from time to time making sure nothing is
bunching or burning. Take care not to hold the iron in one place for too long
by moving it slowly but firmly over the cloth. Turn the cardboard over and iron
the opposite side as the natural folds of the card will dictate from which side
you need to focus more heat onto. Once you have made the cardboard as flat as
it can possibly be then we can move onto repairing the tears and frays..
|
|
Repair the Tears |

Click To Enlarge
To fix a "fray" or a minor scuff in the card as in the pictures above we need to
use a white glue, "Poly-Vinyl Acetate" or PVA will dry clear and strong. Its
absorbed very easily and quickly by old dry cardboard and serves perfectly
for this kind of repair. Apply a thin amount of glue to the fray, you can use
your finger if its a large area, if its a very tiny fray you should use a swab
or a toothpick which is very good for poking the glue into tight spots. Then
press the frayed cardboard into the desired position and wipe away any extra
glue quickly with a cloth or tissue. If you smear the glue accidentally onto the
shiny surface of the card this can be wiped away fairly easily before it dry's,
or if you need to, simply wet your finger or a swab and wipe it gently away
without soaking the surface.
To fix a more nasty rip or tear you may need to add a band aid, this should be
a small patch only. In the pictures you can see the patches i have added to the
inside of the packaging, the long white patches are a thin paper only. I have
used this on some very weak folds which are part of the lid, the constant
opening and closing over the years has caused the hinge to tear and crack.
So a thin line of white glue was applied along the hinge or fold and then some
more glue is applied to the white strip, the patch is then laid carefully onto the
hinge, aligned and pressed gently down then wipe away the excess glue..
For small tears or rips that need shorter and stronger band aids use a fibrous
cardboard similar to the card the packaging is made of, use small squares that
are sufficient to repair the tear and keep them on the inside of the packaging.
Once the glue has dried completely you can fold the packaging once again
into its former glory, ok so its not going to be a C10 but its going to be much
stronger and more displayable than it was. The completed box was then
packed up with the projector and slides and a protective plastic film was
wrapped around the box to finish it off. Hopefully it will last another three
decades without falling apart at the seams, remember that your collection
rely's on you to maintain it always. It can be an investment as well as your
passion and inspiration..
|
|
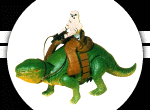
SWTNZ Restoration Tips - My Vintage Tauntaun Has Broken Reigns! |

Above, Tauntaun Reigns before & after repair,
plus Selley's, "Quick-Tight" Glue.
If you have owned a Vintage Tauntaun or bought one recently, chances are
you have seen the broken reigns that all to often accompany these toys and
its not just the solid belly version, even the open belly vintage Tauntaun
suffers with the same complaint. The cause for this is plastic degradation, the
type of polymer plastic used on these reigns have a fragile life span, they
become dry and brittle until they snap, usually right on the bend because this
is the weakest point. So what can be done about it?, well you cant stop the
degradation because this is completely irreversible, the only thing you can
do is attempt to join the broken ends together again and keep the Tauntaun
away from strong light and heat, especially sunlight. The best glue i have found
so far for joining pieces like this is Selleys, "Quick-Tight", it bonds within
seconds and leaves no white residue like super glue often does. Not sure if
its available in the USA but there is probably a similar product available like
this, the glue costs about $8nz.
|
|
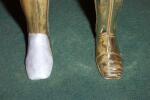
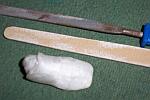
SWTNZ Restoration Fix - Vintage 12' C3PO, The Case of the Missing Foot |
The 12' inch vintage C3PO's foot is one of its weaker points, if dropped to
the floor or whacked with enough force to the toe section the entire shoe will
break away up to the ankle. This unfortunate fellow has lost his foot and its
up to us to help him out, so what we need is some polymer clay and paint..
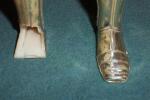
Above you can see how the foot is broken right up to the ankle, take some
polymer clay (In this case, "Du-Kit" or similar product) and press enough of
the clay into the hollow of his ankle until it is solid. Make it the same size in
proportion to his other foot and shape the clay with your fingers and a craft
knife, then place C3PO into a container and freeze him in the fridge for about
30min. Do this to make the clay more rigid so when you remove the clay from
his ankle you hopefully wont squash it out of shape, then bake for 10-12min
in the oven at 150'celcius. Of course if you are using a different brand of
clay make sure you follow the setting directions accordingly..
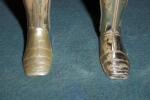
After the clay has set use a small file to create the cut away lines, these go
across the shoe in a step formation, use the other foot as a reference. Then
once you are done all you need to do is paint it gold, now the really good
thing about the replacement foot is that it doesn't need permanent bonding
to C3PO's leg, it can simply plug into place without the need of glue..
|
Star Wars Trader - New Zealand , © 2005-2008 Copyright SWTNZ
Original photographs, graphics & text etc is the property of SWTNZ unless
otherwise stated, "Star Wars" related media including images, video and characters
etc are copyright to and owned by Lucasfilm Ltd. SWTNZ is neither sponsored or
endorsed by Lucasfilm nor does it affiliate with any other division thereof.
This website is best viewed at 1024x768 with Internet Explorer
|
|
Affiliates
VidBox
Buck Rogers
The Time Machine
|