This is my best handling brass chassis to date, especially with a 1/24 scale
hard body NASCAR. Plus, it is so simple to build with just a few tools. I start
with a 3/4-inch strip of .032 brass 12 inches long. The center piece is 5 1/4
inches long and each side piece is about 3 inches long. I cut the pieces with
a pair of snips. This is easy and you get a nice straight cut.
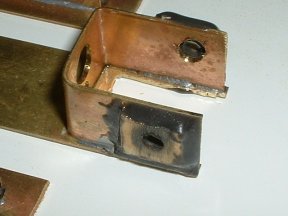
Next, I make the motor/axle bracket. This is done by bending a piece of .032
1/2-inch wide brass. I do the first bend in a vise and then the second bend
of the "U" over a piece of wood a little over 1/2 inch thick. On a
flat surface, I put the motor without pinion next to the bracket and mark where
the shaft lines up with the bracket. With my drill press, I drill the 1/4-inch
hole for the motor. Using the same technique with the motor shaft I mark the
location on the bracket for the axle holes so they will line up with the motor
shaft. I put the bracket back on the piece of wood I used for bending and drilled
the axle hole through both sides with my drill press. I then solder the motor
bracket to the very end of the center chassis piece. I will cut out the brass
for the crown gear later.
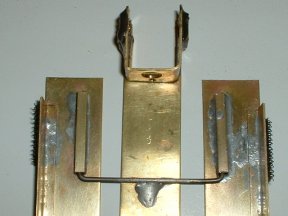
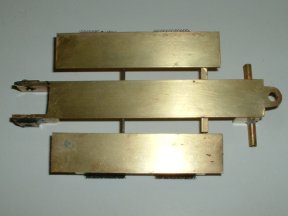
Measure the width of the body you are using to determine the spacing of the
pan pieces. Since this chassis is going in a NASCAR Taurus, my pan needed to
be about 2 3/4 inches wide. This would mean leaving about 1/4-inch gap between
the side pans and the center pan. Bend a piece of small diameter piano wire
(size is unimportant as long as it fits loosely in the square tubing) in a "U"
shape wide enough to span the pans. Put the wire in two pieces of square tubing
and solder the tubing and center of the wire to the pans. Make sure the wire
moves freely in the tubing.
Now, using a dremel or saw cut a piece of the tubing about 1/16-inch shorter
that the distance between the two out side pans in the front. This is to give
a little play in the front. Cut a piece of piano wire and put it through the
tubing and soldier it to both side pans.
Drill
the hole for the guide flag in the front of the center pan and trim. To get
the front axle height, I put the axle through the tubing and mount the wheels
on the axle. I then bend the front bracket in the same way I did the motor bracket.
With the guide flag and braid mounted to the chassis, rear tires mounted on
an axle through the rear holes, and the whole assembly on a setup block I can
see how far I have to nibble away at the front bracket to mount the axle tube.
I try to have the front tires about 1/16 inch off the track. Once the correct
height is determine, the bracket is soldered to the pan and then the tube is
soldered to the bracket. Yes the tube is level; it just looks off in the picture.
Using a vise and a hammer, I bend a 90 degree lip on the bottom of two pieces
of 1/2-inch wide brass. These pieces get soldered to each side pan for body
mounting. I mount my hard bodies with velcro.
After
all soldering is done, I nibble out the brass from the bottom of the motor bracket
using a nibbler from Radio Shack. This is really a handly little thing to have!
Then I use JB Weld to epoxy the popsicle stick axle bushings to the bracket.
Yes they are wood! I have found that after hundreds of laps, there is no play
in the bushings. Once the axle burnishes the wood in the hole, they are supper
smooth turning also. Try it; you'll be surprised! I then drill the hole in the
motor bracket for the motor screw.
That's
about it. Mount your favorite 1/24 NASCAR body and go racing. I was really surprised
how well this chassis handles. It is so simple to build and costs less than
$2 in parts. The whole NASCAR ride costs less than $25. I don't use any chassis
jig; I just eyeball everything and make sure it is reasonably straight. The
trick is in the built-in play between the pans. I will post the pictures of
my 1/32 scale version soon. The only difference is to close the gap between
the pans and shorten the wheelbase.