Trail Maintenance Guide
by Frank R. Leslie ,
6/8/96; Revised 2/15/2001
![]()
Introduction
Trail maintenance is a volunteer effort in many wilderness areas. The responsible government agency is referred to as the "sponsor" in this discussion. When volunteers act for the Federal Government, they are empowered as unpaid Federal workers, thus they are covered by certain forms of insurance and may drive Government vehicles. The crew leader reports directly to the trails supervisor, and the crew works on a designated section of trail to accomplish the directed tasks. This guide is a brief crew orientation to the trail maintenance process.
![]()
Typical Trail Description
The ideal trail is built somewhat like a rail roadbed - with gradual slopes, smooth curves, and nothing to run into. In flat areas, the trail should stay above normal annual water, should drain and dry quickly.![]()
Equipment and Schedules
Work Equipment, Etc.
Daily, bring a day pack, water & treatment, toilet paper, matches, leather gloves, hat, pants, food, sunscreen, rain gear, first-aid kit, and perhaps a camera.
![]()
Schedules & Routines
The trail crew leaves camp about 8:00 a.m. Breaks are taken about five minutes each hour, with 30-45 minutes for lunch. Workers return to camp about 4:00 p.m. Work continues in light rain, but dangers from lightning in exposed locations may necessitate fast hiking lower for safety.
![]()
Description of Tools
Tools used in wilderness areas are people-powered; no gas engines and no wheels. The most common types of manual tools are discussed below:
The Pulaski fire tool has a pointed mattock blade and a 4-inch Dayton axe blade opposite. The axe has a 20° angle edge, while the heavy mattock angle is 40° to resist chipping or gouging on hitting stone.

Pulaski was a forest-fire-fighter!
Rock bars are used to pry and move rocks of 30 to several hundred pounds. To do this, place a 6-inch rock fulcrum about 6 inches from the tip to pry against. Move the large rock only a few inches, then reposition the bar and stone to gain an effective fulcrum. An extra stone can be dropped in the gap to hold the large rock for the next prying.

Rockbars are easier carried in two pieces.
The McLeod fire tool (a flat-bladed scraper) can both chop and rake on trails. One edge has large scallops to rake away all but small stones, while the opposite edge is straight and somewhat sharp. Sometimes a side edge is sharpened to a 15° angle just to cut only grass or roots.

These rakes are often used to scrape firebreaks..
Some sponsors provide adzes or 5 inch-wide Hazel hoes to chop really hard soil.

Trail edges are readily chopped with these.
Standard round-nose shovels are good dirt movers when the soil is soft. In hard or rocky soil, the mattock blade of the Pulaski is used instead. Never pull too hard on a tool, as you risk breaking the handle; the hardware store is a long way away.
Two-man saws are used for cutting trees or logs. Each "sawyer" pulls in turn, never pushing, which would buckle the blade. The saw blade is kept sheathed when not in use. Carry it balanced across one shoulder with the teeth facing away from you. Take two large files with you on the trip to keep tools sharp.
![]()
General Use of Tools
Avoid forcing tools to where they might break. Do not pound rocks with the wooden tool handles, which could splinter them; handles may be used to lightly tamp dirt into place. Push on tools rather than pulling; if it slips, you are less likely to be injured by falling forward than backward. Cracked handles could be wrapped tightly with duct tape to last through the rest of the trip. A taped tool should not be hauled to the field; the handle should be replaced.
Tools are stored away from camp in caches, which must be located out of sight, well off the trail with all tools in the same place. Several people must know where they are located, looking back at the cache from the trail to recognize tree shapes, rocks, etc. to aid in finding them again.
Safety
Protective work clothes must include sturdy boots, leather-palmed gloves, and long pants; sometimes the sponsor will provide hard hats or eye goggles.
In wilderness areas, calling 911 doesn't work very well. Keeping safe is especially important to avoid injury. The best precaution is to be aware of dangers; to think about what could go wrong and prevent it.
Injuries could occur from falling, crushing, cutting, or penetration. Sometimes the trail may be close to a steep slope. Never lose track of where you are, as backing up could take you over the edge. Crush injuries can happen when a tool or rock slips, while cutting can occur if a tool skips off a rock and into your foot or leg.
Penetration can occur from being hit in the head or body with a swung tool or falling on it. Swing a tool with little force in the last 1 to 2 ft of arc. This allows guiding the tool slightly and ensuring that it hits where you want it. Once you have a day's practice, you can strike within 1/8" of the aim point, but if you become tired, your muscles cannot steer the strike point accurately. It's then time for you to rest and let someone else take over. Fatigue is a major contributor to injury. Take frequent breaks as required.
There will be a specific safety briefing by a sponsor representative or your crew leader before the first work starts. These are simple tools, but this isn't gardening.
Carrying tools to and from the camp or a tool cache is done with more separation (about eight feet or more) between workers than in usual hiking. Tools are normally carried in the downhill hand so they can be thrown a little if you should fall or trip. If thrown uphill, they may slide back down to where you are falling. Guards should cover the edges. The least hazardous tool side is carried towards your body.
![]()
TRAIL TRAFFIC
There will probably be trail traffic during the work. The first person to spot a hiker or horse quietly reports it, and word is passed up and down the line. When the traffic is close, workers step downslope about six to eight feet and stand quietly. Greet the persons, which also calms the horses. Tell them you are Sierra Club volunteers working for the Forest Service (or other sponsor). This implies official authorization and support.
Horses in pack trains try to pick the most comfortable trail for their feet. We try to make our trail the one they want. Watch passing horses to see if the last horse walks in the tread (the ground that is usually trod on) or is trying to get out of it.
Hikers are usually interested in the work. Invite them to work on a few feet of the trail. Suggest that they kick a few rocks out as they hike, making the trail better for all those who follow.
Trail Construction
Trail Routing - Most trail work is restoration of the most-used tread. Slight variations are sometimes made to correct the path to avoid obstacles. More than a few feet deviation should be made only with leader approval.

Miss the trees so horse packs don't rub them.
When new trails are made, careful long-path planning is required. The route is marked with pin flags or sticks and walked to ensure that the "best-feeling" path is selected. The trail cutting can then begin with long smooth curves faired evenly through the markers.
Trail Width - The width of the trail tread should be approximately 18 inches (half the length of the Pulaski handle) in most areas. The trail should slope approximately one to two inches across its width to allow water to drain off the lower downhill side. In flat areas, make the center 1/2" to 1" higher than the edges. Side cuts downhill may be necessary to drain the trail.
Sod Chopping - The sod is cut with a Pulaski to reach several inches down to tan, sterile, mineral earth. Seeds that fall on this tread will not germinate, thus avoiding grass and weeds. Edges through the soil thus drop in a 45° angle to avoid undercutting and washout.
Roots - Large tree roots should be avoided in new trails. In existing trails, a small (1-2") root should be removed. Roots larger than 5" should be saved; in between, it's a judgment call. The roots must not move when kicked. Remove any roots that have an opening beside them that could trap and break a horse's leg. (A tip from Walt Shoup, wrangler at USFS Lander WY.)
Rock Removal - The worst rocks are those rollers about 1" to 2" in diameter, which can cause a turned ankle. These can be kicked downslope well out of the trail where they won't fall back in. (This is a good recreation while hiking anyway.) When there are many small rocks, horses will step out of the trail to walk on the grass, cutting numerous parallel, or "braided", trails. Larger rocks (over 8") can be left in place if they won't move when kicked. Many a 3" high rock is connected to 100 pounds of concealed rock - somewhat like an iceberg. Don't try to remove these.
Rock Walls - Lower side slopes are reinforced by layer-stacking heavy, flat rocks to lean inward 10° to support the trail tread. If above the trail, they lean away from the trail.
Tree Clearing - Bushes or trees that are too close to the trail will tend to snag on catch horse packs (panniers), causing difficulties. Any branches that reach within or near 4 ft of the centerline and 8 ft up must be trimmed. Cut the branch completely back to the tree trunk. A few major trees are disregarded, but those thinner than 2 inches should be cut off at ground level.
In new or rerouted trail, a small or medium diameter tree may be in the way. These trees should be dug up around the base, and side roots may then be cut. With the side roots cut, the tree may be pushed towards the downslope side to get it to fall (see felling instructions below). Be careful!
Felling a tree is rarely done, but where necessary, may be done under the direction of the crew leader as the sponsor permits. Cut trees out of sight away from the trail on the uphill side so that they may be dragged downhill to the worksite. Safety is of utmost importance, as missteps may easily be lethal! One person must be designated to stand back to watch the top for swaying, then shouting "Motion!". The sawyer(s) then prepares to run by planning the route. When the tree begins to fall, the watcher shouts "Timber!", the sawyer steps carefully away and quickly moves to the side and away from the falling side while glancing back.
![]()
Trail Slope
Trails that traverse a side slope should have a gradual slope (about 1" in 30") to the outside to drain. The slope along the trail should be consistent (~1 ft in 10-50 ft) so that hikers don't climb and descend unnecessarily. Trails that go up a slope can't easily drain to the side, and water drainage must be concentrated in locations along the slope at waterbars.

Easy to climb -- easy to drain.
![]()
Trail Switchbacks
Switchbacks provide a moderate, gradual slope to ascend a steep area like a mountainside. The number of switchbacks is determined by the sideways length of travel available, and the total height to be gained in climbing the slope. Where the switchback reverses in a broad turn, there must be enough radius (~5 ft) to allow a horse to turn the corner. Blocking may be necessary to make crossing down very unattractive.
![]()
Water Control And Drainage
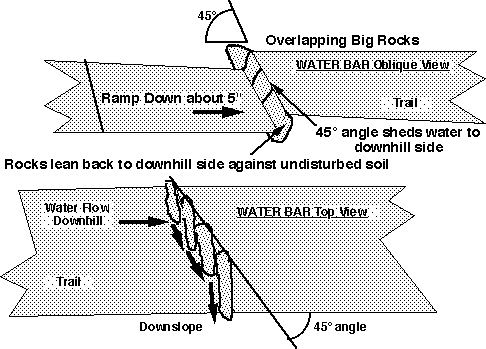
Normal rains only slightly flood the trails. One should imagine the way the water will flow and drain from the tread. Waterbars deflect the flow off the trail to prevent a eroding stream from forming. These barriers prevent the trail water from continuing farther downhill. Constructed of heavy rock or sometimes logs, they are deeply embedded to prevent horses from kicking them loose. Locate them at a natural low spot or every 200 feet or so on a hill. Place the initial cut for the rocks at a 45° angle so that the water rushes off to the downhill side. The rocks should be leaned back slightly (15°) and flush against the undisturbed downslope trail earth. Overlap them so that the water flows in front of the next rock instead of behind it. The uphill trail is ramped down for about six feet, stopping about 4" to 6" down from the top of the rocks. This extra depth ensures that storm season water won't run over the rock tops. Backfill rocks firmly with dirt to pin the rocks in place. The rains will wash in soil and firm up the rock packing.

Waterbars ease water off the trail to limit erosion.
Drains
Hillside water frequently seeps across a trail, making a wet spot. Small streamlets may flow continuously in a trickle. A minor seep may be carried under the trail with a layer of flat rocks stacked and buried 6"-12" under the tread. A culvert drain tunnel is formed with large flat rocks to carry perhaps a 6"-wide trickle.
Leakage channels must be kept clear.
The side rocks must carry the weight of a horse on top, and must slope out slightly (10° to 20°) to prevent collapse of the "roof".
![]()
Water Crossings
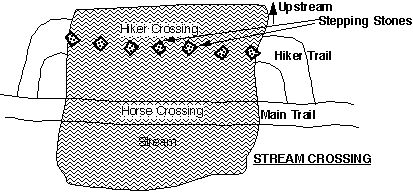
Crossings have a dual use by hikers and horses; these should be considered separately. The main trail crossing should not have rock hazards that would cause a fall or break a leg. Horse trail crossings are often cleared of rocks to spread the water broad and shallow and avoid hazards.

A rock crossing is built upstream.
Stepping Stones - For hikers, a large rock crossing is often made upstream a few feet from the main horse crossing, which must be clear of rocks. Rocks should be two-foot cubes that project well out of the normal water level and thus dry quickly without growing moss. Each must be placed to avoid jumping from rock to rock and well bedded down to prevent tipping. A vertical corner edge should be placed upstream to split the stream, reducing water overturning forces on the rock.
The hiker approaches should lead off at right angles to the main trail made so that only hikers will be tempted to use them.
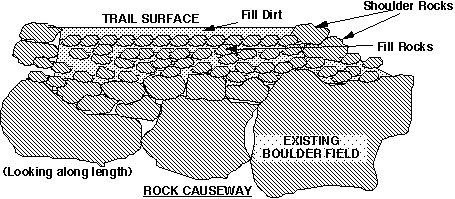
Causeways - are bridges built directly on the ground. Trail edges are formed with rocks or logs, and the tread is created from multiple layers of rocks, then small stones, and finally dirt. Make them 3 to 4 ft wide.

Causeways raise the trail to avoid mud or water.
Causeways are usually built in wet, boggy areas or across rock slides. A rock causeway allows easy passage of a slide area.
![]()
Bridges - must be strong enough to last for years and then break slightly in a noncatastrophic way. When deck logs start to break, the whole bridge may need repair. Approach ramps must offer a clear, gradual slope for four to 10 feet to match each end of the bridge. Use rocks against the wood to avoid dampness that will cause rot.
Pole Log Bridge - provides a simple way for hikers to cross a stream. Fallen logs might be used with trimming, but lack enduring strength. Newly cut trees will last years, but all bark must be peeled to avoid water retention and rot. Logs can be dragged into position on 4" by 3 ft roller logs. Two poles provide far better stability for hikers than only one pole. End supports some 8-10" in diameter are placed crosswise to the trail and slightly flattened on top with an adz. The poles should have about the same diameter and have the butt ends at the same side of the stream.

Pole bridges are supported at the ends.
Puncheon Bridge - Used in areas of low flow rate in small streams. A puncheon bridge is built strong enough to support a pack train by adding a center log under the length of the tread. All logs must be completely peeled of bark to delay rot deterioration. Large support logs (20"-30") and stringers (15"-20") are required to safely hold up. Since these logs can weigh thousands of pounds, they must be moved with ropes and great care into position with roller logs underneath. Deck logs should be 5" to 6" diameter and six ft long. After installation, they are adzed in the middle of each log to flatten it at the tread area.

Puncheon bridges are supported at several points along the span.
Here is a very detailed description of how to build a puncheon bridge.

Frank at the bridge one year later
(Photo by Jerry Leslie, 1995)
![]()
And in Conclusion . . .
Trail work can last many years if you build with the thought of creating a high quality long-lasting trail. Remember that the sponsor may direct working far and fast, or more carefully, using normal attention to details. Be adaptable to the sponsor's needs, and follow their wishes. Work safely, and enjoy the scenery.
![]()