SCGUI - GUI Play
You can do this portion without a web server
Updated: 6/7/01
The
web server portion (another page)
takes a fair amount of setup. However,
you can still play and experiment with SCGUI without
connecting to a web server. This page describes how
and gives sample experiments.
Launching the SCGUI Browser
Running the "scgui.vbp" VB project file from VB will start
the SCGUI browser. (You don't need the Python
script for these experiments.) It should be
in the same file that you un-zipped the demo
file into. This demo assumes you un-zipped to
a directory called "c:\scgui".
 The SCGUI browser console
Here is a brief description of important
parts of the browser.
- URL - Web address of SCGUI server.
(Avoid using the "http://" prefix. The
Python comm utility does not like that.)
(Not used for this page.)
- Go (button) - This is to establish
a link with a SCGUI-enabled web server.
See the web demo page
for more about this. (The experiments on this
page will not be using this.)
- Auto-start comm util. - This
allows the SCGUI browser to automatically
start the Python communications script.
(Not used on this page.)
- Log File - This switch enables
a log file to be created. The log file is
useful for learning and debugging SCGUI
communications. (Not used on this page.)
- Cancel Wait (button) - Cancels any
waiting event. Sometimes used if communication
gets confused or jammed. Not used on this
page, unless you press a button that wants
an event response, but no server is set up.
- Message File Path - The file path
used for message files and test scripts.
Make sure this points where you want it to.
Don't forget the final back-slash.
- Msg. File - Message file name
for the Python script. (Not used on this page.)
- Test File - File name for
local (non-server) test
files. This is useful for checking and
experimenting with GUI layouts.
- Use Test File (button) - Displays given XML
SCGUI test file, assuming the proper "visible"
settings are given.
- Status Bar - Displays current status
of operations.
- Manual Settings - A group of protocol
operations that allows one to create or change form
widgets. Several examples are given on this
page.
- Form ID - Form ID (name)
- Widget ID - Widget ID name for
widget being added or changed. For form-level
commands, use "form".
- Attrib. - Attribute name. Examples
include "widgettype", "content", "align", "width", etc.
These correspond closely with the XML settings in the
draft specification.
- Value - Value of the attribute.
- Set Value (button) - Sends the information given
by the four "manual setting" fields to the given
form.
Try This At Home
Included with the demo are two test XML files.
One is called "test1.xml" and the other is
"test2.xml". They produce nearly identical
results. The primary difference is that
one uses the original XML format and one
uses the "Chilly" format. (They are based
on the examples given on the specification
page, but not identical.)
To run one, make sure the "Message File
Path" has the proper path in it (see
above). Then type "test1.xml" or
"test2.xml" into the "Test File"
box. Then press the "Use Test File"
button.
 A sample login screen
The result should resemble this screen
image. Note that you may have to select
the content window to bring it to front.
Changing a property will not bring a form
to the front unless you change/set it's
"visible" property to "yes" or "true".
Changing Widget Content
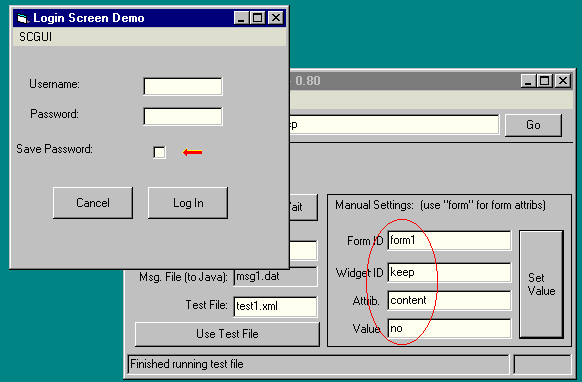
Type the circled settings into the
settings boxes and press Set Value.
 The check-box is toggled
This should un-check the "Save Password"
check-box.
Try it again, this time putting "yes" in the
Value box. This should bring the check-mark
back.
Changing Widget Properties
This example shows how you can change
the alignment of widgets.
 Shifting a label to the right
Try "left" and "center" also. Note that
our example XML did not specify a label
width. An explicit label width that
is longer than the default may make
the effect more pronounced.
Changing Form Properties
Here, we change the width of the form.
Note the use of "form" in the "Widget
ID" box.
 Changing the width of a form
All forms and widgets are scaled in terms
of screen pixels.
Changing Widget Content II
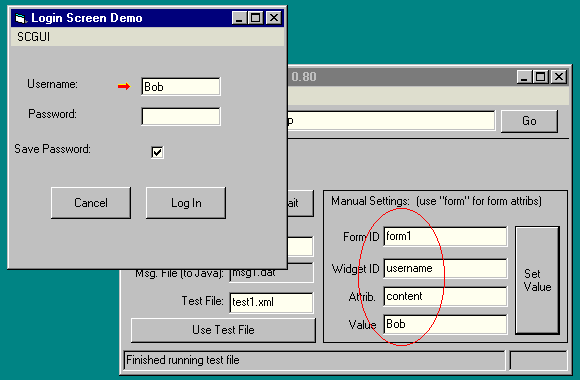
 Changing Content of the "Username" field
Try your own name now. (If your name is
already Bob, then try your friend's name. If you
have no friends, then the computer field
is perfect for you.)
Creating a new widget
Enter the following settings into the
"Manual Settings" panel. Don't forget
to press the "Set Value" button after
each set.
| Form ID |
form1 |
form1 |
form1 |
form1 |
form1 |
| Widget ID |
newthing |
newthing |
newthing |
newthing |
newthing |
| Attribute |
widgettype |
x |
y |
visible |
content |
| Value |
textbox |
2 |
2 |
yes |
I made one! |
 Creating your own widget
Note that you must specify the "widgettype" before
entering any other attribute for a given widget.
An interesting thing about SCGUI is that all
form communication can be reduced to just these four fields
(Form-ID, Widget-ID, Attribute, and Value).
This can simply communications logging, debugging,
and automated scripting.
Main
|
SCGUI-Main
|
Demo-Intro-and-downloads
|
Web-Server-Linking
|
Contact


