Instructions
For Upgrading ROM Chips For The Addams Family Pinball Machine
These instructions
explain the simple steps to changing the ROM chips in The Addams Family Pinball
Machine to upgrade from any version of the standard game to the most recent
deluxe Gold version game. The
procedures are both easy and safe to perform and no special skills or tools are
required, other than the tool supplied with these chips.
All ROM chips were carefully tested and inspected to ascertain they
perform perfectly, prior to shipping.
Before getting
started, you should have received three chips and one special plastic IC
chip-removal tool. Each of the
chips are labeled based on their location on the circuit board:
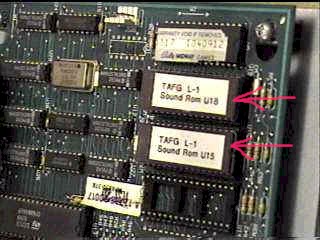
2 sound chips: TAFG
L-1 Sound ROM U15 and TAFG L-1 Sound ROM U18
1 game play chip:
TAFG LX-3 Game ROM U6
Once installed, you
will transform your standard game play into a much more active game with more
opportunities to score points, more game features, and more special effects
sounds. Once these chips are
installed, all previous information from the standard game play will be changed.
If you ever desire to revert back to the standard game chips, you may do
so by simply reversing the steps below, replacing the TAFG chips back with the
standard chips.
Step #1 Unplug the
electric plug from the wall outlet.
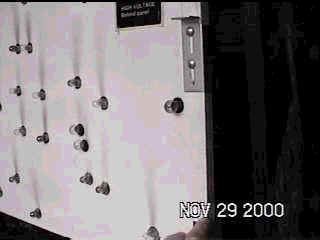
Step #2 Open the
back box door. The back box door is
usually locked with a key lock. Unlock
the
lock, pull the header picture up first,
and then out to remove it completely. Lift the door latch up, and swing the door
open (photo below shows door behind artwork slightly open).
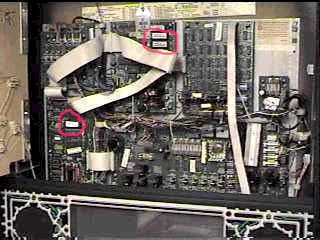
Step #4 Remove the
upper white ribbon cable from the dot matrix display board to fully expose the
sound chips.
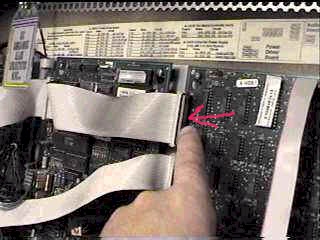
To remove the ribbon cable, grip the
upper and lower ends of the cable and pull it straight outward.
(It should come right out just like an electric plug taken out of a wall
outlet).
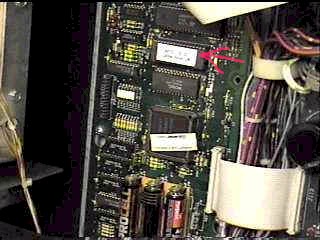
Step #5 Using the accompanying plastic tool, slip the thin end of the tool under the existing standard ROM chips. Start at the direction point shown in the photos below by the red arrows.
Try to slide the tool in between the ROM
U18 chip (the top chip shown) and the socket, and push it straight through along
the length of the chip, lifting the chip slowly upwards and out of the board.
IMPORTANT! Try
not to bend the small legs on the chips!
Be very gentle – wiggle the tool up and down a bit.
The chips were designed to be removed when needed.
Grip both the left and right sides of the chip with your fingers and pull
it straight outward. The socket for
Sound ROM U15 (the bottom chip) should be empty in the standard game.
Plug the new TAFG ROM chips in the sockets, as shown above.
Make sure you line the legs up properly with the holes in the sockets and
push them in firmly. There are
notches in both the chip and socket to guide you with aligning the ROM chips. Store the old ROM chips in a cool, dark, dry place if you
wish to keep them for future use.
Step #6 Replace the
ribbon cable back in the socket and firmly push it in.
Step #7
Follow the same procedures in Step #4 above to remove the standard Game
ROM, located in the lower left corner game board.
Replace this chip with the ROM labeled Game ROM U6.
Step #8 Plug
electric cord back in the wall outlet and start game up.
You may wish to reset the game functions (from the test button inside the
games coin door) to your liking. The
TAFG game ROMs are preset with the original factory settings.
Troubleshooting,
Questions, and Concerns:
Although if you
follow the above procedures precisely you should not have any problems,
sometimes things just go wrong. Here
are the most common problems customers often ask about:
What happens if the
little metal legs bend?
Simply
carefully and gently bend them back straight using a pair of tweezers.
After installing the
chips and powering up the machine, the dot matrix display does not come on right
away, and when it does, all I see are a bunch of dots?
You
forgot to plug the white ribbon cable back into the monitor board.
Simply plug it back in. Turn the power switch off and on again.
There is no sound
and/or the game does not start up properly.
What happened?
You
put the ROM chips in the wrong sockets. Look
at the photos for the correct location for each chip.
Make sure you put the chip in the correct socket and make sure it is in
securely.
The chip will not
come out of the socket?
Yes
it will! If you can’t remove it
with the plastic tool provided, try using a small, thin blade screwdriver.
How do I reset the
game play instructions from step #7?
Please
refer to your game manual. There are many different settings to choose from, and
although simple to change, settings are set based on user’s preferences.
The first steps are to press the button labeled “Test” and then
scroll up to the “Settings” menu – then you are on your own!
Good luck!
If you have any other questions, please visit the website: http://www.oocities.org/tafpinball/
and post a message on the group discussion bulletin board.
Let us all know how everything worked out!
DESIGN DETAILS | GAME RULES | PARTS FOR SALE | REPAIR TIPS | GAME PHOTOS | OWNER'S LIST
MAINTENANCE TIPS | VENDORS | HISTORY | LINKS | WHERE TO PLAY | PERSONAL |