
Top and Bottom design for the Box
![]() Let's get the bottom out of the way first! If the box is going to be 9x12 or
smaller, I generally use 1/8" plywood for the bottom.
Most jewelry boxes or humidors will not contain enough weight to distort the
plywood. Plywood with a variety of veneers on one side are available, I choose
something compatible with the wood in the sides of the box, the grain of the ply, must, of course, run with the length-wise dimension of the box. I have a personal
brand that goes onto all of my work, and I apply it now to the veneered face- rather than risk
ruining the project after the bottom is installed permanently in the assembled box.
Let's get the bottom out of the way first! If the box is going to be 9x12 or
smaller, I generally use 1/8" plywood for the bottom.
Most jewelry boxes or humidors will not contain enough weight to distort the
plywood. Plywood with a variety of veneers on one side are available, I choose
something compatible with the wood in the sides of the box, the grain of the ply, must, of course, run with the length-wise dimension of the box. I have a personal
brand that goes onto all of my work, and I apply it now to the veneered face- rather than risk
ruining the project after the bottom is installed permanently in the assembled box.
![]() We need a groove to fit the bottom into, a saw cut made with a thin kerf blade
(3/32") will suffice. I usually make the rebate 3/8" deep and 1/8" from the
bottom edge of the box sides. If you are nervous about having the blade this
close to the fence, a temporary board could be clamped to the face of the
fence.
We need a groove to fit the bottom into, a saw cut made with a thin kerf blade
(3/32") will suffice. I usually make the rebate 3/8" deep and 1/8" from the
bottom edge of the box sides. If you are nervous about having the blade this
close to the fence, a temporary board could be clamped to the face of the
fence.
![]() One other consideration might be, that, if you were planning any sort of decorative cuts around the edges- you might have to relocate the grooves or modify their depth. Our bottom needs to be diminsioned to fit with about 1/16" clearance in
the groove on the assembled box. Whatever lining you install later will cover the plain (in)side of our plywood.
One other consideration might be, that, if you were planning any sort of decorative cuts around the edges- you might have to relocate the grooves or modify their depth. Our bottom needs to be diminsioned to fit with about 1/16" clearance in
the groove on the assembled box. Whatever lining you install later will cover the plain (in)side of our plywood.
Fitting a Top
![]() Several basic box styles could be; a flat plywood top with veneer cemented to
each surface; a flat piece of wood; or, a raised panel style top. Let's leave
out the veneering for now, it's a tough job for a less experienced woodworker to do
well. We could use a flat, thinner board for a top, thinner means that it might
be 1/4 to 1/2" thick and fittted in a rebate similar to the bottom. An essential
concept here is that whatever material is used for the Top and bottom,
it must not be glued in place.
The reason being that the sides will have their grain running at right angles
to the end grain of the top, since wood will always swell and shrink with
seasonal variations, the wood must be free to move a bit, our book store offers
texts that expand on this subject at greater length.
Several basic box styles could be; a flat plywood top with veneer cemented to
each surface; a flat piece of wood; or, a raised panel style top. Let's leave
out the veneering for now, it's a tough job for a less experienced woodworker to do
well. We could use a flat, thinner board for a top, thinner means that it might
be 1/4 to 1/2" thick and fittted in a rebate similar to the bottom. An essential
concept here is that whatever material is used for the Top and bottom,
it must not be glued in place.
The reason being that the sides will have their grain running at right angles
to the end grain of the top, since wood will always swell and shrink with
seasonal variations, the wood must be free to move a bit, our book store offers
texts that expand on this subject at greater length.
![]() A flat panel of the diminsions discussed above will need to be planed to the
appropriate thickness, The top could be of the same lumber as that sides or of
a contrasting wood, i.e. A walnut top with cherry sides. Choose the wood here
with the same care as in locating the best part for the front side of the box.
A flat panel of the diminsions discussed above will need to be planed to the
appropriate thickness, The top could be of the same lumber as that sides or of
a contrasting wood, i.e. A walnut top with cherry sides. Choose the wood here
with the same care as in locating the best part for the front side of the box.
![]() The rebate to recieve the top must be sized with care; the lid should be "just"
free to move. I prefer to cut the groove with an adjustable dado head; a router
mounted in a table could also be used; lacking these, a groove could be
achieved by making several overlapping cuts with your regular table saw blade.
The rebate to recieve the top must be sized with care; the lid should be "just"
free to move. I prefer to cut the groove with an adjustable dado head; a router
mounted in a table could also be used; lacking these, a groove could be
achieved by making several overlapping cuts with your regular table saw blade.
![]() Whatever top is decided upon, I prefer to finish sand and apply a coat of my finish before glue-up, since your top will be able to move in a limited way, it
is important to have finish on the edges inside the rebate, this also prevents stray
glue from adhering to the top.
Whatever top is decided upon, I prefer to finish sand and apply a coat of my finish before glue-up, since your top will be able to move in a limited way, it
is important to have finish on the edges inside the rebate, this also prevents stray
glue from adhering to the top.
![]() Another great idea would be to resaw a narrower
board that you like and edge-glue the sections together in what is called
bookmatch style. After the board is resawn, the halves are opened like pages in
a book and glued, beautiful effects can be achieved this way, and you do not
need a real wide board to create your top. You will want to make yourself a taller fence to keep
your board vertical while reswing it. These boaeds need careful clamping to maintain their flatness abnd to get a nice joint (this joint will be very visible). Since the grain pattern will not match perfectly after you cut the board in half, your original board should be a little long to allow you to slide the boards to arrange the best effect in the bookmatch. After gluing, you will need a planer to flatten the wood or to
use a belt sander with finer grits to level the surface. The groove should not be cut in the sides until your top is done, allowing you to make the rebate a correct width.
Another great idea would be to resaw a narrower
board that you like and edge-glue the sections together in what is called
bookmatch style. After the board is resawn, the halves are opened like pages in
a book and glued, beautiful effects can be achieved this way, and you do not
need a real wide board to create your top. You will want to make yourself a taller fence to keep
your board vertical while reswing it. These boaeds need careful clamping to maintain their flatness abnd to get a nice joint (this joint will be very visible). Since the grain pattern will not match perfectly after you cut the board in half, your original board should be a little long to allow you to slide the boards to arrange the best effect in the bookmatch. After gluing, you will need a planer to flatten the wood or to
use a belt sander with finer grits to level the surface. The groove should not be cut in the sides until your top is done, allowing you to make the rebate a correct width.
Raised Panel Tops
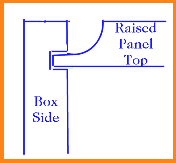
![]() Raised panel tops are very traditional and lend an air of formality to a box.
The general idea of a raised panel can be seen in the illustration at the
right. There are a variety of designs for the edges of the panel, shown is a
cove. These are generally made with a table mounted router, a couple of
designs can be achieved with only a table saw. there generally would be some
treatment of the sides to create coves, ogees or bevels to enhance the box. The
grooves for the top will need to be located so that "iland" of the top is level
with the top edge of the sides. Now and then, I manage to get the groove a bit
too loose for the top, and, then I add bits of very thin weather stripping in
the bottom of the grooves. This can center the lid and still allow for seasonal
changes in the wood.
Raised panel tops are very traditional and lend an air of formality to a box.
The general idea of a raised panel can be seen in the illustration at the
right. There are a variety of designs for the edges of the panel, shown is a
cove. These are generally made with a table mounted router, a couple of
designs can be achieved with only a table saw. there generally would be some
treatment of the sides to create coves, ogees or bevels to enhance the box. The
grooves for the top will need to be located so that "iland" of the top is level
with the top edge of the sides. Now and then, I manage to get the groove a bit
too loose for the top, and, then I add bits of very thin weather stripping in
the bottom of the grooves. This can center the lid and still allow for seasonal
changes in the wood.
![]() Now, it's time to get out that "giant rubber band" that we made earlier, and,
dry fit the entire box together.
Now, it's time to get out that "giant rubber band" that we made earlier, and,
dry fit the entire box together.
