
Did you ever fish with more than one fishing rod, or cook dinner leaving your rod unattended. Or have your grandson get bored and leave the rod leaning against the railing when the fish weren't biting only to return and find that a fish had stolen the bait without leaving a clue.
Well, when the fish start to nibble the Tattler™ (pictured below) will let you know, day or night, and you won't have to eat those hot dogs you were about to cook. Fresh fish will soon be on the skillet.
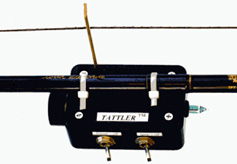
It weighs only 2-1/2 ounces, including the 12-volt battery, and mounts on any fishing rod near the reel. It can be engaged or disengaged without handling the line. It has an audible alarm for daytime fishing and a lamp alarm for night. We use it for pier fishing but I can imagine it would be great for lakes, rivers, sandpits, ice fishing (I put it in the freezer and it still worked), etc.
IMPORTANT:
The Tattler™ is patented, but is not in production.
Back to Fishing Menu
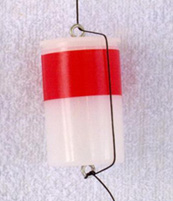
Film-Can Bobber:
This bobber can be attached to the line without breaking the line. It can be repositioned
nearer or farther from the hook without removing it; can be partially filled with water to
add casting weight;or with pebbles or BB's to make a rattling sound when jerked.
Before you get started you will need some plastic film cans, some GOOP adhesive, and
some very small screw eyes (may be as small as 1/4" ring diameter). Kodak film cans are
black with gray lids, and Fuji cans are translucent white. Get some of each free from
your local film developing store.
Gap open the eye of half of your screw eyes just enough to pass a fishing line through the
opening and into the eye (a pocket knife blade will work for this). Drill or puncture the
center of all can bottoms and lids to allow threading the screw eyes in. Roughen the
surface of each can or lid in the area immediately around the puncture, inside and out.
Start with an undoctored screw eye. Wrap the screw eye's thread with a small glob of
GOOP, then screw the eye into the can's bottom from the outside. Using a long toothpick
or something similar, wrap some goop around the screw threads where they come
through on the inside of the can and against the can bottom. Repeat the process for the
lid using one of the screw eyes that has a gap opening. After applying the GOOP pull a
fishing line through the gap to clear any GOOP from it. Leave the parts sit for 24-72 hrs
(with the lid off of the can) as solvents evaporate and the GOOP sets up.
Now, get some bright paint or 3M decorating tape and dress it up. A bright stripe around
the can just below the lid looks good, and the gray lid of the black film cans should be
painted or taped for better visibility. To tape them, try laying out some waxed paper;
then sticking a piece of tape about 1-1/2" square on the paper. Trace a circle on the tape
with the bottom of a film can; then cut out the circle. Use a paper punch to make a hole
in the center. Peel off the waxed paper and stick the tape to the lid of the can with the
screw eye in the hole you just made.
To put the bobber on the fishing line form a "U" shaped loop in the line and push the
loop through the screw eye on the bottom of the can. Pull the loop over the entire can
and pull it up tight at the screw eye. Now, thread the line that is going back to the fishing
rod through the gap in the eye on the lid. Presto! you are hooked up. If your gap is too
big to retain the line, wrap the line around the base of the eye and back into the gap a
couple of times. You should still be able to slide the bobber up and down the line to
change your fishing depth. The bobber will lay on it's side in the water with the top
facing you. You can change the attitude of the bobber in the water by adding or
subtracting sinker weight at your leader. The more weight, the more upright
(until you sink it). If you want it to stand upright without all of that sinker weight fill it
about 1/3 full of water then add a small sinker to your leader in order to tip it up initially.
You can add noise by putting some pebbles or BB's in the empty can. This will also tilt
the lid into the water more and it will make a bigger splash when you jerk it to attract
feeding fish.
Back to Fishing Menu
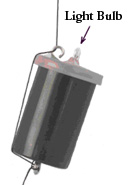
Lighted Film-Can Bobber:
This bobber uses an exposed lamp mounted in the lid, providing a visible glow at night,
for a minimum of 5 hours (at summer temperatures) on a single "N" size battery. Use
a Kodak black plastic film can for the housing. You can pick one up for free from your
local film developer. You will need three Radio Shack parts: a 272-1139 lamp, a 23-023
battery, and a 270-405 battery holder. You will also need two very small screw eyes, (as
small as 1/4" ring diameter). Drill or puncture the center of the can bottom to allow
threading the screw eye in. Roughen the surface of the can in the area immediately
around the puncture, inside and out.
Wrap the screw eye's thread with a small glob of GOOP, then screw the eye into the can's
bottom from the outside. Using a long toothpick or something similar, wrap some goop
around the screw threads where they come through on the inside of the can and against
the can bottom.
Gap open the eye of your remaining screw eye just enough to pass a fishing line through
the opening and into the eye (a pocket knife blade will work for this). Drill a 3/16" hole
in the center of the lid and an approx. 1/16" (match to your screw eye's requirements)
hole off center, midway between the 3/16" hole and the inner sealing flange of the lid. It
will be easier to locate if you drill from the inside of the lid. Roughen the surface of the
lid near each penetration, inside and out. Strip the ends of all wire leads about 3/8"
from the end. Tin the bare wire ends with electrical solder. Prepare a screw eye with a
gap as described in "Film-Can Bobber" above. Using a toothpick, wrap a small glob
of GOOP around the base of the lamp, reaching about 1/4 of the way up onto the glass
bulb. Install the lamp from the outside of the lid, wires first. Shove it into the hole until
2/3 of it remains outside of the lid. Clean any GOOP from the upper 1/2 of the lamp
bulb. Turn the lid over and wrap GOOP around the base of the lamp, and against the lid
surface.
Using a toothpick wrap a small layer of GOOP around the threads of the gapped screw
eye and thread it into the small hole (on the outside) of the lid with the gap next to
the lamp bulb. Turn the lid over and wrap a larger glob of GOOP around the screw
eye threads and against the lid surface. Leave a gap between the glue and the lid's sealing
lip and clean any residue from the lip. Turn the lid over and pull a string through the gap
in the screw eye to clear it of GOOP.
Let the GOOP dry for 24 to 72 hours.
Solder the black battery holder lead to one of the lamp leads. Insulate the connection
with electrical tape or shrink tubing. There is no switch so when the remaining leads are
connected the lamp will light. Since the wires are fragile, they should be connected to
each other with a miniature removable connector that won't damage them. I have found
that an RC (radio control) screw lock pushrod connector (not an electrical part) will work
well. You can find it at your local hobby shop. Just slide both wires into the hole where
the pushrod goes and thread the screw in until it clamps the wires. Bend the red battery
holder lead wire (con't bend the wire from the lamp) after it passes through the connector
so that it will not pull out when disconnecting. The connector is not insulated so you
must tape it or tape the exposed metal parts of the battery holder (recommended)after
installing the battery.
Tape the battery into the battery holder. Now, when you get ready to fish you just shove
the battery and wiring into the can and put the lid on. To put the bobber on the fishing
line form a "U" shaped loop in the line and push the loop through the screw eye on the
bottom of the can. Pull the loop over the entire can and pull it up tight at the screw eye.
Now, thread the line that is going back to the fishing rod through the gap in the eye on
the lid and you are hooked up. If your gap is too big to retain the line, wrap the line
around the base of the eye and back into the gap a couple of times. You should still be
able to slide the bobber up and down the line to change your fishing depth. The
bobber will lay on it's side in the water with the top facing you. You can change the
attitude of the bobber in the water by adding or subtracting leader sinker weight.
The more weight, the more upright (until you sink it).
Back to Fishing Menu
Adjustable Anchoring Bridle:
You need a cleat at or near each end of your boat. You will need a good, soft 1/4"
(unless you have a very large boat) nylon rope about 2-1/2 times as long as the distance
between your cleats; a good brass snap hook, with a large enough opening to grab a loop
in your anchor line; and a piece of 2x2 (wood) about 6" long to make a sliding block.
Drill two, 3/8" diameter holes through the 2x2, each about one inch from an end. Now,
turn the 2x2 over and drill another 3/8" hole in the middle of the 2x2, at right angles to
the first two holes.
Cut about 3 feet of line from the rope. Run it through the center hole in the sliding block.
Slide the snap hook onto the line and tie the ends of the line together with a square knot.
Seal the cut ends with heat to prevent fraying.
Run the remaining 1/4" line through one hole in the sliding block and back through the
other. Make a large loop in each end of this rope with a bowline knot. The loop should
be large enough to go over the cleat or through the slot under the cleat and back over the
points of the cleat (if you have that type of cleat). The line with the hook should be
behind the bridle line in the sliding block when the anchor is in use. Then, if the block
breaks, the lines will be interlocked and still connected to the anchor. Pull one end of the
bridle line through line with the snap hook to reverse the situation if necessary. Hook the
bridle to the boat and check the fit and feel. If the block slides along the bridle rope too
easily make another one with smaller holes or holes drilled at an intersecting angle rather
parallel to each other and perpendicular to the surface. If the bridle is too long, shorten
it, Seal the cut ends of the bridle rope with heat to prevent fraying.
I have found that a position about 1/4 of the way from the front cleat is a good general
purpose point for the sliding block to be located.
Your anchor rope should have a loop tied in it about every 15 feet. These loops will be
used by the snap hook to grab the anchor rope and relocate the boat or to anchor at
various depths. Make the loops by forming a "u" in the line, then making a circle with
both lines of the loop and pulling the apex of the loop through the circle. Hard to
describe but very simple to do.Back to Fishing Menu
Hamster Powered Aerator:
Registered racing Hamsters are the best. Of course the equipment and working hours
must be approved by the International Union of Working Hamsters. This puts a damper
on everything because you have to have a hamster in reserve in case you need more than
two hours of operation. Worse yet, the Hamster must have Hamster SCUBA gear
available in case of emergency. This will run your cost up a bit.
Hummmm, how about commercial operation with Greyhound operated paddle wheels
operating in stock tanks??? :>)
Back to Fishing Menu
E-mail me at 53morris@sbcglobal.net
The white film cans need nothing on the lid because white gives the best visibility.
This bridle will allow you to align your boat such that you and your fishing partner can
both fish in the "hot spot" regardless of wind and current. Only one anchor is required.
Sorry, no picture as I don't have a boat now.
Keep your bait alive without pumps and batteries. A Hamster driven, direct-drive paddle
wheel spinning inside an Igloo ice chest, 1/2 filled with water, will stir things up, aerating
the water at an amazing rate.
![]() Get your own Free Home Page
Get your own Free Home Page