KITES & KITE GADGETS
Setting Up:
First, you need a nice breeze that you can feel on your face while standing still. Find a park or field with space for flying. Determine which way the wind is blowing, and turn your back to the wind. If there are buildings or trees behind you, move away a distance of five times the height of the obstruction, so that you will have straight line wind. Look ahead of you and make sure there are no power lines that the kite could reach.
Launching the Kite:
Lay out at least 100 ft of kite string in the same direction that the wind is blowing. With a Flyer and a Helper, the Flyer will hold the flying handle (string winder) and, at the far end, the Helper will launch the kite, facing it into the wind, and letting the wind take it up. The Flyer may have to walk backward as the kite is released to help it gain altitude. If there is only one person, the flying handle must be anchored to something during launch.
Flying the Kite:
When flying, if the kite begins to fall slowly due to lack
of wind, walk backward to keep
it up until the wind picks up again.
If the kite begins to circle and dive due to a
high wind gust, walk toward the
kite to stabilize it until the gust passes.
Adjusting the Kite:
On many kites, such as the common diamond shaped kite, the bridle may be adjusted to suit wind conditions. To begin the adjustment, grab hold of the bridle at a point that appears to be aligned with the cross spar. With the wind at your back, and the kite in front of you, raise the kite, and slide your fingers up the bridle until you feel the kite begin to "fly" in the breeze. Bring the kite down and tie a tow loop at that point in the bridle.
You may need to adjust again later. In general, in higher winds the bridle should be adjusted so that the tail end of the kite will fly higher than normal and the kite will be slanted away from the wind. In lower winds the bridle should be adjusted so that the tail end of the kite will fly lower and the kite will catch more wind. For instance, on diamond shaped kites, move the kite string’s connection higher on the bridle for higher winds and lower for lower winds.
Some kites (most sled kites and all diamond shaped kites for instance) require a tail for stability. The higher the wind the longer and broader the tail needs to be. Before adding significant length to the tail, try doubling the tail back upon itself for more wind resistance where it counts, up close to the kite. If the kite has multiple tails, connect the loose end of each tail to it's nearby partner. If you have an odd number of tails, double the middle one back upon itself.
If, after adjusting the bridle and the tail the kite still doesn’t fly right, the wind is out of range for that type of kite.
I had trouble getting pictures of the above, 5" (width between the spars), universal sled kite in flight. It darts quickly here and there, never stopping. That is what makes it so much fun to fly. The design is based on the universal sled kite drawing click-able below. It uses soda straws for spars and kitchen garbage bag material for The sail. The tails are plastic surveyor tape from Ace Hardware.
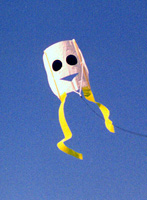
The opening in the kite face looks like a mouth and the twin tails look like dancing legs in flight. Your kids/grandkids will love it. It requires a nice breeze of 8-10 mph or so because of its small area, stronger breezes don't bother it (if you add enough tail).
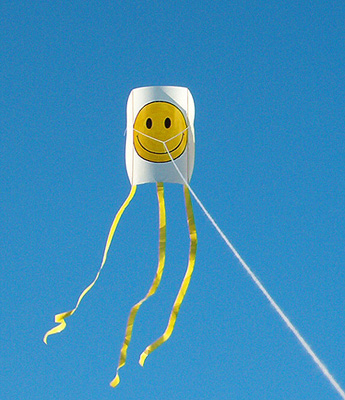
Click photo for full page picture of the above, 12“ (between the spars), universal sled kite made from a kitchen garbage bag, with sticky-back shelf paper to draw the smiley face on. The spars are 1/8” diameter dowels, and the tails are 1-1/8” wide plastic surveyor tape from Ace Hardware.

Click photo for full page picture of the above, 16“ (between the spars), universal sled kite. The kite is made of a cheap shower curtain liner. The spars are 1/8" diameter dowels and the tails are 1-1/8" wide plastic surveyor tape from ACE Hardware.

Click photo for full page picture of the above, 20“ (between the spars), universal sled kite. The kite is made of 3-mil polyethylene sheet with sticky-back shelf paper used for the face pieces. The spars are 3/16" diameter dowels and the tails are 1-1/8" wide plastic surveyor tape from Ace Hardware.

Above is a 32" (between the spars) universal sled kite. The kite is made of 3-mil black polyethylene sheet with sticky-back shelf paper used for the decorative pieces. The spars are 1/4" diameter dowels and the tails are 1-1/8" wide plastic surveyor tape from Ace Hardware. The sun was hidden from the kite face, a common problem for kites made of black polyethylene, so I enhanced the decorations with a photo editing program.

Above is a 16" (between the spars) universal sled kite. The kite sail was made from a Hallmark plastic tablecloth. The spars are 3/16" diameter dowels and the tails are 2-1/2" wide strips of 4-mil polyethylene. The facial features were painted on with Scribbles 3-D paint. The mouth and eye highlights are openings in the sail.
Above is an array of small, paper-cutout sled kites made from a single sheet of printer paper with no spars at all. The instructions are printed on the sheet that you cut the kite from. See Sled kite Patterns and Drawings at the bottom of this section.
Above is a video of a small, wildly active, paper-cutout sled kite. It has a single, very long tail. It is best flown from a lightweight fishing rod. You can make it spin dip, and dive by jerking the rod tip back. And you can save it from a fatal spin by tipping the rod forward. Click the start arrow above to view the video of the kite in action.
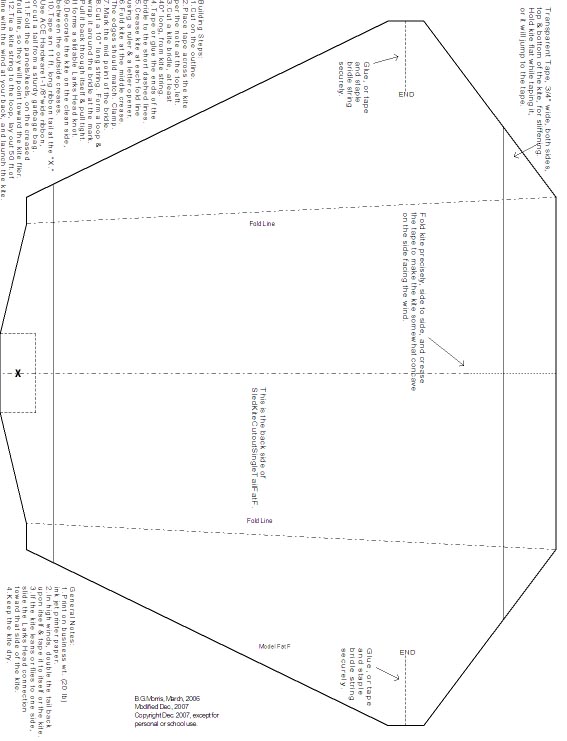
NOTE: The following paper cutout, sled kite patterns will print about 2/3 the size they should. Until I learn how to fix the problem, you should pick a pattern, then email me (53morris@sbcglobal.net) and I will send you a jpg file for printing the file full size.
Paper Cutout, Sled kite Patterns:
Sled kite Drawings:
The above picture shows the big kite flying in a beautiful sky south of Houston, Texas.

The above picture shows the big kite’s size relative to a garage door. Look closely and you will see a sliding block where the bridle meets the kite string. Also, you can see most of the 100 ft of bed sheet tail.
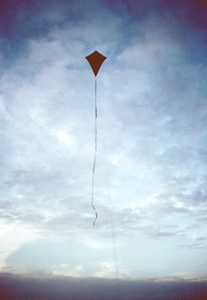
Diamond Kite Pictures and Drawings:
In the photo below note a deviation from the above drawings. A string and post has been added for supporting the vertical stick. For weight savings, the vertical stick in this kite is skinnier than the dimensions in the above drawing. Building of the cross stick is critical. The ideal cross-stick would be tapered like a bow of a bow-and-arrow set.

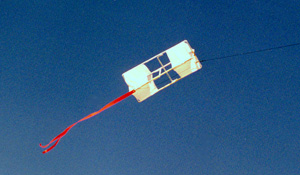
Above is a miniature Box Kite, just 15" long, 5" high and 5" wide. Built with soda straws and kitchen trash bag material, it flies great in a strong breeze of 10 mph or more.
Above is a Large Kite String Winder for super size kites. It will release string on demand to get the kite up there in a hurry. You bring the kite down with the Kite Bringer Downer, then wind the string as you walk to the kite.
The rope loops in the handle end are for two different purposes. The loop at the extreme end is for anchoring the flying handle during one person launch or kite retrieval. The second loop is for securing the kite string before anchoring with the first loop. This second loop is wrapped around the string and then over the end of the handle. No tying is necessary.

Above is a picture of my Favorite Kite String Winder. I cut it from an old pine shelf that had been painted white. I sanded most of the white away, then coated it with epoxy. You can wind and unwind string quickly with this gadget. To unwind string you peel the string off with your free hand or merely rock the handle up and down. To avoid releasing string this way when a youngster is holding the handle, just wrap some string around the tie-off screw at the upper right corner.

Above is a picture of Small Kite String Winders made from Popsicle sticks and toothpicks. You Can make these for light pulling kites, and give them away with kites you have made as gifts or to those showing a real interest at a park or other flying location.
You can buy 1000 of the Popsicle sticks for around $3 at a craft store, and 250 of the round toothpicks for about 50 cents at a grocery. Two types of glue are required. Glue the intersections of the sticks (two used for the grip, one top and one bottom angular, and one vertical string stop) with Elmer’s Carpenter’s glue and clamp the joints for half a day. Then, drill through at the intersections with a bit the same size as the barrel of the toothpicks (I use 5/64” for toothpicks just over 1/16“ diameter). Insert the toothpicks and cut the ends flush to the sticks. Sand the cut ends. Then, place a drop of super thin cyanoacrylate (CA) glue on each end. Wipe off the remainder with a paper towel after a few seconds. This glue is a “Super Glue” and will penetrate the wood fibers. It will also glue your fingers together, so be careful with it. You can get CA at hobby and model stores.
A short piece of Popsicle stick can be glued between the grip sticks, midway from the ends, to stiffen the grip area.
Use a string that doesn’t stretch to avoid collapsing the winder due to compression of the Popsicle sticks when winding under load. It is best to have someone hold the winder, then bring the kite down by walking to it while sliding your hand or a tool along the string until you reach the kite. Then unhook the kite and wind in the string.

Above is a picture of a Large Kite Bringer Downer kit. You are wondering what this is? Well, you don't just pull-in or wind-in one of the super kites from the sky. You hammer a tent stake into the ground, then anchor the string to it.
Secondly you place the Bringer Downer (a slightly bent, used paint roller) over the kite string and walk to the kite, thus bringing it down. If you want it to stay down you must stake it down or disassemble it.
Below is a photo of a Kite Camera Bracket. Hang your camera from the kite with this bracket and let the self timer or a servo shoot a picture.

Please come back soon and visit my site or e-mail me at 53morris@sbcglobal.net.