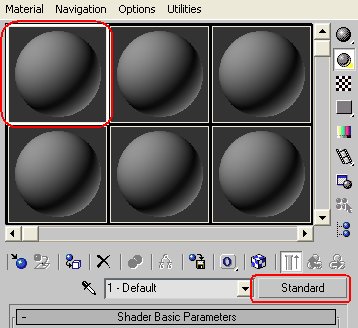
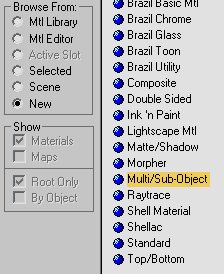
In the dialogue that appears, pick at the Browse From section "New", and from the Materials list pick .... drums .... Multi/Sub-Object!!! Click OK.
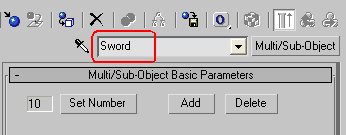
Now, the material parameters looks mucho different than before, rename the new material to "Sword" or whatever you find suitable, do this by entering the word Sword in to the drop down menu next to the Multi/Sub-Object button and press Enter.
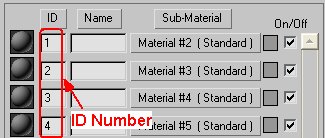
Now, if you'll look at the Multi/Sub-Object Basic Parameters rollout you'll see a list of blank numbered materials, these are the ID's we assigned to our polygons earlier, now we only need to assign a material to each ID number.Im not going to make my own materials, I'm going to use the ones that come packed in Max, this is a big no-no for many modelers, but I'm doing it to speed things up.
Okies, number 1 is the accessories, lets assign a material to ID number 1. Click the Material #2 (Standard) button next to ID 1.
Hmmmm, you the screen you've seen before, a so called blank material. Click the Standard button, pick Mtl Library in the Browse from section, it should open the default 3dsmax material library, 3dsmax.mat, there, pick Stones_Travertn, and click OK.
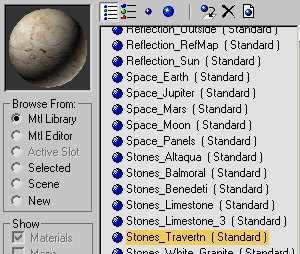
(If you Mtl Library shows different library than mine, click the Open... button in the Material Browser window, and from the list pick and 3dsmax.mat file).
Ok, now we've set this stone material to ID number 1. Next? The blade, which is ID Number 2! Go back up one level, to Sword material, do this by clicking the Go To Parent button.

This gets you back of course, click the Material #3 (Standard) button next to ID 2, as before click the Standard button, pick Mtl Library in the Browse From section, pick Metal_Chrome from the materials list, and go back to Sword material again, the main Sword material should look weird now in the preview, something like this:
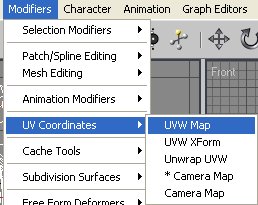
And now, the 3rd ID, the hilt, lets also give it a metallic sort of look, click the Material #4 (Standard) button next to ID 3, and when u get to the Mtl Library pick Metal_Galvanized. Go back to the parent Sword material. And now, the final part! Click the preview sphere, and while holding the mouse button drag and drop on the sword... Before u render you have to assign the UVW Map modifier to your object so it can render correctly. Do this by in the Main Menu > Modifiers > UV Coordinates > UV Map (make sure the object is selected when you do this).
Go ahead. Rednder!!! - Please take a second to rate this tutorial -