|
STEP
1: First
step is to find good picture to draw. GOOD means
the picture is Clear, Big, and got so many point
of identifying. Most common identifying point is
EYE,NOSE,MOUTH and TEETH.
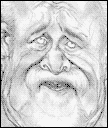
In
this tutorial we take one of most famous opposition
party member in Malaysia (DAP), KARPAL SINGH
as an example. This picture is from local newspaper
.Click to enlarge.
|
 |
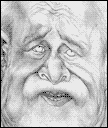
Step
2: Sketch rough figure. Use HB, 2B or 6B depend
on what type of pencils that comfort to you. I always
use 6B. Sketch freely to catch early mode . Here you define
the 'form' of the subject whether circle, obligue, square
or etc..etc. Dont push too hard on this part. Sketch freely
and create a light line of stroke. This is more like a
guide for the next step. Click
to enlarge. |
 |
Step
3: From the light line of stroke that you create in
step 2, slowly you develop the 'BUMP' on Mr. Karpal face.I
use B and HB technical pencil. Identify the dark and light
part and render it slowly. Have to be very pasion to be
the BEST artist! :).Click to
enlarge. |
 |
Step
4: Base on step 3 you just high light ( make
tone ) to identify more precisely between dark and light
portion. Do it carefully base on original Big Clear picture
that you have. Use HB and 2B and also you can use technical
pencil for outlining. From time to time use your finger
to create smooth surface. You also can use cutton buds
or tissue. Click to enlarge. |
 |
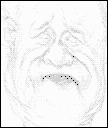
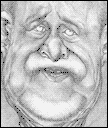
Step
5: Now you use 2B ,3B and 6B to clear out the tone.
Do it slowly. Take your time and hold your breath while
doing this part! This part you can see all main part
(identification point) are detailed out. Eyebrow,
Eyes,Nose,Mouthtache and teeth. Here you can see
the terrain. The Bump.
Most
identifying part on Mr. Karpal is his eyes, nose and
mouthtache . Click to enlarge.
|
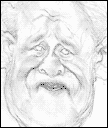
 |
Step
6: From step 5. Develop the tone very slowly and
very carefully. Use clean paper to cover your hand (to
separate) your hand from directly damage the tone that
you already make on your artwork.
On
this part i only use technical pencil (2B) to
create more real bump.and here also you can see i create
dark background because Mr. Karpal's hair is white,
so in order to make it appear. i make a dark background.
Click to enlarge.
|
 |
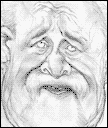
Step
7: Clearly you can see that i draw and render the
tone on the left side first. thats the way i do. But
its depend on you how you gonna do it. But remember
always to cover your hand with clean paper in
this process.
Just
to avoid frustration to see what you render before damage.
use your finger and cutton buds to create more variety
and live of tone. At the same time, keep on shade the
background to more darken. Click
to enlarge.
|
 |
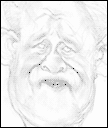
Step
8: Use HB, 2B , 6B and technical pencil
to furnish out at all points. Do it slowly and be patience
because you are almost to the finishing line.Use your
finger to rub all parts to make it look smooth. Cutton
Buds also work very well. Mix it.Becarefull of your
finger! make sure no sweat! OK! :) Click
to enlarge.
FINISH!
Now your TURN! Hope this will help you. If not to master
it but at least i hope this would be the kick off for
you to start!:)
|