|
1. To make previews you need to make
a preview picture in Photoshop. Canvas size 377 x 190
2. Once preview is made. Index your
preview into 252 colors adaptive.
3. Save file in : WW2mymapname.preview.pict
/ Also save in : WW2mymapname.preview.bmp
4. Open Fear. Choose import pregame
preview. Select the .pict file preview.
5. Close fear. Open Amber. Open preview,
located in the collections in local folder.
6. Open preview in Amber. See if the
preview made it in, by clicking exessions.
7. View your preview. Then select replace
bit map. Use the file bmp now.
Example:
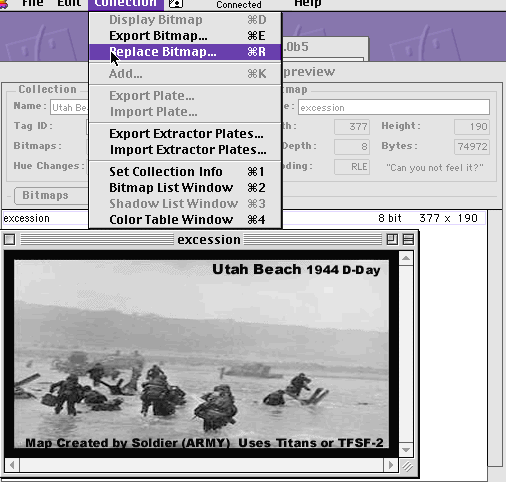
8. Close amber and save changes.
9. Open fear. Open Meshes. Under pregame,
choose your newly imported preview.
10. Check on Tcp if pregame preview
has any black speckles. If it does. Remember that canvas background
viewed in PS should be black. Make changes by selecting the foreground
foreground to black.
Test The Map.
11. Separate mesh, collections, and
string lists [ leave only these folders in the local! . And put
all the other tags in a separate folder.
Test map in the local using TCP. Remember
to turn WW2 units plugin on.
Or ! you can test the whole tag set,
with every tag in the local folder on TCP. Do not use plugin support.
Because the local folder has all the tags you need.!
|