COMMAND DECISION (Individual Missions)
A Gear Krieg Scenario in Three Parts by Scott Lynch
"Results of reconnaissance must reach the commander in the shortest possible time and he must then take immediate decisions and put them into effect as quickly as possible. Speed of reaction in command decisions decides the battle."
General Erwin Rommel, "The Rules of Desert Warfare"
I. Move to Contact, 0745 Hours
Situation and Set-Up
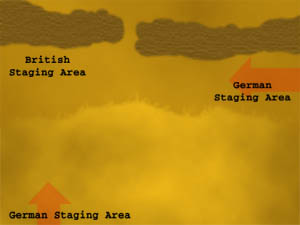
The northern half of the battlefield is controlled by a long ridgeline running all the way across the map. The top of this escarpment (as well as an area about 6-8 MU south of it along its whole length) should be considered rough terrain. The rest of the map should be considered sand.
Both sides receive those units previously allocated from available forces.
British units may begin the scenario dug in. They may be placed anywhere on the ridge or the rough terrain beneath it within 10 MU of the western edge of the map. The German player may split his forces as he sees fit between the rough area beneath the eastern edge of the ridgeline and the sand dunes to the south. German units may be placed within 5 MU of any map edge in those areas.
|
 |
Mission Objectives and Victory Considerations
The British are attempting to keep the Germans off their end of the ridge, and the Germans are out to knock them off it. The battle may continue until one player determines that his victory is unlikely. At that point, he may attempt to remove his forces from the mission by moving them off an appropriate map edge- north or west for the British and east or south for the Germans. Any units so preserved may be placed into the order of battle for "The Sieve and the Sand," described below.
The battle will be over when one side no longer has any presence on the map.
Units withdrawn and placed in the third mission do not have their damage repaired or their ammunition replenished.
The winner in this engagement may add the following to their available forces for either of the next two missions:
If British: 2 x MVIIIB Cavalier Walker
If German: 1 x SdKfz 231 (8-Rad) Armored Car
II. Fuel Raid, 0850 Hours
Situation and Set-Up
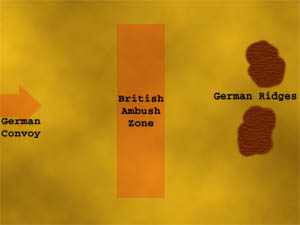
The German player receives an additional eight trucks for this mission, each of which is unarmed. If there are other German trucks present in the scenario, mark the eight record cards of those in the supply convoy with a small "s." Do not let the British player know which trucks are or are not carrying supplies until they're destroyed.
The Germans player must split his available forces for this scenario. Some will be escorting the convoy, and some will be placed on or near (within 2 MU of) the two small ridges. The convoy and its escort may be placed anywhere within 5 MU of the western map edge. The British ambush may set up in the middle of the board, no closer than 5 MU to either the northern or southern edges of the map, and no closer than 15 MU to either the ridges or the leading edge of the convoy (thus, at least 20 MU away from the western map edge). The British units have just arrived and may not begin the game dug-in. German units on the ridges may begin dug-in.
All terrain in the scenario should be considered rough.
|
 |
Mission Objectives and Victory Considerations
German supply trucks must cross the map from its western edge and exit on the eastern edge. In order to continue daily operations, at least three of the eight supply trucks must survive the battle. If the British can destroy six of the eight, they will win the engagement.
If the British player decides that victory is untenable, he may attempt to withdraw his forces off the southern edge of the map. For every unit so withdrawn, a die should be rolled. If the result is a 5 or a 6, that unit may be placed into the order of battle for "The Sieve and the Sand," described below. Units so preserved do not have their damage repaired or their ammunition replenished.
The winner of this engagement may add the following to their available forces for the final mission:
If British: 1 x Matilda Mk. II Tank
If German: 2 x PzKpf IV Aust B "Loki" Walker
III. The Sieve and the Sand, 1000 Hours
Situation and Set-Up
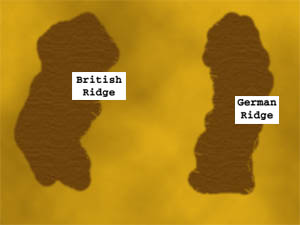
Each side sets up on a single large ridge, at least 5 MU wide and 15 MU long. These ridges are rough terrain, as is an area of 2 MU in all directions around them. The rest of the map is to be considered sand. The ridges should be 15 MU apart.
Each side may set up anywhere on its ridge or within 2 MU of it on all sides. Any units may be considered dug-in or hull-down as the game begins.
Both sides receive those units previously allocated from available forces.
|
 |
Mission Objectives and Victory Considerations
The Germans and the British each have the unenviable task of crossing a wide, sandy expanse to pry the other side off a well-defended ridge. In essence, each side must balance the defense of its position with the need to charge up a similar position under heavy fire. The victor here will dominate Sidi Rezegh and hold the upper hand in the battle for Tobruk.
The first side reduced to three or fewer operating units will lose this engagement.
Variations and Complications
Sandstorm
At the beginning of the third turn of "The Sieve and the Sand," roll a die. If the result is a 5 or a 6, a dust storm will blow up at the beginning of Turn Four.
The Iron Gamer Challenge
Those players who sincerely believe themselves to know exactly what they're doing may take another challenge- each may sit down with a copy of the Gear Krieg sourcebook, and, in five minutes, assemble a force with a TV equal to or less than 3000. This force must be split between the three missions before the timer runs out.
The Command Decision Drinking Game
Each player should arm themselves with a supply of the alcohol of their choice (brews appropriate to the nationality of each player's forces are especially acceptable) and lock up the car keys. During the course of these three missions, players should take a shot any time:
A vehicle fails a Dangerous Terrain test;
A German "88" hits a vehicle and causes a catastrophic overkill;
A walker destroys another vehicle in physical combat;
A vehicle runs entirely out of ammunition;
An infantry unit Heavily Damages a tank or walker;
Either side loses all of its initially allotted trucks;
Either side loses all of its allotted infantry units;
The British player wins the Initiative three times in a row.
Designer's Notes
Hooh-hah... once again, I'm trying to move players away from the total gamer mindset by giving them something other than the minutiae of the rules to think about. In my experience, the best wargames are those that thrust an educational decision-making responsibility upon their players above and beyond maneuver and dice-rolling. Bad decisions can throw the whole battle before the first shot is fired...
Of course, drinking heavily while playing GK can throw entire battles as well, but fun's fun.
All of these Rommel quotes are taken from Desmond Young's fascinating Rommel: The Desert Fox,originally published in the very early 1950s, when many of Rommel's subordinates and colleagues were still living in Germany and easy enough to find and interview. The book is inflected with a very personal tone based on Young's experiences in both the First World War and the Desert War against Rommel, and that tone makes it the exact opposite of dry, turgid history written from a distance. Highly recommended.
Ghosts of the Steel Age |
Gear Krieg Scenario Bank |
Snark Hunt Main |