"WHERE H.O. IS KING!"
THE TRACK T-JETS AFX PROJECT CARS HOME
|
|
"WHERE H.O. IS KING!" THE TRACK T-JETS AFX PROJECT CARS HOME |
|
|
|
|
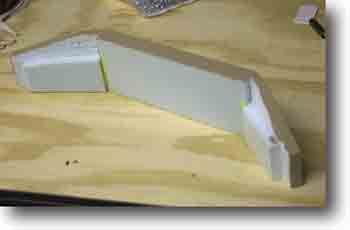
The photo at the left shows the back side of the bridge construction. The wings were cut to half their original thickness to blend better with the surrounding scenery. The main section was left full thickness to support the bridge. |
|
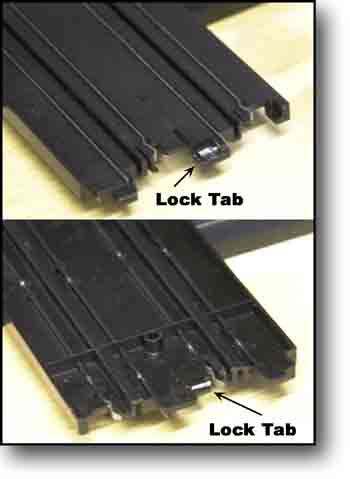
One of the problems inherent with plastic track is getting it to fit together correctly to create a smooth racing surface. One of the problems with the Tomy/AFX track in particular is that the locking tabs often cause the ajoining surface to rise, causing a bump in the track joint. In many cases, this can be greatly reduced by removing the locking nub from the underside of the tabs. This should only be done if the track is being permanently installed. I used a simple Exacto knife to remove the tabs, where necessary, from mine. Two cautions should be observed it this with. First, use a new, sharp blade for easier cutting. Second, keep your fingers well out of the way of the blade. |
|
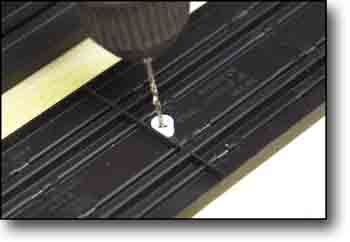
Another problem with creating a smooth track surface is the fact that many of the longer 15" straights, and even some of the curves, become warped in storage and will not lie flat, even when secured with screws at the ends where the holes are provided. To solve this, I cut short pieces of Plastruct or Evergreen styrene tubes and glued them to the bottom of the track adjacent to the lateral support rib. A hole is then drilled (from the bottom side) and then counter sunk from the top to provide two additional screw holes in the track, allowing it to be flattened to the table. |
|
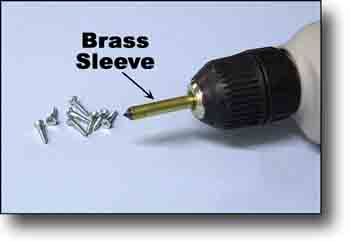
To secure the track to the table I used #5 flathead phillips wood screw. I used a 1/4" countersink bit to open the holes manufactured into the track, and the ones I added above. To maintain an consistent countersink depth, I cut a length of 1/4" ID brass tubing at exactly the correct length to prevent the bit from cutting too deep. I put a very slight crimp in the tube with a pair of pliers. It is tight enough to keep the sleeve from falling off by itself, but loose enough for easy removal, since the plastic debris must be removed from the sleeve after each cut. |
|
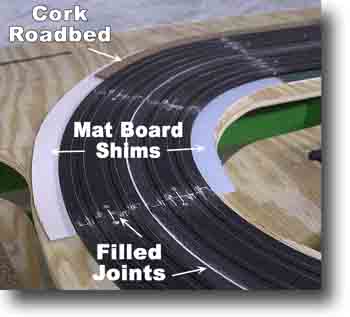
Once the track was securely fastened to the table I used hobby files to smooth out the joints and remove any high spots. All of the joints between sections, and the joints between the inside and outside track pieces were filled using lightweight patching plaster. All joints were then sanded, using a small wood block, and then filled again. After filling and sanding the track was thoroughly cleaned and test runs made on all lanes to make sure the joints were smooth. Do not forget to file the joints in the slot as well as the flat top surface. I made the test runs in both directions, since TRS will run in both directions. I use HO scale cork railroad bed for shoulders. The cork is a little thin to come flush with the edge of the track, and so I use matte board shims to bring it level. You should be able to find matte board very inexpensively at any framing shop. |
|
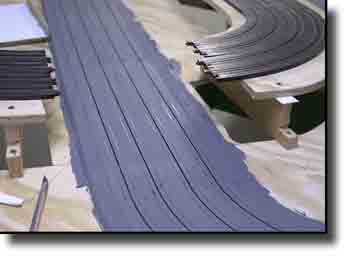
After testing and touching up any rough areas, the entire track surface was painted with Behr Premium flat latex Antique Pewter. After the paint is well set, clean the rails with 600 grit wet and dry sand paper. You will probably find after painting the first coat that small flaws you didn't notice suddenly appear. Fill or repair flaws, lightly sand the entire surface, and repaint. It will amaze you how quick and quiet the cars are on this racing surface. It was necessary to finish the lower level first, before completing the bridge and proceeding to the upper level of the layout. |

|
For more excellent information on tuning up your plastic track, and lots of detailed instructions, please Visit Joe Aquino's Dragon site, too. The Tips and Notes sections is especially worthwhile. The photo at the left is from Joe's beautiful track. |
|
|
MORE OF THE CONSTRUCTION OF THE NEW THUNDERROAD. |
|
|
|
|
|
VISIT OUR FRIENDS AT HO WORLD  |
|
Created - December 26, 2000 |