 |
|
This page hosted by: |
|
|
This page hosted by: |
As with all levels, concentrate on buildings that are in the carrier's path. You will need to get a jet start to get a Platinum on this level. Stay on the road where you can. Pay attention to the L-shaped barn (bldg 3)… you have to take out every section. Veer back to the right to get building 4 and then stay on the edge of the green swamp. Keep trucking through the rest of the buildings, just veer left to take out building 6 and plow right into building 7 to stop the clock.
Sideswipe Training [Prev] [Index] [Next]
You will find many sites telling you to aim your strikes at the joining points between building sections to break down four sections for each strike. This is rubbish for use in attaining a Platinum time on this training level. There are virtually unlimited strikes on this level so just hold the R button down so you can concentrate on driving down the center red line. The first building is lined up for you. Then take out five sections on the south side of building 2 as you turn left. The fifth section is critical, because taking it out early will allow you to make the turn into the second alley sooner. I like to take out all five because it gives more time to get lined up perfectly to take out both sides. The "center" of the second alley is actually just to the right of the red line. You should see just a sliver of your Sideswipe just to the right of the red line. Same for the third alley. Start over if you miss a section and keep at it until you see a Platinum.
J-Bomb Training [Prev] [Index] [Next]
I haven’t actually got Platinum on this level myself… my nine-year-old son did. He achieved Platinum by going all the way to the top of the buildings and striking the center. He then bettered his time when I told him that he could strike the side of the building from a short distance, causing the above sections to fall and shatter.
Backlash Training [Prev] [Index] [Next]
1) Get a JET START: (Important for step 2!). Stay on the gas the entire time! 2) Do NOT press the R button to slide through the first building. Steer right on the arrow. You will slide right through the first building because of the loose soil. Stop turning just as soon as the first building is clear and line up for the tan building. Do not overslide! You should be heading straight east. 3) Hesitate for just a fraction of a second until you get to the red arrow going left. Follow the arrow through the second building USING the R button this time as soon as you turn. You should go all the way through on one pass. 4) You will most likely be approaching the barn from the northwest. Burn rubber over there and crossover to the northeast then lay on the R button and make a hard right while you slide the back end through the whole building.
If you manage to go through all three buildings in one pass, you should get a 8-9 sec run. Mine was 7.6 seconds. That might be enough time to go back to the any of the three buildings if you missed a section on any one and still get a Platinum.
Argent Towers [Prev] [Index] [Next]
Keep an eye on your building count during this level. Don’t waste time on a building if you’ve already destroyed enough to let the carrier pass.
Get a jet start and travel straight north on the road. Press the R button and turn to the right when you see the first building in the carrier’s path. Slide through the entire building. Approach the second building from the right and slide left. You don’t need to take out the left-most section. Demolish the third building by driving over the dirt mound and straight through. The fourth and fifth buildings are connected. They are the also the hardest to get in one pass. Slide into them from the right. Again, you can leave the left-most sections of these buildings.
The sixth building will all come down if you drive over the dirt mound and go northeast through the entire building. Turn left immediately after and cross the road to make a wide swing around the last structure. You can demolish it in one pass with a big slide to the right. Give yourself a pat on the back, collect your Platinum and go on.
Havoc District [Prev] [Index] [Next]
After your jet start, drive the Skyfall straight north using turbo power at least twice. Watch your turbo gauge. Drive up to the J-Bomb on the north side of the hill. Use the J-Bomb to take out the three buildings to clear the carrier path. No problem. Next level
Carrick Point [Prev] [Index] [Next]
You might actually be able to use the Sideswipe effectively in this level if you could just get in front of the missile carrier. Alas, that is not the case. So, drive the Sideswipe east and then straight north as quickly as you can so you can use the much more effective Thunderfist. Clear the path, collect your Platinum. Next.
Blackridge Works [Prev] [Index] [Next]
I like this level a lot. The Ramdozer makes quick work of this level, but the Platinum time is very fast also. Three things to keep in mind: 1) All three sections of the first building must come out. Start right and angle left. 2) Taking out the first building has left you in good position to take out the small extension of what I call the water building (it’s blue). Couple of taps with the blade from the left side should do it. Make sure that you come in facing directly east to take out two sections of the main building together. Again, the second tap will bust through. 3) Most important. You must take out the two silos together. The center silo along with the one to it’s right. If they come down on the second tap, you’re home free. Plow through the remaining buildings to claim your medal.
Thunderfist Training [Prev] [Index] [Next]
One of the more irritating levels. Kind of like a little bug that keeps flying by your ear. Little crates, large shipping containers, and even larger buildings on uneven terrain will keep you busy aiming and rolling. Pick a pattern and stick to it. Concentrate on the direction you will be heading after each roll. Keep at it.
Tempest City [Prev] [Index] [Next]
This is actually a fun level for the Ballista, normally one of my least favorite vehicles. Get a feel for what sections of what buildings need to come out, then point the Ballista north and blast away when your front wheel is on the ground. Take out the third building, from a distance if you can. Then quickly veer off the path for the thirty missiles to your right, returning to the carrier path without backtracking if at all possible. Blast away until splitting the last two buildings to stop the clock.
Beeton Tracks [Prev] [Index] [Next]
You might want to see if you can beat the Platinum time without using the Homer Simpson method first. It’s faster if you run around the north side of the building after driving the train to the end of the tracks, rather than run over the bridge. Do the crane, the TNT, the whole nine yards.
Then for a really fast time, stop the train at the footbridge and run across. Drive the Ramdozer through the shack and then pull up the big building and get on the Z button. Boom! Forty seconds faster than the Platinum time without breaking a sweat.
Echo Marches [Prev] [Index] [Next]
Don’t move the train. Don’t move the barge. You are not required to fill the gaps in the course. just use J-Bomb to take down the required buildings.
Cromlech Court [Prev] [Index] [Next]
Get moving because the nuclear missile carrier is right behind you and somebody forgot to drop it into low gear. Aim Thunderfist for the building junctions to take as many out as possible. Go around the trees by rolling. Walk only as far as you have to, then drop Thunderfist to the ground and roll around the trees and take out the building on the other side.
Ironstone Mine [Prev] [Index] [Next]
Use Sideswipe to take out the first two sets of "row houses". Then drive directly to Thunderfist so you can use him to finish off the main complex.
Ebony Coast [Prev] [Index] [Next]
I suppose you can get a Platinum time on this level by driving the Ramdozer onto the train, moving the train to the end of the tracks and then pushing the TNT into the buildings, but I’ve never been able to do it that way.
I cut off a few seconds by actually driving the Ramdozer around the train (without first moving the train). Don’t ask me how, because I can’t do it consistently either, but it is possible to jump the Ramdozer over the train and get in front of the train from the right side. I always use a jet start. The trick is to get the Ramdozer into an "unstable" position. I saw someone do the same thing from the left side, but I could never duplicate the feat. You can save eight to ten seconds this way if you can get through without wasting too much time mucking about. I suggest that you have your technique for pushing the TNT into the buildings well polished before you try this method.
The other and I trust easier way… because I haven’t tried it myself yet, is to turn around and push the TNT into the grey stones blocking the track. Drive the Ramdozer through and use the Homer Simpson cheat to blow up the Easter Island statue. Don’t quote me on this, but I believe you need to drive on the east side of the statue facing south. The J--Bomb found inside should allow you to get a decent time.
Outland Farm [Prev] [Index] [Next]
A jet start is helpful on this level. Instead of staying at the bottom of the gully, drive on the inside of the big curve. That means driving on the left side of the small ravine along the top. This should save at least a couple of seconds if you stay off the grass. Go around or over the buildings at the end of the gully, they are of no consequence for our purposes.
Don’t bother sliding into the first building in the path of the carrier, but use the bump on the north side to plow through. Use the same bump to take out the silos to the north. If they don’t come down right away, you are not hitting them in the right spot. Try aiming directly at the center one, keeping in mind that you only need to take out the one on the left.
Now the hard part. Stay off the turf and you’ll minimize your frustration level. The Backlash must be too heavy for soft Mother Earth because she won’t slide on grass. Find a technique that works for you. Every building can come down with one slide. The trick is to get into a position to make your slide. Try to slide all the way through the barn and put the back end directly into the heart of the silo for a truly amazing finish. Send me your record time when you do.
Skyfall Training [Prev] [Index] [Next]
(Note: Use the orientation of the ravine as the North/South line for the following directions. The Skyfall is actually facing to the Northwest at the start using this convention)
The trick here is to get situated so you can take out (at least) the two silos at the southern end of the ravine and then quickly roll up onto the side of ravine to take out the last two. This will give you a 4.0 or better if done right. The Nintendo site has a time of 3.2, which tells me, that you can take them all out with one drop. I’ve only managed a 3.4, so I don’t know exactly how that was accomplished.
I start by getting a jet start while holding the analog controller down and left (just hold it in the notch). This will turn the Skyfall around as quickly as possible. What I want to do is to drop down on the southern-most silo with the Skyfall heading north. Use a short turbo boost as you drop into the shallow gutter. Using the turbo to come up out of the gutter does not work.
Use just enough turbo so that you don’t bounce all the way down the wall of the ravine. You must get airborne, but need to save your turbo to blast through the final pair of silos. The first two come down easily. You may need to put a tire or two on the western wall of the ravine to get the second two to come down.
Shuttle Gully [Prev] [Index] [Next]
The first four buildings should be down in short order using the small bumps and ridges on all sides. The third building might be easier to take out using the ditch, but just plow through other three using nearby bumps.
Stay to the right of the ditch until you get to set of buildings in the carrier’s path. Use the ditch to take out all four sections of the first large building by landing in the center.
You’re now left with five buildings to destroy. The hill behind them that is ideal, but it just takes too long going up and down. I suggest using the ditch on the right for the big buildings and the one available bump for the rest. Get used to doing "blind" jumps into a building from the ditch. Should you be left with just a single building section with no nearby mound, just get on the turbo and run into it.
Glory Crossing [Prev] [Index] [Next]
Don’t spend much time on this level until you are proficient with the Backlash. I spent hours on this getting nowhere because I couldn’t control the vehicle. The missile carrier is too close behind you to make this level much fun until you understand how Backlash responds on different terrain. Get good times on the Backlash Training and Outland Farm levels first. It’s a whole lot more fun watching buildings getting pulverized to dust than wrestling with the control stick only to see Backlash doink off a building without making a mark.
Get started right with a jet start. After the bridge there is much debate about which way to go… left or right. I say go whichever way puts you in the most comfortable position to take out the first building in one pass. I personally prefer the left. I use the small depression to get airborne over the slow terrain. Others go to the right either driving around the shed (which slows you down) or sliding through it (which is error-prone). I don’t see the advantage, but to each their own.
Anyway, the first building in the path of the carrier should preferably be taken out from left to right. I know that slides towards the fast approaching carrier, but it allows a possible second slide to go away from the carrier and directly into the second building. If you are lucky (or skilled) enough to get the first building out in one pass, then you are facing the next target.
You can hit the second building head on with Backlash and the far wall, amazingly enough, will fall immediately. The fastest way is of course to slide through the whole thing, but there is also time involved getting Backlash to stop sliding and get to the third building.
Building three is on grass and has nonessential buildings on the southwest and southeast sides. You must start you slide before the grass and so chances are you should just take out a section or two of one of the adjacent buildings in the process. Darn! Unnecessary destruction! ; )
Drive on the road and blast through the last building so as to open up some clear pavement. Now power slide through the building with the attached shed made of titanium steel. Turn around and make another run if that pesky shed is still there after the first attempt. Pick up your medal and move on.
Ember Hamlet [Prev] [Index] [Next]
Use the Ballista only to drive to the building in the southeast corner of the level. Blast it enough to get access to the Cyclone Suit. Use the Cyclone Suit to take out all the buildings in the Carrier's path.
Angel City [Prev] [Index] [Next]
After the ditch, get on the road and head straight north. Time your turn. You can turn a little earlier if you got a jet start. Hang a hard right and get on the R button. You should be able to slide through the entire first building. Continue sliding until you are headed north again. Now you are in position to use the same technique on the second building, but you’ll be turning left instead of right. The third building is taken out exactly like you did the first.
Take out the fourth building from the right. Don’t worry if you only get the south half. You can get the rest from the north.
Go ahead until you see a rock. Drive over the rock and plow diagonally into the building north of it. Quickly turn around and use the same technique to the south. You should be able to completely demolish the two buildings directly south of the rock.
Take out the remaining structures in the area, the head north to get the west half of the building protected by the trees. Don’t waste time taking out the whole building.
The final structure is a real bear, unless you make a wide arc around and slide the back end into it. It is possible to take it out in just one or two good slides.
Oyster Harbor [Prev] [Index] [Next]
When you start out, you'll be up on a plateau with the Ballista. Go immediately to the north end of the plateau. Do not waste time shooting shipping containers with the Ballista. Exit the Ballista, run around the containers and get into the Ramdozer. Backtrack and destroy the containers that are in the Nuclear Carrier's path.
You CAN destroy the storage sheds in the walkway like this...
Next, you'll need to use the TNT Crates to the right of where you found the Ramdozer to clear obstacles from the bridge. Park the Ramdozer over near the crates, climb into the Crane and bring the platform around to the Ramdozer. Exit the Crane, jump back into the Ramdozer and use it to push a TNT Crate onto the platform. Exit the Ramdozer, get back into the crane and swing the platform around so that the TNT Crate will explode on top of the obstacles blocking the bridge.
Note: This obstacles blocking the bridge can be destroyed piece by piece, so be sure to detonate the TNT Crate at the place indicated by the arrows! To detonate the TNT Crate, lower the Crane's platform onto the obstacles. Once the bridge is clear, exit the Crane, jump back into the Ramdozer and drive to the new area that you've just opened up.
... but I would recommend just parking the blade of the Ramdozer next to them and using the Homer Simpson method until they are all cleared away.
Do not waste time filling in the the holes in the next section. The platinum time requires only that you destroy the buildings.
Destroy the building at the end of the level like this if you wish...
Go past the first and second Barges and stop on the deck of the third. Get into the Barge, back it all the way up into position and then drive the Ramdozer to the pedestrian bridge. Cross the bridge, run to the left to the second Barge and back it up into position. Depending on the position of the carrier and its distance to the first Barge, this next step can be done before the Truck passes the first Barge or after. Drive the Ramdozer onto the deck of the first Barge. Sail it all the way forward and use the Ramdozer to push the TNT Crate onto the deck. Sail the Barge back into position for the carrier and push the TNT Crate all the way to the end. Destroy the large building with the TNT Crate.
... but with the Homer Simpson method, you only have to move one barge, the third one, and drive to the end and lay on the Z button to stop the clock.
Diamond Sands [Prev] [Index] [Next]
Diamond Sands is not the most difficult course in which to attain a Platinum, but it does require you to be proficient on some different techniques.
First of all, you should be able to take out all five sections of the buildings straddling the tracks in two passes using the "normal" method of sliding the back end of the vehicle into them.
I also use another technique that I call the "parallel technique" in which you drive parallel to the tracks, then as you approach a building section, turn the Backlash nearly ninety degrees so that the hood is pointed toward the tracks and angled slightly in the direction of the building to be demolished. Just as you reach the building, turn toward and directly perpendicular to the tracks and quickly turn back toward the next building section.
You would do well to learn how to take out a gas tank efficiently with the Backlash also. Do not drive into it head-on, but instead graze the side. Even better, "squeeze" between the tracks and the tank for nearly effortless destruction.
You also need to be able to control the direction of the TNT boxes with the Backlash. You’ll get plenty of practice with this technique if you can stay ahead of the missile carrier all the way to the last building.
As you read the following, note that north is the direction that the nuclear missile carrier is facing. Here’s a walk-through:
The west side of the first building should be taken out in two passes the normal way. You should be headed south toward the culvert when you complete the destruction of all five sections.
The building’s east side, is player’s choice, but I prefer the parallel method because if allows you to continue driving north as you complete the destruction.
The secret to destroying building number two has not been very well kept. Both the east and west sides can be demolished using the blue gas tanks on the east side of the tracks.
Now you have enough time to continue on down the east side of buildings three, four, and five using the parallel method for building three and four. Use the normal method for building five so you are pointing south when done. Don’t waste time with the TNT, the last building can be completely destroyed from the west side.
Drive through the culvert south of building five and barrel directly south down to path to the two sheds on the west side of building three. Slide left to completely demolish the southern shed and use the parallel method to destroy the west sides of buildings three, four, and five.
It is now a simple matter to push the TNT crates into the last building. Use the crates you’re most comfortable with, but I only one of the two southern crates, both of the crates near the west ridge, and one inside the building to finish clearing the path and stop the clock. Platinum is 2:35. My time using this method was 2:25.5.
Obsidian Mile [Prev] [Index] [Next]
Email me if you need this level.
Crystal Rift [Prev] [Index] [Next]
Drive the train down to the end of the track and press the Z button as you ram the stop at the north end of the tracks. Run over to the Skyfall and drive on the short track which turns south as you leave the train. Get a turbo boost or two, but save something for the jump. You must clear the mountainside to get down quickly.
Do not drive over to the missile carrier path. Turn left and stay alongside the mountain on the manmade plateau. Drive as quickly as possible, using turbo, to the Ramdozer. Drive the Ramdozer south through the buildings in the missile carrier’s path, staying on the road as much as possible.
Take out only the building sections that are vital to clearing the path even though it seems to be no more effort to take out an entire building. You’ll probably need a few attempts to attain a Platinum.
Jade Plateau [Prev] [Index] [Next]
You must use the red Muscle Car on this level to get Platinum. The Ramdozer would be ideal for this type of course, but is simply not fast enough. Each lap must be done in an average of :18.25 seconds. I would say that the upper limit for the first lap is :24 seconds. If you have not established a clear path and/or your first lap is :24 or more… start over.
Obviously, you want to take the shortcut after the first bridge and make a path through the buildings after the second bridge.
You must learn not to oversteer after the second bridge. Also, you will spend a lot of time on this level and still not have a Platinum if you keep trying to turn too early at the end of the second bridge. Stay on the left side and do not start your turn until you drive off the end of the bridge.
Practice making the turn after the second bridge with only one section of the barn out. Two sections are much better, but very hard to accomplish without costing precious seconds. Don’t waste time opening up a path, you can steer past the building with only one section taken out.
Also, practice bouncing at an angle off the trees just before the start/finish line to quickly open up the path. You should be able to clear a path with two bumps from the car. I’ve done it with one bump, but not consistently. Stay close to the trees, the car sticks on the building. Again, don’t oversteer across the starting line.
Here’s how my Platinum run went:
:19.3 One section of bldg one taken out. The two required sections of bldg
two broken out in one hit.
:18.0 Bruised remaining section of bldg one, went on. Did not waste time
knocking out the section.
:16.6 Cleared bldg one without a touch, by turning after bridge.
:16.4 Again, cleared the building after the second bridge even though only
one section was broken out.
Notice in lap two that a miss on the turn after the second bridge cost me nearly 1.5 seconds compared to laps three and four. I can’t stress that turn enough, the race will be made or broken here.
Salvage Wharf [Prev] [Index] [Next]
Get a jet start as you hold the controller to the right to "fly" down the grassy slope to the wharf below. Take out the containers right along the edge of the water as you turn left. Take the corner to the east as close as you can and take out the row of containers closest to the water. Practice making a quick U-turn at the end of the dock and take out the remaining containers along the north shore.
Make your turn to the south wide as you destroy containers around the corner. Take out every single container from here to the south end of the wharf and you should have a Platinum, if you can do it in one pass.
Marine Quarter [Prev] [Index] [Next]
Email me if you need this level.
Orion Plaza [Prev] [Index] [Next]
Email me if you need this level.
Sleek Streets [Prev] [Index] [Next]
Use the van. I know you want to use the red muscle car to go fast, but you need a cornering vehicle that doesn’t slide.
From the start, dive into the gully and exit just after the bridge. Avoid the long building, turn through the trees and drive diagonally across the grass. Make the corners around buildings square and practice, practice, practice.
Kipling Plant [Prev] [Index] [Next]
I can’t count the number of times I’ve told people to get a jet start. Don’t do it on this level. The object here is accuracy and lots of ammo.
Make a slight left turn at the start and shoot the first gas plant immediately. You will not get a Platinum on this level if you bounce off gas plants rather than blow them up and drive through.
Go clockwise around the building and keep shooting your way through gas plants two and three. Gas plant four is on the other side of a building to the right of gas plant three.
Here’s the big secret: the buildings before and after gas plant four are weak. You can drive right through them without slowing down or firing a shot. Other than that, just know where everything is so you can fire blind and you will get a Platinum.
Cooter Creek [Prev] [Index] [Next]
Email me if you need this level.
Twilight Foundry [Prev] [Index] [Next]
|
Platinum |
Minimum Time |
My |
Nintendo's |
Description |
Recommended |
|
:29 |
:51.0 |
:28.0 |
:28.0 |
Find 85 RDUs |
RamDozer |
You can practice with the Van, but the RamDozer is the vehicle of choice for this level because it is large enough that you do not have to drive directly over the top of most (but not all) of the RDUs. The jet start on this level is when the "starting text" has rolled halfway off the screen.
The following description assumes that you start the level facing north. Hold your controller to the left as you get a jet start. Head directly toward the southwest corner as you turn left.
When the SW RDU lights up, make a turn to the north to drive along the west side of the long alley. Make a U-turn just as you drive onto the "rock" near the northern edge of the alley. You need to "fly" through the building, lighting the RDUs to the north, and get a quick turn as you head back south on the east side of the alley.
Stay close to the fence as you turn left to go east, then make another left by the blue building to go north. You will follow the perimeter clockwise all the way around the level until you get back to the start area.
Go to the right of the blue building and pick the remaining RDUs just to the east and north to stop the clock. You need to have :51.0 seconds or more remaining on the clock to get a Platinum. My best time using this method is :28.2 (Platinum :29.0).
I’m working on a map of this level (though I don't believe you'll need it) to show one possible path for a Platinum.
Skerries [Prev] [Index] [Next]
|
Platinum |
Avg Lap Time |
Minimum Time |
My |
Nintendo's |
Description |
Recommended |
|
1:35 |
:23.7 |
1:25.0 |
1:31.7 |
1:32.0 |
4 Lap Race | American Dream |
Skerries is actually the first level I established a Platinum time. You must use the American Dream race car. You would think that the Red Muscle car would be the best because you have to drive on grass. But the Red car simply is not fast enough, and the surface of the grass apparently does not slow the American Dream car down much. You have to average :23.7 seconds per lap on this course. If you don’t have a :23.7 or better time on the first lap using the jet start, make some minor adjustments until you do.
The timing of the jet start on this level is when the text at the start has "rolled" halfway off the screen. The "window" for the jet start is small, so it may be hard to get, but it's worth the effort.
One of the most helpful tools to use for this course is the ghost car and the "Replay" feature. Pay attention to what works and what doesn’t work.
You have to drive on the grass as you make a "U-turn" around the northernmost point of the course. Don’t over-steer the American Dream car! Easy does it on the controller. A skid means that you've just lost a tenth of a second or two. Then, just before the second bridge, you can shave off precious tenths going through the trees, but you can mess up a good run in a hurry if you miss the bridge entrance. Practice going through the trees near the bridge entrance using one path, then race your ghost using an alternate path so you know what works.
You should already know that there is a "secret tunnel" through the mountain after the second bridge that puts you just before the start/finish line. It’s not exactly the best kept secret about Blast Corps. The key, however, is to get a precise feel for where the tunnel entrance is. Then try to exit the tunnel heading straight toward the first bridge.
A good time using this method is 1:32.0 flat, an average of :23.0 seconds per lap(Platinum is 1:35), but I believe that you can beat that time with a little practice. Try to get a nearly flawless first lap with a time of :22.6. Anyone ever get a :22.5 or better?
Cobalt Quarry [Prev] [Index] [Next]
Email me if you need this level.
Glander's Ranch [Prev] [Index] [Next]
Email me if you need this level.
Silver Junction [Prev] [Index] [Next]
Email me if you need this level.
Moraine Chase [Prev] [Index] [Next]
Email me if you need this level.
Mica Park [Prev] [Index] [Next]
Email me if you need this level.
Morgan Hall [Prev] [Index] [Next]
This is a "clockwise" level. It is much faster to go clockwise than counterclockwise. Did I mention that you should go clockwise? I spend many hours off and on trying to figure out how to do this level going counterclockwise, but to no avail. The very first time I tried to go the other direction, I beat the Platinum time by three seconds and with some adjusting, came up with an easy :21.8… a full :13 seconds off the "unbeatable" Platinum standard.
Fifteen of seventeen buildings will blow up with just nine crates of TNT. except for an old storage shed that you can drive through using bumps in the road. You do not have to slide until the very last two-section shed.
Start by backing up and touching the crate behind you. Don’t worry if it blows up, just get it ticking. Then push the two crates directly in front of you. One to the right, and one to the left.
Make sure that the one to the left blows the building because you need to make a hard left turn. Did I mention that you need to go clockwise? When you make the left turn, push the first crate into the barn to your left. Yes, you read that correctly… the red-roofed barn to your left.
The next crate is key to this whole plan. You must maneuver it so that it is situated on the far end of the building with a shed on each end. Just leave it be, because it will blow the closest shed, the main building, plus the building across the road. Leave it ticking and go on to the next building.
There is a TNT crate in front of the white house with a connected shed. Push it into the house, but close to the shed. If it blew, great, if not, just leave it alone.
Make the turn to the right along the road. There is a TNT crate just off the road on the right. You can bump this, but it is not necessary. A TNT crate pushed into the building to the north will blow two additional buildings, the one you just drove past to the south, and the one to the southeast. Turn right and go on.
Push one of four TNT crates into the only building left standing and drive straight across the road and push another TNT crate directly into the house at the northeast corner of the level. This will also blow the house directly to the south.
Now bounce across the dirt road and drive straight through the dilapidated shack and immediately position yourself for the only building you need to slide into… a tiny two-section shed. I prefer to make a wide turn and slide nearly 360 degrees before neatly crumbling it to dust. Pick up your Platinum.
Corvine Bluff [Prev] [Index] [Next]
Email me if you need this level.
Bison Ridge [Prev] [Index] [Next]
Email me if you need this level.
Geode Square [Prev] [Index] [Next]
Email me if you need this level.
Lizard Island [Prev] [Index] [Next]
Email me if you need this level.
Saline Watch [Prev] [Index] [Next]
Accuracy is key here. Learn to slam down on target, the speed will come. I use J-Bomb’s head over the beacon when I’m going left to right, so you can use this method for 10 of the 15 beacons on this level.
When the light turns green the analog controller should be all the way into the upper left notch on the controller and you should be on the A button. When J-Bomb’s rockets quit firing, take your thumb off the A button and don’t touch it again until you’ve destroyed the fifth beacon.
What is that you say?!? Don’t fire the rockets? Yep. If you are indeed hitting the beacons properly, you don’t need to fire the rockets until you fly over to the second row of beacons.
J-Bomb will touch down on the first beacon without pounding it. I prefer to just glide onto the first beacon because you have to make a turn in the direction of the second beacon. Worrying about when to stomp adds unnecessary complexity to the turn. You should however, stomp on all the rest of the beacons in the first row.
The blast from the first beacon will lift you high enough to get the second, and you will be plenty high when you start pounding on them.
Fire your rockets as you finish the first row and hustle over to row two as soon as you gain enough altitude. Do not rush over and ram the tower, you will only bounce off and lose both altitude and forward velocity. My preference is to glide onto every beacon in the second row, however, it is possible to slam them also.
The third row is done just like the first, glide onto the first beacon and turn. Pound the rest. Still have plenty of time when you get to the very last beacon? Glide onto it to collect your the Platinum or pound it to shave those last couple of tenths off your time.
Dagger Pass [Prev] [Index] [Next]
Email me if you need this level.
Magma Peak [Prev] [Index] [Next]
Email me if you need this level.
Baboon Catacomb [Prev] [Index] [Next]
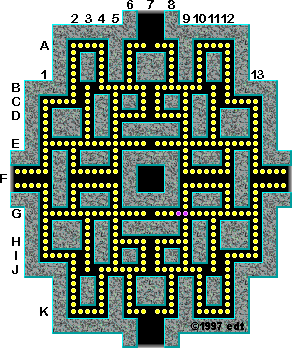
I’ve used this route to get a fairly easy Platinum time of :42.7, over 2 seconds faster than the Platinum standard. However, the Nintendo site claims a time of :40.9, so if anyone has a route that is faster than this one… I’m all ears.
 This
description requires that you follow along on the map: Start by going straight
ahead (the purple RDUs show the starting point) and turning south (right)
at D4. Continue south then turn west (right) at F4. Swerve south at F3
just enough to pick up three RDUs in the alley, but DO NOT drive through
the alley. Continue west along Row 4 and turn south (left) at F2 and immediately
turn west (right) at H2.
This
description requires that you follow along on the map: Start by going straight
ahead (the purple RDUs show the starting point) and turning south (right)
at D4. Continue south then turn west (right) at F4. Swerve south at F3
just enough to pick up three RDUs in the alley, but DO NOT drive through
the alley. Continue west along Row 4 and turn south (left) at F2 and immediately
turn west (right) at H2.
At the southwest corner of the level (H1), turn north. Cut back inside at the midway point (E1) . Continue north on Column 2, but stay on the right-hand side to pick up the two RDUs just east of D2.
Turn east at C2 and swerve to get three RDUs in the Alley at Column 3, but do not enter the alley.
Turn south at C4. If you’ve done this fast enough, it will be clear. However, you must beat the green bulldozer to point D4. Turn west at F4, then north at F2.
Immediately cut to the outside for the rest of the race at E2. Continue north in Column 1 and drive around the outside to Row A. If you beat the yellow bulldozer to A3 and have not missed a RDU, you now have a clear shot all the way to the end.
Stay on the outside and drive clockwise all the way to the end of Row F. You should have at least :45 seconds left and a Platinum medal when you get there.
Dark Heartland [Prev] [Index] [Next]
Email me if you need this level.
Falchion Field [Prev] [Index] [Next]
Stay as low as possible and go clockwise. Stomp at an angle as you approach each gas plant, don't wait until you are over the top of each one.
Gibbon's Gate [Prev] [Index] [Next]
I’ve seen many sites that advise you to go to the outside first on this level. Unless you have a particular route that you know will work, my advice would be to stay on the inside. Why? Simply because the inside is much more treacherous. It is very easy to get the outside RDUs without getting caught by a bulldozer, but the inside track is much more congested. If you get caught by a bulldozer on the inside, you haven’t wasted all your time collecting the easy RDUs on the outside first. This one piece of advice could save you hours trying in vain to collect a Platinum on this level.
 One
more important piece of information before we get into a detailed description…
You do NOT have to drive directly over an RDU to activate it! If you look
at the map, you will see a number of short alleys, each containing three
RDUs, between major "streets". One example would be the section
between G9 and G11. You do not have to drive through these sections to
collect all the RDUs in the alley. We will have to make use of this fact
to get our Platinum.
One
more important piece of information before we get into a detailed description…
You do NOT have to drive directly over an RDU to activate it! If you look
at the map, you will see a number of short alleys, each containing three
RDUs, between major "streets". One example would be the section
between G9 and G11. You do not have to drive through these sections to
collect all the RDUs in the alley. We will have to make use of this fact
to get our Platinum.
There are a number of alleys that the following successful strategy avoids, but I want to mention one in particular. There is a "T-shaped" section at E12 containing eight RDUs. These eight RDUs need to be "collected" from F12, E11, and E13 (the ends of the "T"). If you fail to collect all eight, you will not finish with a Platinum. Be conscious of this area, but always drive through intersections with the intention of lighting peripheral RDUs unless you KNOW you will later drive over the top of them.
That said, here is my "tried and true" route to Platinum success:
Get a jet start as you head west from the starting point (the purple RDUs) and turn north at G5. Pick up a few extra RDUs in the double corridor at F5, then continue north and beat the green bulldozer to E5 and turn east.
Make a left turn at E9, then another quick left at D9. In the double corridor at D7, pick up all six of the RDUs, turn around and continue west on Row D.
Make the a double left turn at B5 and B3 and head south as quickly as you can. Pick up the remaining RDUs to the east of E3 and continue south on Column 2. Collect the remaining RDUs in the double corridor at E2.
Jog east at G2, picking up all RDUs east of G3, and turn south on Column 3. Make a quick lefts at J3 and J5. Collect the remaining RDUs north of H5 and turn east. Swerve into the double corridor at H7 to pick up all six RDUs.
Continue east to H9, then dip south to J9. Turn left, then left again at J11.
If you can beat the blue bulldozer to G9 then turn left at G11, pick up the RDUs in the corridor area at F9-12, go north at F12 and north at E11. Otherwise jog right then make a big "S" turn through the corridor at F9-12, head north at F9 and try to beat the green bulldozer to E11 and head north.
Go west at B11, then counterclockwise around the outside of the level to finish near B10. Whew! Good Luck!
Shuttle Clear [Prev] [Index] [Next]
Email me if you need this level.
You can slide without pressing the R button. Experiment. If the target is directly ahead of you, press the R button, but if you need to slide either left or right, keep your finger off the R button. Don’t spin out of control… hit the target(s) in your path and setup for your next slide.
Get a jet start and try to get the large building to the northeast in one hit using the hill. Then speed over to the area with 13 buildings directly north of the start. You should be able to complete this area with at least 4:45 left on the clock to have a decent shot at a Platinum medal.
When you finish this area, take out the two buildings directly east behind the large hill. Use bumps extensively the rest of the level. Line up several buildings and hit them all in one pass. Good Luck!
Email me if you need this level.
Email me if you need this level.
Email me if you need this level.
Email me if you need this level.
|
If you have any questions, suggestions, |
||
|
This page conceived and maintained by: |
||