CONSTRUCTION:
Construction starts with the lower hull. Like many Eastern European kits, it's a multi-piece construction consisting of separate parts for the floor, sides, rear, front, and fenders. My biggest gripe here is that the exterior facing parts include numerous ejector holes that must be filled. Also, the rear plate does not fit quite square with the sides. One side had to be filed and filled with putty to get a flush fit.
The road wheel assemblies consist of 2 road wheels, 2 structure cases, spring, and a spacer. Two are required per side, and a nasty seam is created where they outside armor casing meets up with the inner case. I used liquid glue containing melted plastic to fill in the seams. Pay special attention when attaching them to the hull. The assemblies are attached by sliding them on two small poles that stick out from the hull. They are not uniformly the same length down the entire side of the hull, and must be carefully trimmed to keep the road wheels in alignment. The rear road wheel slides onto an axle arm that must also be trimmed to ensure alignment.
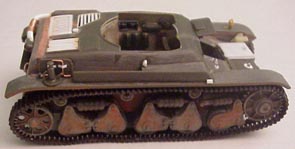
I deviated from the instructions at this point, with the entire suspension and road wheels assembled, I now began adding the non-workable MK tracks.
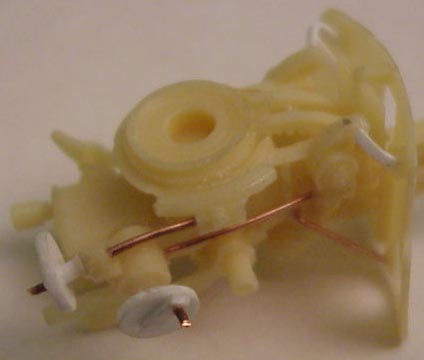
Before putting the MK tracks on, I first spray painted the interior white, and then assembled the resin interior that Ironside provides. I replaced some of the small details and the drive shaft with plastic card/rod. Once painted, I inserted and secured the interior. The dashboard is made of PE and has a resin attachment piece. After folding up the PE and painting it, I took a piece of plastic card and glued it to the back. This creates a nice gauge effect for the instruments. Of course I should have attached this piece prior to putting on the front portion of the hull, but didn't catch it to later. It was tricky getting this piece in position. Small note, the interior has an overhang that from the firewall that rests on the lower hull. In order to seat the fenders on correctly, either a notch has to be cut into the fenders or the lip on the overhang has to be removed. I chose to remove the overhang. Then I slid the torsion bars for the drive wheels through. With the front drive wheels on, I sprayed the lower hull an earth brown color. Then I dry-brushed a dark gray over parts of the lower hull, painted and painted the tires. Next came a good hour of removing the MK track links from their sprues. Once this was completed, I spent another two hours cleaning up the attachment points. It requires a total of 127 links for one side per the instructions, but I found only 124 links were required. I assembled two runs of track, coated them with glue and after about 20 minutes, I came back and draped them over the wheels. Add a small piece of tape to help keep both the shape and the attachment to the second run. After having left them on the vehicle for a day, I removed the tracks to paint and weather. I first sprayed the tracks with a new Krylon Flat Black Primer (this is really flat/anti-reflective paint). Then the tracks had Rustall applied and finally they were dry-brushed with steel from a paint line called "The Armory" (which is a fantasy war gamer's line of paint that has been around since 1989). Once the tracks are completed and attached to the vehicle, the fenders were added. Upon adding the fenders, I had to go back and filled and sand the seam line created between the fenders and the lower hull.
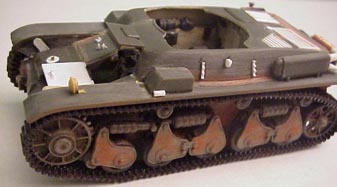
To make the modification to the upper hull, I photocopied the drawing with the cut lines and very carefully taped it to the hull. Then with an X-acto knife, I scored the areas for removal and snapped them out. Back by the grill, a 1mm strip has to be removed. I drilled several holes and then used a combination of an X-acto blade and a dental pick to remove the strip. Having finished this, I decided that I could not live with the chunky solid grilles. There are 3 grilles on the vehicle. I removed all three and began to box out the grilles and reconstruct from plastic strip. The big long grille did not come out right, so I ripped it out and started again from scratch. This time I chose a different method. I took a 'H' beam of plastic strip and removed part of the upper H. Laying down some double-sided tape, I laid the 2 modified 'H' beams on the tape, measuring the distance apart with calipers. Then I cut plastic strips using the "Chopper" and glued them one at a time between the 'H' beams using a piece of metal as a spacer. This was then inserted into the grille deck and two sides were fashioned from strip. In the front of the upper hull are two items requiring some surgery to correct. First is a transmission cover that should have an access hatch and a handle. To remedy this, I drilled a whole, inserted a plastic disk and made a new handle from a piece of brass. The second item is the large front hatch. This item is missing all detail, which includes a stopper for when the hatch is opened, a hinge and the inside handle. Looking at the part, I decided it would be easier to make a completely new hatch. Using my new toy (and X-Y Marker) I measured out a new hatch out of .010-card stock (which took about 5 seconds with the new toy!) and made a slightly smaller piece out of .030-stock. The pieces were laminated together; new hinges were added from plastic rod. The inside handle was a combination of using a punch and die to punch out a base plate circle and card and rod stock made the handle. Bending some brass to shape created the bumper stop.