WARLORD
A Game of Military Strategy
Copyright 2005, all rights reserved
Overview
Warlord is a board game which can be played on an ordinary checker board using chess pieces, although it is a very different game from either checkers or chess. I invented Warlord out of vexation with the weird abstractness of typical board games. It doesn't make any sense that castles move around in chess, or that you kill pieces in checkers by jumping over them, or that the men in Go can't move. Even if we were to change the names of the pieces to get a better sense of realism, the pieces still wouldn't be fighting or moving like actual military units would.
Warlord is a far more intuitive game, and the general consensus among those who have played it is quite positive, partly because it is so easy to imagine the units engaging one another in heroic battles. Killing pieces in Warlord generally involves ganging up on them, which is quite true to reality (and a convention which actually appears in many ancient games, such as Hnefatafl, a charming Northern European board game which is discussed here).
The objective of Warlord is to sack the enemy's tower, using mounted knights who storm across the battlefield, spearmen who can attack over their allies' heads, archers who are poor fighters but can fire arrows across long distances, a well armored warlord who carries a shield to protect him, and of course several peasants whose main strength lies in sheer numbers. Each piece in Warlord has one attack, and it (generally) takes two combined attacks to kill a piece. Thus the fundamental strategy of the game is to outflank and gang up on your opponent's pieces. The main difference between Warlord and chess is that the pieces on the entire board are very strongly interdependent - the battle develops not as a series of individual pieces kiling one another or holding specific squares, but instead has a very strong "flow" to it, which you will discover for yourself as you play.
Note: Beginners and younger players are encouraged to try a simpler variant on Warlord, called Kesch, which will help to build familiarity with the rules.
The Rules

| | |
|
The board is set up as shown to the left. Using a chess set, the pieces are represented as follows:
Peasants - represented by pawns (arranged in an "S" for black and a "Z" for white).
Warlord - represented by a king.
Tower - represened by a queen.
Knight - represented by a knight.
Spearman - represented by a rook.
Archer - represented by a bishop.
|
In Warlord, black goes first, and players take turns moving their pieces. After every move, combat ensues, during which pieces direct their attacks.
During combat, each piece has one attack which it may at any time direct on any single enemy unit. Pieces can withstand one attack at a time, but any piece which is attacked by two enemies at the same time is overwhelmed, and dies. If a piece kills an enemy unit, and has not been simultaneously killed itself, it may then turn its attack on any other enemy which lies within range. In this way it is possible to kill multiple enemies in a single turn.
After combat is resolved, the other player takes his turn. This continues until one player destroys his opponent’s tower and wins the game. If each side has fewer than two moving pieces left, it is impossible for either player to win, so the game is a draw.
 |
| | |
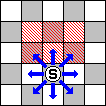
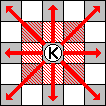
SPEARMAN
Attacks: Any of the three squares in front of the spearman, or any of the three squares beyond those. To clarify, they may attack over other pieces' heads with their long spears.
Move: One space in any direction.
Special: Spearmen may not direct attacks to their flank or rear.
|
 |
| | |
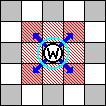
WARLORD
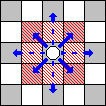
Attacks: Any adjacent square with ax
Move: One space diagonally
Abilities: Armor - The warlord’s heavy armor and shield prevent him from being Overrun by knights, and allow him to withstand two attacks before dying. So, three pieces have to be attacking the warlord at once to kill him.
|
 |
| | |
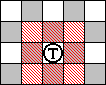
TOWER
Attacks: The princess who inhabits the tower has one attack to adjacent spaces with boiling water, broken crockery, old helmets, pet cats, and anything else she might throw out of the window.
Move: Obviously, the tower is stationary.
Special: Can't be Overrun. If your tower is taken, you lose the game.
|
Movement Option: Marching
If two or more of your men stand next to one another in a diagonal line, they may all March one space together in the direction of the line. Marching may be done forwards or backwards, but no pieces which are currently under attack may March. To clarify, you may March units into danger, but not out of or through danger.
Movement Option: Pass
Either side may opt to pass rather than moving. If there are three passes in a row, the game is a draw.
Movement Option: Surrender
Rather than making a normal move, set your tower face-forward. Your opponent must accept your offer of surrender, unless he can take the tower by force in one move. In either case, you lose the game.
Clarifying Examples
|
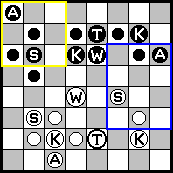
To more firmly understand the combat system of Warlord, consider the situation at right. It is White's turn, and he has a variety of options.
One option would be for him to move his rightmost knight across to the upper left, into the squares noted in yellow, and overrun Black's peasant there. If the knight could survive, it would simultaneously kill Black's archer - but a peasant and archer both defend that square and would kill the knight as it overran the peasant (see case A). If Black had no peasant there to defend, White's knight would be able to wreak havoc (see case B), so if Black moves either the archer or peasant, this will be a feasible move. Until then, however, it won't work.
| |
 |
..Case A
 .. ..
|
....Case B
..
| |
A) A knight who overruns a square defended by 2 or more enemies dies in the process.B) A knight overrunning a square which is defended by 1 or fewer enemies remains alive.
The knight may then attack and kill other pieces in the same move, as shown at left.
|
Abandoning this line of thought for the time being, White turns his attention to the rectangle outlined in blue, where more pressing matters lie. There, Black has a peasant and an archer next to one another, while White has a spearman two spaces away, attacking the black peasant (but not the archer). White's spearman is currently under attack by Black's archer - if something isn't done, Black can kill White's piece next turn.
 |
|
Here, White moves his peasant up so that it comes into range of both Black units. White directs his peasant to attack the Black peasant; both Black units attack the White peasant. The White peasant and the Black peasant die. White has other options, however.
|
|
 |
|
This time, White moves his peasant into position, but White's peasant attacks the Black archer this time, so it dies rather than the Black peasant. White's peasant still dies, but this is a much more advantageous trade.
|
|
 |
|
Now say that, instead of a peasant, White had his warlord present. The warlord wouldn't die even though both attacks from Black's peasant and archer are directed on it. However, after the warlord kills either of Black's pieces, the warlord then has a free attack to direct on the other piece. Thus, both Black units are killed in one move. |
|
In the event that many pieces come into contact with one another (as they did above), each player should state which units his own pieces are attacking, to avoid confusion.
Blocked
 |
Combined

|
Lastly, when considering long-range attacks, remember that spearmen can attack over their fellows' heads, whereas archers can not. Thus a spearman standing behind a peasant occupies a very powerful position, as both pieces can combine their attacks, while a peasant in front of an archer will block off the archer's shot to the fore. |
|
Strategy and Discussion
One of the first things you will notice is that in Warlord it is generally unwise to move your pieces into a position to directly attack an enemy piece. Doing this renders your own piece open to being killed the next turn. The trick is to attack your enemy in ways which will not allow him to overwhelm your own piece in the following turn. This usually forces him to withdraw the piece you are attacking or risk it being killed on your next turn.
The best ways to advance and attack at the start of the game are with spearmen, archers, and the warlord. Developing these pieces, and securing land with peasants, is the focus of the first few moves. If you are ever at a loss for what to do, try advancing one of these pieces. However, it's important not to be too assertive, especially with the archers, as they are easily killed if left without support. When combined with other pieces, archers and spearmen are solid defenders as they cannot be easily killed unless they stand alone or with their flanks undefended, and they can inhibit enemy movement by laying attacks on their ranks and preventing them from marching.
Moves in Warlord are somewhat safer than those in chess or checkers. You can always move backwards with any piece, and since few pieces move very far or can dominate the board by themselves, it is very difficult to achieve victory after only a few moves. ("Fool's mate" in chess requires only four moves, whereas the shortest number of moves necessary to win a game of Warlord is five, with three moves made by Black. There are at least two ways of doing this; see if you can figure out what they are). The majority of the game centers around controlling land, without simultaneously overextending yourself, and making advantageous trades which force your opponent into an awkward position with his pieces stumbling over one another.
|
Concerning trades, it's usually best not to trade pieces on your own move, because you must spend a move to initiate the trade. (Of course, you don't have to give up a move if you can kill an enemy piece and then force your opponent to use a move of his own to complete the trade.) After test runs and some discussion, it appears that pieces are worth roughly as shown at right. Note, however, that knights have rather variable power - towards the start of the game, they are relatively ineffective, but their usefulness increases as the board thins out. |
|
Peasant:
Spearman:
Archer:
Knight:
Warlord:
Tower:
|
1 point
2 points
3 points
4 points
5 points
Game
|
The warlord is the strongest piece, and should not be given up unless it is to kill two other important pieces. After the warlord, the knights are probably the most important pieces, since their ability to move over great distances and Overrun pieces makes them extremely adept at slaughtering spearmen and archers. Spearmen and archers are very useful at the start of the game, however, more useful even than knights when the board is still somewhat crowded. It is often useful to set archers in a position to attack enemy pieces even if they cannot complete a kill, because they are very good at breaking up formations and preventing enemy units from Marching. However, archers and spearmen lose their importance as the battlefield becomes sparse, and the point at which one side has lost over a quarter of its pieces is when knights become truly deadly.
It is somewhat easier to attack pieces with diagonal arrowfire than with arrows fired straight down the center, since you can't kill any piece with only an archer, and the second piece used to complete a kill will usually want to stand directly in front of its enemy. This is where knights and spearmen can become useful, since they can more easily attack enemies without getting in the way of vertically directed arrowfire. It usually happens that if your opponent moves an archer into position to attack the tower, your tower is not going to stay standing for long. Be mindful of enemy archers, and try to keep your forces by your tower if it is threatened in this way.
Ultimately, it is most important to watch your tower and your warlord. The warlord is the only piece which can by habit stride up next to an enemy and engage him hand-to-hand without fear, so this makes him the mose useful offensive unit. However, the warlord's moves are limited, and he can often be heckled or destroyed by spearmen and archers. Avoid marching peasants unnecessarily along with the warlord; it's better if one of the two spaces to his rear are left open in case he needs to retreat. The opposite strategy serves to protect the tower, however - try to be sure that peasants stand at your tower's flanks to protect it. Peasants and spearmen are also good support for the archers, and must be left nearby to prevent them from being slaughtered by enemy knights.
For more options and additional discussion on Warlord, see This Page.
Back
Email the creator at harkenbane@juno.com
| 
 ....
....

 ....
....
 ......