|
| It is always a good practice to know of what and where files are to be installed by application. For once you are well acquainted with them, you often don't have to reinstall the entire application even if it's got some troubles; usually replacing damaged files with backup suffices. Neither do you have to re-install system-related applications every time you upgrade system software; simply dragging necessary files out of older system folder to the new, clean-installed system works fine most of the time. Anyway, below I will show what and where files are to be installed by JLK 1.2 installer, and how to make a para-JLK out of KanjiTalk. |
 As the above JLK 1.2 installer menu shows, you need to choose Custom Install to have the extra four Japanese fonts: ChuGothic, SaiMincho, Tohaba Mincho and Gothic.  Font suitcases go into Font folder, and Marukan-files (the gray circular one with the Chinese character "Han" on it) are put in the first directory of system folder. Font suitcases go into Font folder, and Marukan-files (the gray circular one with the Chinese character "Han" on it) are put in the first directory of system folder.The contents of Japanese Language Support (underlined with red pen above) are, first off, the following files put into Extension folder: 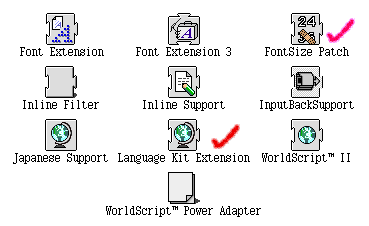 Font Extension, Font Extension 3, Inline Filter, Inline Back Support, Japanese Support, Language Kit Extension, WorldScript II and WorldScript PowerAdapter. FontSize Patch, which fixes some font corruption problems when using Japanese on KanjiTalk 7.5.3 or later, is availabbe from Apple's FTP site, but it may not be necessary any more under Mac OS 8. Font Extension, Font Extension 3, Inline Filter, Inline Back Support, Japanese Support, Language Kit Extension, WorldScript II and WorldScript PowerAdapter. FontSize Patch, which fixes some font corruption problems when using Japanese on KanjiTalk 7.5.3 or later, is availabbe from Apple's FTP site, but it may not be necessary any more under Mac OS 8. Language Kit Extension is not needed if you changed your system's primary script to Japanese. (Actually, this is the only significant file that KanjiTalk doesn't have.) Chainging primary script is possible by ScriptSwitcher, or by directly rewriting system using ResEdit. (! : Don't forget to put Language Kit Extension into extension folder again when updating JLK. Also change the primary script back to English while using JLK updater.) 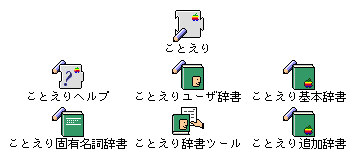 In addition, seven Kotoeri related files wil be installed into extension folder. If you use another Japanese input method from third party such as ATOK, you can discard these files (unless you want to use both for some reson). In addition, seven Kotoeri related files wil be installed into extension folder. If you use another Japanese input method from third party such as ATOK, you can discard these files (unless you want to use both for some reson). Installed into System suitcase are: 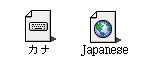 Japanese script file and several keyboad layout files ("Kana," "Roman" &c.). The script file in system suitcase disappears if you changed primary script to Japanese; it will reappear when changed back to English. Keyboad layout files you don't use can be thrown away. Japanese script file and several keyboad layout files ("Kana," "Roman" &c.). The script file in system suitcase disappears if you changed primary script to Japanese; it will reappear when changed back to English. Keyboad layout files you don't use can be thrown away.Lastly, Language Register and Simple Text Japanese are installed into the first directory of your hard drive.  Language Register has no use once you changed primary script to Japanese. Also the original, English version of Simple Text can display Japanese text just fine; but since there is no reason you should keep the old English version rather than the new Japanes one, you may want to discard English Simple Text instead. Language Register has no use once you changed primary script to Japanese. Also the original, English version of Simple Text can display Japanese text just fine; but since there is no reason you should keep the old English version rather than the new Japanes one, you may want to discard English Simple Text instead.
|
Making para-JLK from KanjiTalk
Underconstruction
If you found typo or mis/outdated-information or expired links or too abstruct/technical description or whatsoever seems wrong, let me know.