|
Fan Art Help!

Awright, welcome to the TiPS!
page for Fan Art! If you're a beginner and need some help, this is the
place to come for the basics of drawing. I, Ranma Saotome, will be your
guide! As mentioned before, I am not a professional, and these are merely
pointers I use myself.
No Flames, ya hear?
Thanks, and now.... our TiPS!
(I'm
not good at explaining this.)
(Note : Due
to image complications, I have refrained from uploading many images. Examples
may be found where stated.)

Go to the Main
body!
Email
me!
Gotta
opinion to post? Click here.
|
Catgeories
The Basics
Advanced
help
Clothing
and Apparel
Guide
to pencilling techniques for beginners and intermediates
CGing
Tips and Tactics and Colour Theory *alternate site*
1) The Basics
Right, let's get started. Everyone
knows that there are dozens of styles of drawing, none so distinctive as
Japanese Manga. (All right, I'm lying, but it's half true!)
Those big eyes, oversized attributes,
and flawless complexion, I mean, who wouldn't be envious? But I'm digressing
here, let's go.
Remember, Rumiko has her distinct
"simple but beautiful" style.
Since I said Fan Art, I'll assume
you've already read at least one or two mangas and are hooked onto them,
regardless of artist.
Basics - The absolute basics for
beginners
First off, what every beginner should
do is to pick up their own favorite artists' art and try to copy it. (Yes,
copy it. No, this isn't copyright infringement as long as you don't publicize
it.) No need for shading, no need for so much detail unless you're really
determined. Just a basic sketch.
What most people do is to take tracing
paper and copy, but I don't mean that. What you do is to take a reference
picture that you like, put it down beside you, and with your sketching
apparel, try to sketch as accurate a picture as possible. Look between
the pictures you are sketching and you are drawing reference from, and
make corrections as you see fit. Draw until you've completed what you want.
Don't bite off more than you can chew, just a simple pic should do.
Don't worry if you don't get it
right the first time (I'll bet it'll turn out a little warped), try again.
Practice until you can get everything right (the proportions, positioning
of body parts, etc.), and then try it from memory! Repeat as necessary.
It may sound tedious, but if you're really serious, it should be great
fun!
Serious tip : The easiest pointers
anyone will tell you is that 'point' system. Work from a basic starting
point, maybe a bit of hair from a corner, and compare distances, angles,
lengths, positive/negative space as you work along. This is the best way
to learn, and the most deceptively difficult.
Eyes. (Eye-examples can be found
in the Pencilling TiPS! segment)
Now that I've got a scanner, I can
only say that you people would be better off looking at the Platinum award
winner on the second Fan Arts page for facial
reference. But that is of the extremely stylized sort.
Eyes on manga characters can be
anywhere from 3/7ths of the entire face, and the more reasonable 1/5ths.
It all depends on the series you're drawing. I'll touch on the ones in
Ranma first.
Eyes here are normally rounded at
the top, and flat at the bottom. Depending on whether the person is a male
or female, they can also have eyelashes. Eye glint is another factor. Practice
step by step. Here are the two basic steps in eyes, and a pointer.
1) Draw the top area, a rounded
curve. Depending on the emotion the person is feeling, it can be slanted
or raised. Use a mirror on yourself if you're not sure.
2) Then draw the rounded portion
of the eye, the glint first. Make sure they're facing the same side, to
give the effect of the light. (remember the light source!!!) Followed
by the iris, partially cut off by the glint. The eye doesn't have to be
completely round, you can draw the bottom eye-line to cut off the eye,
like Ranma-chan in the background. :)
3) Remember, ALL eyes MUST have
a FLAT base no matter what. If you're drawing the base of an eye, remember
to make it flat if possible. For more advanced tips, go
to my pencilling guide.

|
A basic idea of how a head should be measured and drawn. Begin with
a basic oval, and bear in mind where the eyeline (the uppermost line of
dots on the face that passes through the eyes), and the eye's baseline
go. The 'eyeline' should be in the middle of the head, and that is where
is eye is centered around. The 'baseline' is a general idea of where the
base of the eyes will be if the eyes are completely open.
Note : Distances from the chin to the bottom of the nose should be
approximately be as long as the distance from the bottom of the nose to
the brow.
The ear should start from the top of the eye(balls), and terminate
halfway down the nostril area. |
The glint can be singular or double
glint. Note the eyelashes do not have to be long, just noticable and in
order of length, longest towards the nose, shortest towards the ear. Eyelashes
apply only to the females. The double line at the top is nonexistent for
men. You're gonna need eyebrows, thin lines across the head above the eyes,
for short hair.
Speaking of ears, noses and hair,
this is the second order. Noses in ALL manga are generally just a cuving
line down the face ending in a small mountain, sharp at the tip, or just
the tip part.
The lines are generally made up
when the nose terminates at the bottom of the eye. This generally occurs
when the face is very flat to one side, just enough to see the other eye.
(Give or take a bit.) But the proper proportions would be : the nose curve
starts from the eyebrow, comes down and ends about 1½ to 2 eyelengths
down the face, or 3/5ths of the way down.
Most characters have either long
or no sideburns in comics, and if the sideburn is short, it's just a shading
ofcolour besidesthe ear. Some people have hair long enough to cover their
ears, so ears become a moot point. Ears are generally one curve inside
the other, and then the rest is pretty simple. If you need more advanced
tips, please refer to the Pencilling TiPS!
page.
ON TO THE HAIR! (Again, references
may be made at the Pencilling TiPS! page.)
Hair is what makes or breaks a person's
facial features. Good drawing of hair will make it worth your while. Bad
hair.... well..... everyone has bad hair days, right? ^_^U
If you look at pictures and use
them as reference points, most of you might notice that sometimes, the
outlines of the eyes and eyebrows can be seen underneath. This is up to
you. I generally draw the eyes first, then the hair. The hair can come
in one big clump (a la some posters) or as multiple layers, (a
la everything else.)
It's better to draw hair segment
by segment,rather than one big lump then segmenting it off. Again, the
order is shorter at the top, longer in the middle, and shorter (dependent)
at the face itself, above or over the eyes.
You'll want to put a tapering effect
on people with long hair only if there is a "wind" effect. If you wish
for the hair to simply stay down, depending on the hair style, you should
always draw it slightly jagged or segmented.
Using the basics of drawing a head
(an ovoid, with the line defining the basic shape and structure of the
face), you should consider the shape of the face itself. The face curves
in at the eyes (because of the eye socket), while the chin is noticably
sharp (on manga characters). The mouth is one more thing I'll cover on
the basics.
The mouth is, as you can see by
the background, also sometimes quite oddly shaped, but one of the more
important aspects to the face. There is a fine line between an angry open
mouth and a shouting open mouth. I can't explain it to you here, I can
only let you look at the examples around the page, and you should have
enough references at home to help.
Note on lips : For women, there
is the issue of lipstick or double lips. Sorry, but you'll have to figure
these out yourself.
Well, you've got the basics out,
now it's time for the advanced course. The body and the advanced methods
on earlier topics.
2) Advanced Help.
As you draw people's bodies, you'll
notice a trend among the men and women. Alright, outside of the oversized
chests of women, you'll notice that even in real life, they normally wear
their skirts/pants/jeans/etc. at their abdomens, just a small distance
under their chests, while the men wear their pants just over the waistline.
This is for a reason. To look good. (imagine a woman who, if she had a
choice, wouldn't want to look like she had longer legs. Besides, in my
opinion, wearing them at the waist makes for bad fashion sense) For
both men and women, the body follows a general shape (unless you're out
of shape, in which I'll cover later.), chest wider, slimming at the abdomen,
then filling out again at the waist. For men, this is more of just a straight
line going down then out again. For women, theirs are genuine curves, and
before any of you start thinking hentai, let me assure you that if you
decide to draw things out of proportion (hint, hint), people'll rather
puke at the picture than admire it. (No, Mai Shiranui borders at this line
between oversized and plain large. Of course, no one's perfect.)
Chest, abdomen, Arms, Legs.
Women's bodies.
The sides of a woman's chest from
the front view should never go beyond 3/5ths of the arm in any drawing,
this is to keep proportionality. (At this level, the breasts are about
as big as some of those in Bastard! or some others.) At the sides, it should
curve slowly downwards and then curve gently around the tip. (Remember,
breasts are about 80-90% fat, which is soft. The 'underswell' is an effect
of the fats sagging over the chest.) On the way down, it should be, depending
on what she's wearing, straight down towards the abdomen for a tucked in
shirt, a small deviation for a loose shirt, or for those bikinis, a curve
in proportion to the top.
You should use shading on the shirt.
This is to reflect the creases in it. It shouldn't go beyond 2.5/5ths of
the arm even at the side, unless it's to a more extreme extent, or else
chest is LARGE. The abdomen should be slanting inwards as well, but remember,
proportion's the word. Fill out the waist just above theabdomen, and this
is where the legs start. Belts also begin at the abdomen.Shapely legs on
a woman are a problem.
Considering that clothing most of
the time is pulled up a little higher than men's, pants should always have
allowance for a longer "waist-down" ratio. Thighs should start out thick
at the top, and only slant in A LITTLE to the knee. Below the knee, the
leg curves out three-quarters of the way, then slants inwards to the ankle.
You should notice that the lower
leg curves out (calves), then in at the ankle. The thigh curves in at the
back of the knee. The average shape from top of body to bottom should be
that the body itself seems to stick out a little at the front, the calves
and buttocks at the back, the shoulder-blades just a little further in.
Arms are generally a simple affair,
slightly rounded to reflect the muscle, slanting in at the elbow, then
following the lower leg portion at the lower arm. Short of giving you a
muscle chart, plain observation is the key.

Fig 1.1
|
Typical manga lady's proportions. Note that for ladies, Hips to Shoulder
ratio is roughly 1-1, or 1.5-1.
In Fig 1.1, I've eliminated the breasts to give you a general idea of
the shape of the woman's body.
In Fig. 1.2, note that the shoulder and arm forms most of the shape
of the back of the body. Note underswell.
|
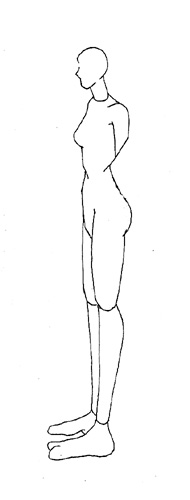
Fig 1.2
|
Men's Bodies :
Men are generally referred to as
"flat chested". Not so. They do have flat chests, but that doesn't mean
just a straight line on the shirt. A slanted line out to just above elbow
height, then back towards the abdomen is the order. Men's abdomens always
curve inwards much less than their female counterparts, therefore the waist
isn't very hard to draw from there. Men's legs are generally thicker, less
shapely. But, remember, men have muscle tone on their arms (most of the
time), this is important. Men wear their pants and belts at waist level,
so there is a lower "waist-down" ratio. Just remember to leave space for
the buttocks.

Fig 2.1
|
I've decided to go ahead and give you a rough idea about the human
anatomy on the male. Note : These are extremely rough, and are only meant
to give you a general idea of how the body and muscles work. (Also, my
memory's a little fuzzy without my lost anatomy notes) The muscles on the
inner side of the arm (armpit area) wraps around from the inside out toward
the biceps (that part you flex). The muscle on the other side of the bicep
wraps around from the outside.
Men's Hip to Shoulder ratio is about 1:1.3, because men generally have
less hip than women and their arms are more bulky. The leg-body ratio is
1:1 for men. Also, note that manga males have two distinct variations of
back-curve.
One : The person is ridiculously muscular, resulting in a body that
resembles an oversized woman's (sans breasts!).
Two : The person is more conventional and follows Fig. 2.2's general
shape. |
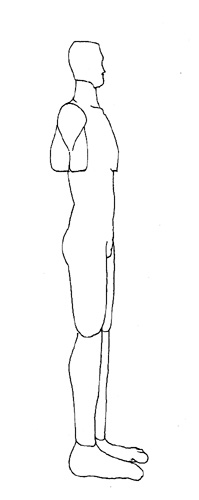
Fig 2.2
|
Hands, Feet, Legs and Arms.
Hands : The thumb does consist of
three bones like the other fingers, but one of it is part of the palm (or
nearly so), so draw the thumb with two segments. Fingers should start about
half the thumb's length away from the point where it originates. Also,
on an outstretched arm, the middle finger should be no longer than 3 thumbs'
length away from the knee.
Feet : Arched and flat feet can only
be discerned from the inner sides. Draw a sharp curve from the ankle to
the foot, and the heel sticks out a little from the back, from the ankle.
Remember, big toe on the inside, small toe on the outside.
Legs : Depending on a body ratio,
you'll be looking at leg lengths of ratio 1:1 (upper torso from the waist
up to the legs from the waist down) for most people. For females (young
ones, of course!), the optimum should be 1:1.2 - 1.5. (It's easy to estimate
the ratio, just halve the body in your mind and see if it's more leg than
body.) Naoko Takeuchi's Sailormoon series has her Sailor Senshi blessed
with figure ratios of 1:2! While this isn't bad, it's extremely unusual
to those not used to such proportions. Better to stick with more realistic
manga. (Yeah, if there're any!)
Arms : Now this is important. Angle
of view notwithstanding, all arms come in this measurement - The elbow
ALWAYS terminates just above the midriff. Any longer or shorter would result
in a person who looks like a gorilla or praying mantis. And as above, the
arm and fingers, when completely outstretched, ends above the knee.
Well, that's more or less the advanced
course. What about clothing now?
3) Clothes and Miscellaneous
Items.
For examples of clothes, just look
around you, in the mirrors. Unless you're tucking those abs in, the shirt
is creased at the places where is should be. Inwards at the belt, at the
large sleeves, at any point of movement where the limbs and body are not
straight. It is difficult for me to explain where and how to crease shirts
and pants, but you should have the general idea here. Joints and areas
where the shirt might be loosened by a protrusion. Again, look in the mirror
for reference. (But real life creases are tons more plentiful than manga,
so stick to the major creasing to be safe.)
Pants or skirts, for the other part,
are something else.
Skirts :
As usual, usually found a small
distance under the chest area at the abdomen, skirts are not completely
shapeless. Unless the skirt is a tight one, draw a small fringe at the
sides by the legs. Large, frilly dresses always follow a definite shape.
Pleated skirts as well.
Pants :
Depending on whether it's a tight
or loose pair, pants on a man and woman are different.
(Refer to topic above)
For men, as mentioned, pants should
be at the waist level. The crotch area is usually a little more prominent,
unless it's a pair of loose pants. (I mean loose!)
For women, as mentioned above, pants
are around the abdomen area. The crotch is less pronounced, and generally
pants are tight enough to show off leg and butt shape. Common practice
is, of course, to emphasize the shapeliness of buttocks (in jeans, at any
rate), but in doing so emphasize the crotch area.
Apparel :
Rings, bracers, belts, necklaces,
etc.. These count as apparel on a character. Remember, these are not completely
flat and part of the person's body, leave a small spacing between the outermost
line and the point of contact on the skin.
Well, that's about it then. Please
comment below if you have anything to say. Thank You!
Now go and try your
hand at art! (And let me look at them
when you're done.)
And remember, my
page displays only Ranma fan art.
Or......
You can go to my
TiPS!
- Main page
TiPS!
- Pencilling Help and TiPS!
TiPS!
- Fan Fiction
Pages!
[ Main
Page| Fan
Fiction |Fan
Art |YKYBRTMR1/2W....|What's
Ranma 1/2? |My
Links ]
[My
Webrings |Ranma
1/2 in Singapore |What's
New? |About
Me! |TiPS!
|
Persona
Pairup]
[ Feedback
and Vote! | Voting Results | Sign
Guestbook! | View
Guestbook! | Multimedia]
[ Really
Resembles Ranma ]
Back
to Geocities
