Free
Time-Saving & Money-Saving
Tips & Hints
From Tracy's Studio
...based
on students' frequently asked questions:
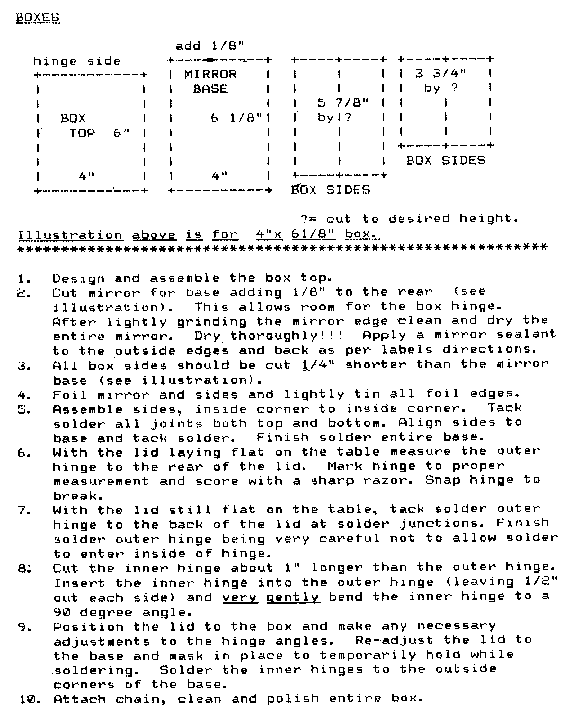
- So you want to know how to make a stained
glass box?
Click here for complete, easy-to-follow instructions.
Then select "File", "Print" on your browser menu. Also check out
the Gallery page & Patterns
page for ideas for a box top. Enjoy!
- So you want to know why NOT to use brown paper bags to
make patterns for cutting your glass, even though they are free, right?
Yes, brown paper bags are free, but your time is not. If you
are going to take the time to trace and cut out a pattern, you only want to
do it once, and then be able to use it over and over again. Using
mylar paper instead is the key, and the trick to cleaning the mylar
pattern pieces after each use is called alcohol in a spray bottle. Simply spray and wipe
the temporary glue right off the back of them. Then store the cut pieces in an envelope and file with your full-size patterns
for use another day.
Glass suppliers charge $1.00 for a sheet only about 11" x 14",
which can really add up quickly. But did you know you can go to an
architectural supply store and purchase mylar in sheets as large as
48" x 32" for only $5.00?!
You can store your large mylar sheets in the empty cardboard tubes
from holiday wrapping paper, which you have on hand every year after you
finish wrapping all those gifts you made.
Note: Those same cardboard tubes are also excellent for
rolling up and storing your large full-size patterns in.
- So you want to know how to "flux-proof" your traced
or book pattern for when you place & solder pieces on it, right?
Let's start with making at least four copies of the pattern for
your file. Take one copy and cover it front & back with
contact paper, leaving a 1/2 inch border of it on all four sides when
trimming the excess.
- Oops! So now you need to remove a soldered piece of glass
which broke, or which suddenly has an apparent flaw in it, right?
To separate out a piece of glass from the solder, first find an
empty soda can and a snipping tool. Next, put on a pair of
gloves to avoid getting cut. Now cut the can open and snip out
a long, wide strip of metal. Fold the corners of the piece of
metal over (also to prevent getting a cut). Using your soldering iron, heat the solder line until it
starts to melt. (Be sure not to let the iron touch the
glass!) Then slowly and gently begin to push the aluminum strip
through the solder, in between the pieces of glass. Go a little
at a time, allowing the solder to cool. The trick to freeing the
glass is simply that the solder won't adhere at all to the aluminum,
so your piece will slip right out!
- So you want to know how to store all your scrap glass, right?
Collect cardboard trays, such as used for shipping canned pet food
(free and easy to come by at any pet feed store or pet shop).
Sort glass by color & texture and lay flat in trays.
Don't lay glass in more than two layers, and be careful not to let
pieces slide around too much when handling trays! The trays
stack nicely, and they keep your scraps organized and ready to use for
your mosaic projects. As long as pieces of glass are not
scratched, they are not garbage.
back
to top
[ home
] [ gallery ] [ patterns
] [ classes ] [ tips
] [ alternative ]

A Pane in the
Glass

apaneinthe@aol.com

Site designed by

|