


|
DRAWING INTERIORS USING PERSPECTIVE LINES

We will be using the line tool for 99% of this tutorial so you can do all of this
with a mouse. First of all, we need to set the perspective point. If you've never
wasted time with this in high school get a book on how to do perspectives. The
perspective point needs to be somewhere close to where I put it for most rooms.
The reason: if you put it too high, your room will have little perspective and look
quite flat (the character will not be scaled much as he's walking towards and away
from the player). If you put it too low, you will have an exaggerated perspective,
which is impossible to realistically reproduce with an adventure game, which is in the
end faking a third dimension with visual tricks, not rendering the scene from a real
3D model. If your character grows suddenly when you move it slightly forward, it will
look very awkward.
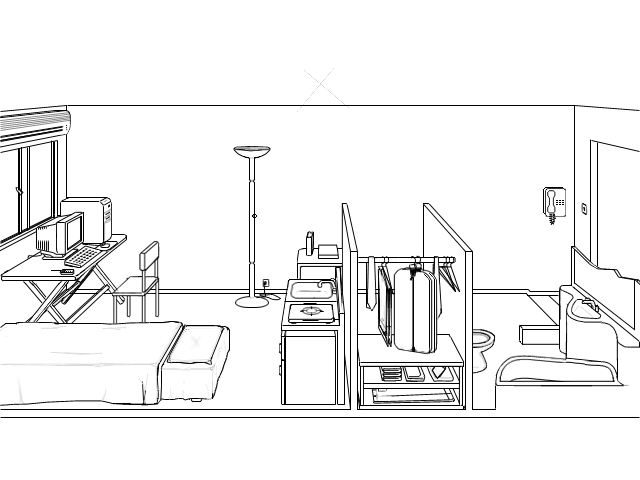
Big progress here, but all is done in the same way. Except for the bed, which has some
curved lines, everything was made by tracing lines from the perspective point...
The round toilet sink was approximated by hand by first making it square, then drawing as
realistic a curve as possible inside the square (of course this square was skewed according
to our perspective). You won't notice it here and neither did I but the desk is too high, the
sink too low and this screen won't let you have your character walk realistically inside it.
You must be very careful of proportions. I had to scale my table and other things in the
end and it wasn't a nice experience. For this reason make sure that everything you put inside
your scene is SCALED (go measure your fridge, and go measure your table, and make sure
the proportions are correct). Heights, needless to say, need to be scaled according to the
perspective we set up in this screen. E-mail me if you don't know how to do this...
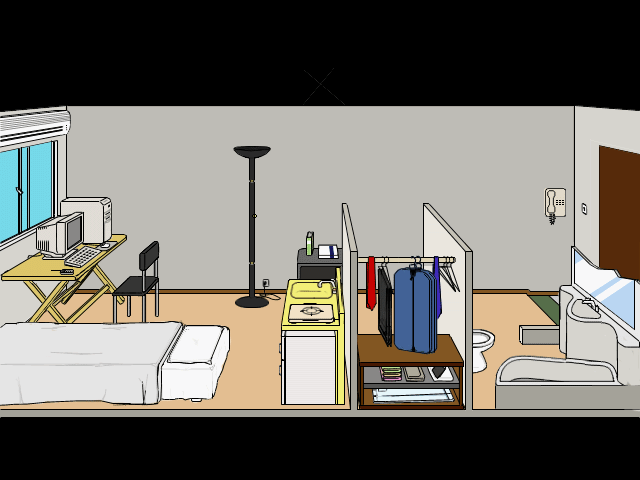
Here we start coloring. It will be very hard if you don't use layers so make sure you
draw every object on a separate layer from step one. The easiest way to keep the black
borders smooth is to create a layer underneath your lines layer for the object. You can use
the line selection tool (in Photoshop) to select the area to fill, or just fill by hand
with the paintbrush. If you're doing it by hand and you go outside the lines just use the
eraser on the paint layer and the lines layer will remain intact.

Now here's where you can screw up royally as I did for the longest time. I start from the
biggest objects in the background, color those, then move on to smaller objects. The lighting
of the scene is what tricks your eye and creates a fake 3rd dimension. If you shade the
room wrong it will look flat and ugly. I have three layers, one for each of the walls that are
visible. Eliminate the black lines layer for the current object (hide it) and work on the paint layer to make
all the edges meet smoothly (no transparent holes or ugly color spots). Then set the
layer to Preserve Transparency and use the airbrush to create shadows at the edges.
You must make sure the edges of all coincident objects melt smoothly. That doesn't mean
blur. It means edges have kind of uniform colors so that the wall looks continuous. Check
out my wall edges. In this screen I also start doing shadows. They are not real perspective
shadows because that takes too long to do and the resolution is not enough to do it correctly.
Fortunately it's easy to make a realistic shadow, just select the area and use brightness/contrast
to reduce the brightness of the shadow spot. You must of course do this for every layer
affected by the shadow...

And I just go on shading and shading, it took me 2 weekends plus 10 hours to finish this
screen. The more you work on it and look at the real thing and try to reproduce it exactly,
the better it gets. Just keep messing with your screen and if you get stuck let me know...
BACK
|
|