Making Monochromatic Anaglyphs in Photoshop
by Tony Alderson
|
Making anaglyphs in Photoshop is easy! In this tutorial we'll demonstrate creating
monochromatic anaglyphs, but
the process for color images is about the same. This tutorial is for red/cyan glasses with the RED lens over the
LEFT eye. Some variation of this method should be possible in any graphics program that supports RGB color
channels.
|
|
Note: This tutorial done in Photoshop 4 on a PowerMac. Some keyboard shortcuts are different
in Photoshop 3, but
the process is the same. The differences in Photoshop 5, and in the "Wintel" versions, are trivial.
|
1. Start with both images in Grayscale mode (not indexed, etc.)

The above pair may be cross-eye freeviewed.
2. Convert the RIGHT image to RGB mode
Image > Mode > Grayscale

Here, the pair may be parallel freeviewed.
3. Copy the LEFT image to the RED channel of the RIGHT (now RGB) image.
a) Activate the LEFT image (single channel grayscale)
b) Select ALL (CMD-A on the Mac; CTRL-A on PC)
c) Copy to the clipboard (CMD-C)

| If you keep swapping the image positions around the desktop, as I often do, pay attention to the document names when executing each step! |
d) Activate the RED Channel of the RIGHT image (click on the bar)
e) Select all (CMD-A)
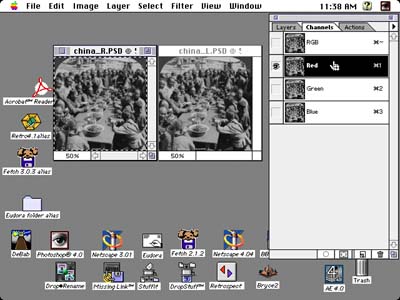
f) Paste the clipboard into the channel (CMD-V)

Note the freeviewed image has gone flat!
g) Drop the selection (CMD-D)
or, via menu: Selection > None

Note the "crawling ants" have disappeared.
4. Turn on visibility for the RGB channels (CMD-~).
Enjoy thrilling 3D

5. Save your image with a NEW name

|
If necessary, one can shift the RED channel for better convergence, or to fix any vertical
misalignment. You can use either the move tool (keyboard shortcut "v") and the arrow keys; or
Filter>Other>Offset to accomplish this.
(See your manual for details.) This will probably require cropping to get rid of the bands on the side and set the
window. See my "Rendering Computer Stereo" tutorial for more information on the stereo
window.
|
|
For color ("polychromatic") anaglyphs, both images start in RGB mode. Copy the RED channel
from the LEFT image into the RED channel of the right image. As I demonstrate in "Rendering Computer Stereo," not all images work well with this technique, due to the retinal rivalry
inherent in anaglyphs.
|