BASIC TAPESTRY WEAVING TECHNIQUE
STARTING TO WEAVE A TAPESTRY 2 / STRAIGHT LINES
The usual way to learn to weave tapestry is to warp for a sampler about 20 cm ( 8" ) wide at 12 epi, or larger width, if your epi is smaller or you want to give yourself more space to practice.
Usually too, one uses a cartoon with fairly simple shapes to practice with. (A cartoon is a life size design for the tapestry which shows all outlines of the shapes to be woven and is copied on to the warps with a permanent ink pen or marker). I like to teach to weave the first sampler without a cartoon, so that you can learn how the shapes and their outlines are constructed.
I will try and explain the way I look at shapes when I weave.
Lets look at straight lines. How do you control how steep or flat a line will be?
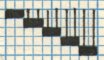
I think of the weft creating little steps on which the next shape will rest. On the graph you can see a line with 2 warp steps. To give an example, I lay the weft in 14 warps from the left edge, (going from right to left) beat down, lay the next weft in (from the left to the right) but stop 2 warps earlier than where I started, beat down, next weft back to the edge, next weft return towards the middle and again 'miss' the last 2 warps. I continue till there are only 4 warps left from the edge.
|
|
This time I start on the other side of the tapestry (change color of your weft ) 15 warps from the edge in exactly the same way as before, except that I miss 3 warps on the first turn and every pick coming from the edge towards the middle, - repeat until there are only 3 warps left from the edge.
Note that this line is flatter than the first line, but both are straight lines (unless you have made a mistake( -ooops!).
Let me tell you here that "unweaving" is as important as weaving. Be precise and undo mistakes until you get it right. It will pay off greatly in your weaving future and enhance the enjoyment of your weaving success.
|
|
In the remaining space, lets make triangles. Use a different color for each shape. It will be better to use contrasting colors, which will make it easier to see how many warps you have to move in or out to follow the shape you have woven first.
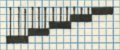
To make a triangle we need two straight lines. I lay the warp in counting the number of warps needed,
beat down, lay in the next weft, and miss 2 warps from the starting point., beat down. I lay the next warp in and now miss 2 warps again. I continue on both sides to 'miss' 2 warps until I have only 2 warps left on top.
Check out the difference in the next triangle,(2) - by mixing 3 warp steps and 2 warps steps the line goes flatter, but is still straight.
Look at graph 3. this means that I stay on the same warp for 2 picks before I 'miss' one warp. This makes a much steeper line.
|
1 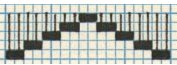
2
3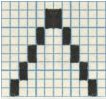
|
Now that most of the space is taken up, I need to fill in the remaining space before I can continue weaving more new shapes.
Why? Because if you overlap an empty (unwoven) space you can not get underneath to weave, since the shed will not open anymore, being held closed by the weaving above.
This is very important. It will also affect your decision as to which shape can be woven first, when you will work from a cartoon.
I lay the weft into the first space and follow the weft 'steps' exactly as I have made them in the shapes on each side. I stop when I reach the top of the shape which is lower than the other.
Filling empty spaces between shapes by weaving with different plain colors is a very good practice. It is very important that you give yourself time to do this and rather go slowly and do it right.
|
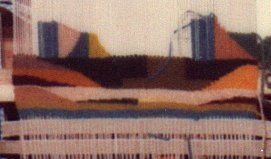
Tapestry sampler
Find a summary of this lesson below.
|
WHAT DID I LEARN?
To achieve straight lines I need to count the weft steps. If I use the same steps, like 2,2,2,2 it will be a straight line. Even if I mix 2,3,2,3 but do this continuously, it will be a straight line. The angle of the line depends on how many warps I 'miss' at the start and/or end of each pick. The larger the number, the flatter the line will be. If I turn around at the same warp for more than one pick, the line will get steeper.
Go slowly, be exact, --"unweaving" is as important as weaving, --and take your time.
You will speed up weaving, once you get the hang of shaping your lines exactly as you want them.
Text and Graphics are copyright © of Vermiro-Vera L Hazelgrove, but you are welcome to print this page for your private use.
If you would like to use text and/or graphics for publication please contact me.