Cut two pieces of cardboard, approx 2 cm (3/4") wide and about 5 cm (2" ) longer than the width of the tapestry you are going to weave.
Start on one side to pick up every second warp on to the card board strip. Continue to the other side.
Put the frame on the floor and do this close to the reed. When all the second warps are picked up push this cardboard strip up towards the reed. Insert the second cardboard strip and pick up every alternative warp (the ones not picked up with the first strip).
|
|
Now put the frame back into weaving position, When you hang the frame, position a comfy chair in front of it. You need to adjust the length of the clothes lines so that the frame will rest on your lap when you pull it towards you. If you are using an easel, get a chair which will allow you to sit comfortably. You may have to adjust the position of the frame. Experiment what works best for your body, as a comfortable and good position is really essential.
Now push both strips further down where you can reach them easily and push them as close as possible towards each other. Now check carefully that there is no crossed over warp and no mistake.
|

|
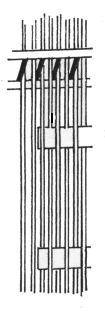
Now push the lower cardboard strip further down and position the top cardboard strip where it is comfortable for you to work. Either from previous left over warp, or from your new warp roll, cut about 45 cm (17 1/2") lengths. (You can wrap the warp around a 22.5 cm (8 3/4") wide cardboard strip and then cut along the edge) You need as many of these as you have warps. R>
Take one strand and put it around the first warp on the card board strip, evening out both ends. Hold that with your left hand (you may want to start from the left side) and put the next strand around the next warp and hold with your left hand. Do about 12 warps, then tie a knot in the end of the bundle. (you can trim the ends neatly if you like). Continue till all are done. Push the card board strip and all little bunches lower down and position the second cardboard strip to repeat the same procedure with these warps. Make sure you start from the same side.
You may prefer to do one bundle of each shed alternatively at the time, whatever seems easier to you is ok. Tie a small piece of colored wool around the knot of each of the lower heddle bundles. This will help you to see which shed you are using.
|

|
Now push lower cardboard strip on top of the tension board. Pull the top cardboard strip out. Form a shed by pulling at the first lower heddle bunch (the one with the colored wool around the knot) inserting the cardboard, pulling the second bundle and following with the cardboard strip. When the strip is fully in the shed, push it down firmly on top of the lower cardboard strip.
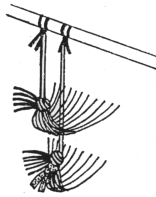
Tie each of the top heddle bunches with a piece of string 20 cm ( 7 3/4") to the heddle rod, Fold the piece in half slip knot the knot of the heddle bunch, pull tight, slip both ends of the string over the heddle rod, take around the string and tie a simple knot into the end, pull tight. see pic.
Now tie each of the lower heddle bunches with a piece of string , 30 cm ( 11 3/4"), placing the ties in between the top heddle bundles.BR>
Now untie the reed from the top of the heddle rod holders. Push the reed up to about 10 cm from the top edge of the frame and retie it to the top of the frame. This way the warps will have more space to move, when you make a shed. The reed primarily keeps your warps in place.
This Setup becomes very easy when you do it more often. Consider that the first time is always the hardest and most confusing. Keep these notes and when you set up next time you will find things a lot easier. Feel free to write to me if you have questions.
I have tried to explain things as good as possible. It is a lot more difficult than holding a workshop! :-)
I place a white piece of paper behind the warp before I start weaving, so that I can not see the warp behind the frame. You can sticky tape it to the sides of the frame or if the paper is large enough to the top of the frame. Now you are ready for weaving!
If you are a beginner click here to find out about the weaving technique and how to weave a sampler.
|
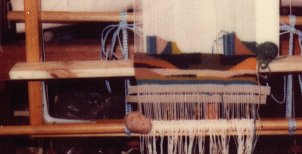
close up of corner brackets, stick tie up and tension board in work position.
|